> ## Documentation Index
> Fetch the complete documentation index at: https://docs.actionabl.ai/llms.txt
> Use this file to discover all available pages before exploring further.
# Task Management
> This document is a User Guide to Task Management functionality and processes. These tasks are primarily assigned to Actionabl Business Users, but they may also be assigned to Technical users.
# **OVERVIEW**
[Actionabl.ai](http://Actionabl.ai) is a platform that automates your business processes and alerts users whenever human intervention is needed.
This guide covers Tasks reviewed and resolved by Business users, including:
* **User Tasks** - a task that must always be completed by a human, like reviewing a proof.
* **Quality Control (QC) Tasks** - a task whose output must be double-checked by a human, like issuing a payment to a vendor.
**Error tasks** may also be routed to a Business User when they involve business process errors, such as a missing document, a document that fails OCR because of poor scanning quality, or an invoice that fails content validation against business rules.
If you are a new user of Actionabl, you should review [Getting Started with Actionabl](/GettingStarted/getting-started) to familiarize yourself with key concepts and terms used throughout this document.
***Related Documents:***
* [**User Management**](/UserManagement/user-management) covers all aspects of managing users, groups, and departments including setting access privileges to tasks and processes.
* [**Controller Guide**](/Controller/controller-guide) covers the Controller dashboard, which is central to managing the flow of automated processes through the system and enables monitoring and reporting on the workflows being managed in Actionabl.
* [**Automation, Task, & Rule Administration**](/Admin/automation-management) covers the core of setting up and managing the tasks, automations, connectors, and rules that make up the process flows.
* **The Process Administration Guide** teaches how to create, edit, and manage processes and their components. This includes creating tasks, connectors, data fields, data sources, and more.
# **PROCESSES AND TASKS**
There are three accordions in this section:
## **The Process / Task / Stage Structure**
Actionabl is all about automating your business **processes**. Those processes are composed of **tasks** that are grouped into **stages**. **Items** move through the process stages and are acted on within the tasks.
Within your Actionabl account, you will likely have several automated processes.
While each process has its own flow and tasks, your dashboard and the modules show you an overview spanning all processes. Use filters and searches to narrow down the tasks shown, focus on a specific process, or locate a specific task or group of tasks.
### ***Processes***
A process is best visualized as a workflow with a clear starting point and a well-defined goal. It may contain branches of logic to account for decisions and conditions, or it might be a straight-through flow of information.
Here’s an example of a simple business process where a vendor sends an invoice, we validate the information and then record the payment or send a rejection notice.
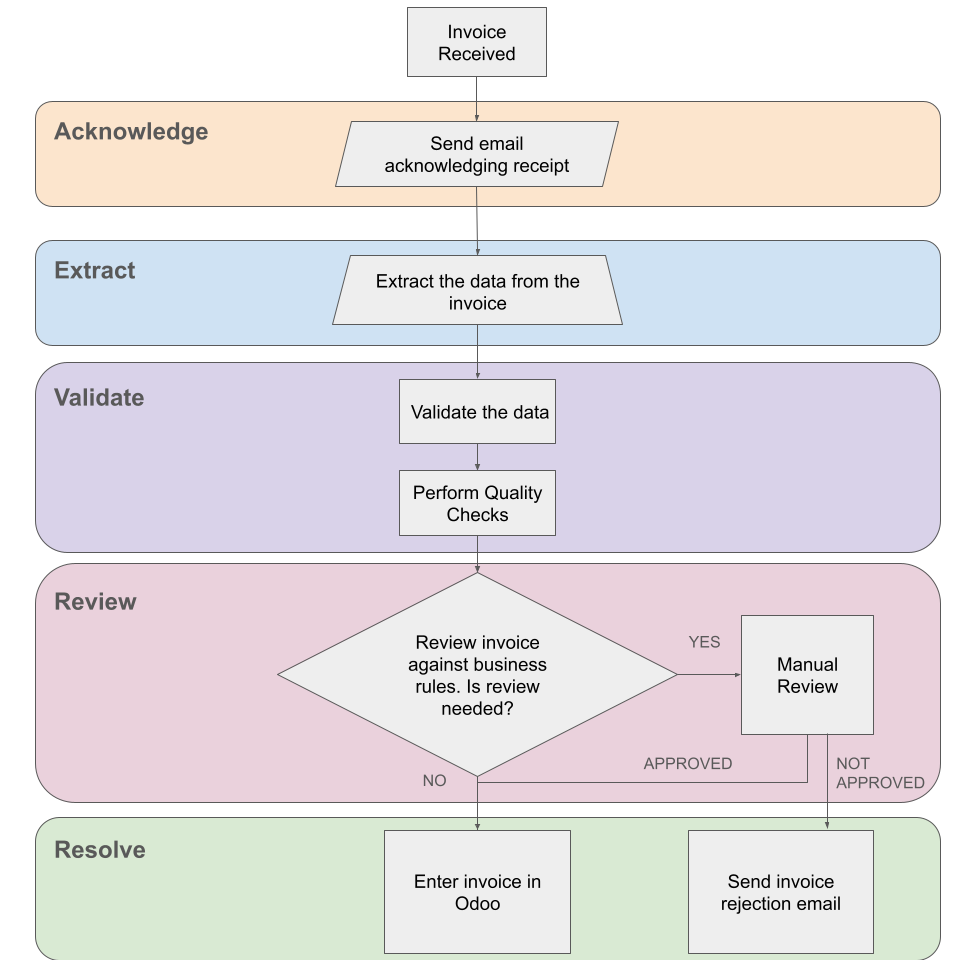 A process always has:
* A goal (process the invoice)
* A status (pending, in progress, complete)
* A starting point (vendor sends the invoice)
* One or more stages (acknowledge, extract, validate, review, resolve)
* One or more tasks within each stage (perform quality checks, validate the data, conduct a manual review)
* A completion point (record the invoice or send a rejection email)
When you begin working with Actionabl, our team works with your business to clearly define each process to be automated. We then implement (or work with your IT team to implement) the automation in our system. Integrations with your systems monitor and move items (such as emails, documents, purchase orders, and data) through the stages and tasks within the process.
When human intervention is needed along the way, the system creates alerts and provides the data and tools needed to resolve the alert and move the item along to the next step. There are two usual reasons for human intervention:
* **A step in the process that cannot be automated**. This is typically an offline process, such as shipping a physical product or signing off on a proof. It can also include filing in missing form fields.
* **An error during processing**. This could be business-related, such as a missing document or a poor-quality scan that can’t be read through OCR, or it could be a technical problem, like not getting a “success” message back from an API call to an integrated system.
#### **Process Examples For Training**
Throughout our guides and training, we use two process examples, called **bank invoice process** and **send notification**.
The following sections describe these processes in common business terms and show how they are translated and displayed within Actionabl. While these are fictional and simplified processes, understanding how they are implemented in Actionabl will help you visualize how your own processes translate from real-world action to automation.
#### **Bank Invoice Process**
**Goal**: Pay the vendor for their work and post the accounting in our systems. In most cases, this is where the process ends, but it can also end with an invoice being canceled, usually due to a mistake or dispute, in which case we also want to notify the vendor.
**Business Users**: Accounting or financial staff, production management
**Stages and Tasks:**
* **Starting Point:** An invoice is received from a vendor who has produced and shipped a customer’s order based on a Purchase Order the business sent to them.
* **Acknowledge**: Send the vendor an acknowledgment that the invoice was received and will be processed.
* **Extract**
* Process the emailed invoice through OCR.
* Read relevant data (vendor code, vendor name, date of invoice, list of items, etc.).
* Store data in the database.
* **Validate**
* Does invoice data match basic requirements?
* Is any required data missing?
* Perform automated quality control checking.
* **Review**
* Does data meet the business rules or require intervention?
* Does the invoice or data qualify for manual review?
* **Resolve**
* If the invoice is approved,
* enter it into the accounting system for payment
* notify the vendor, and
* update the records for the invoice and its original purchase order in the system
* If the invoice is rejected, notify the vendor.
**Business Rules**:
1. The invoice must be from a valid vendor and have appropriate dates (cannot be from future dates or dates older than 6 months in the past).
2. Some invoices will always require special review:
* If they are from certain vendors
* If they exceed certain thresholds in size or scope.
3. Some invoices will never require manual review:
* If they are below a certain threshold
* If they are from VIP vendors who are highly trusted
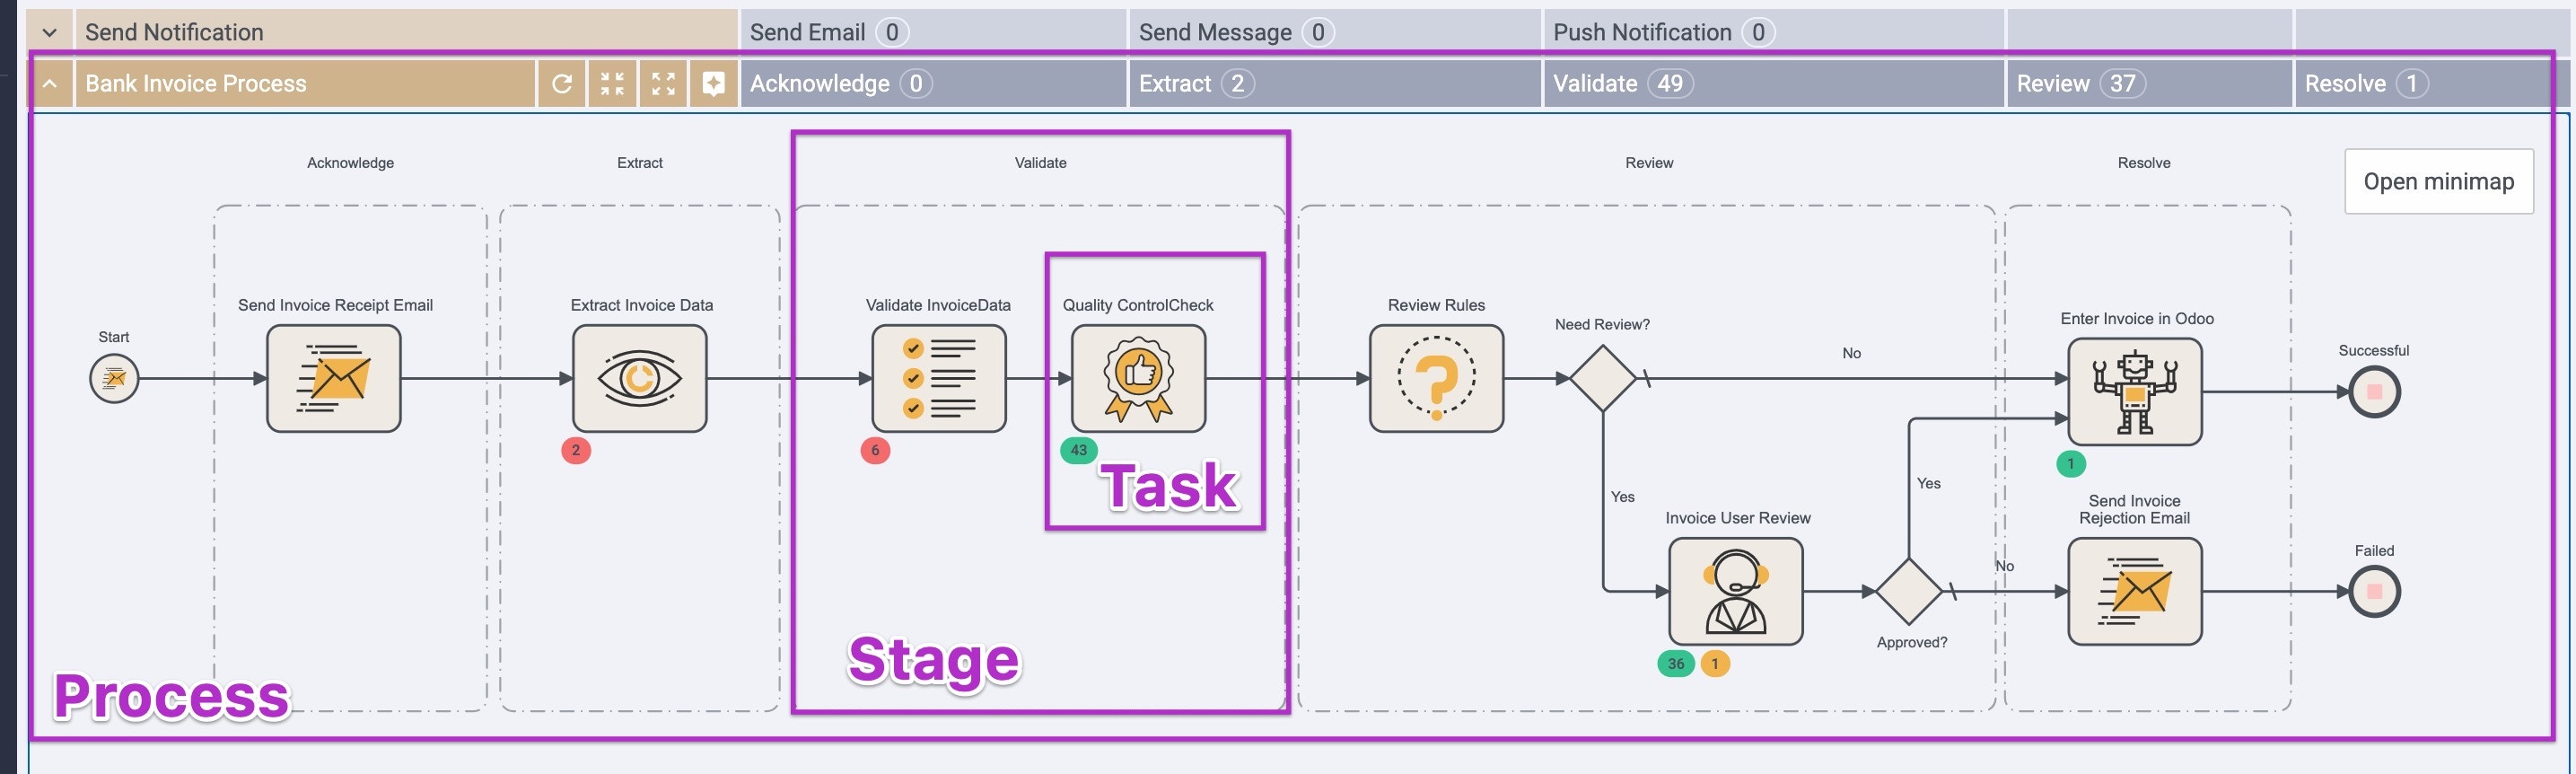
When this process and its rules have been coded into Actionabl, it produces a process flow that looks like this in the Process View:
A process always has:
* A goal (process the invoice)
* A status (pending, in progress, complete)
* A starting point (vendor sends the invoice)
* One or more stages (acknowledge, extract, validate, review, resolve)
* One or more tasks within each stage (perform quality checks, validate the data, conduct a manual review)
* A completion point (record the invoice or send a rejection email)
When you begin working with Actionabl, our team works with your business to clearly define each process to be automated. We then implement (or work with your IT team to implement) the automation in our system. Integrations with your systems monitor and move items (such as emails, documents, purchase orders, and data) through the stages and tasks within the process.
When human intervention is needed along the way, the system creates alerts and provides the data and tools needed to resolve the alert and move the item along to the next step. There are two usual reasons for human intervention:
* **A step in the process that cannot be automated**. This is typically an offline process, such as shipping a physical product or signing off on a proof. It can also include filing in missing form fields.
* **An error during processing**. This could be business-related, such as a missing document or a poor-quality scan that can’t be read through OCR, or it could be a technical problem, like not getting a “success” message back from an API call to an integrated system.
#### **Process Examples For Training**
Throughout our guides and training, we use two process examples, called **bank invoice process** and **send notification**.
The following sections describe these processes in common business terms and show how they are translated and displayed within Actionabl. While these are fictional and simplified processes, understanding how they are implemented in Actionabl will help you visualize how your own processes translate from real-world action to automation.
#### **Bank Invoice Process**
**Goal**: Pay the vendor for their work and post the accounting in our systems. In most cases, this is where the process ends, but it can also end with an invoice being canceled, usually due to a mistake or dispute, in which case we also want to notify the vendor.
**Business Users**: Accounting or financial staff, production management
**Stages and Tasks:**
* **Starting Point:** An invoice is received from a vendor who has produced and shipped a customer’s order based on a Purchase Order the business sent to them.
* **Acknowledge**: Send the vendor an acknowledgment that the invoice was received and will be processed.
* **Extract**
* Process the emailed invoice through OCR.
* Read relevant data (vendor code, vendor name, date of invoice, list of items, etc.).
* Store data in the database.
* **Validate**
* Does invoice data match basic requirements?
* Is any required data missing?
* Perform automated quality control checking.
* **Review**
* Does data meet the business rules or require intervention?
* Does the invoice or data qualify for manual review?
* **Resolve**
* If the invoice is approved,
* enter it into the accounting system for payment
* notify the vendor, and
* update the records for the invoice and its original purchase order in the system
* If the invoice is rejected, notify the vendor.
**Business Rules**:
1. The invoice must be from a valid vendor and have appropriate dates (cannot be from future dates or dates older than 6 months in the past).
2. Some invoices will always require special review:
* If they are from certain vendors
* If they exceed certain thresholds in size or scope.
3. Some invoices will never require manual review:
* If they are below a certain threshold
* If they are from VIP vendors who are highly trusted
When this process and its rules have been coded into Actionabl, it produces a process flow that looks like this in the Process View:
 ***Tasks***
A **task** is a single, specific action that occurs within the process. Tasks have a triggering event, item, action, outcome, and status. For example:
The **Validate Invoice Data** task in the Bank Invoice process looks at the total amount, items, and quantity data from the invoice and ensures:
1. If it’s a required field, it contains data
2. The data in each field is in the correct format (number, text, currency, etc.)
3. The data in each field is “valid.” For example, ZIP codes are validated against the USPS database, emails are in the appropriate format, vendor name and ID match against the company’s list of vendors, etc. Not all fields require this type of validation.
A task always has:
* **Triggering event**: Successful OCR scanning of invoice received from vendor
* **Item**: Invoice
* **Action**: Validate invoice data elements
* **Outcome**: Invoice moves into an automated quality check
* **Status**: Complete
Within Actionabl, tasks can have the following types:
| **Type** | **Definition** | **Icon** |
| :------------------------ | :------------------------------------------------------------------------------------------------------------------------------------------------------------------------------------------------------------------------------------ | :------- |
| **Decision** | Assess whether a condition has been met, like checking whether an email has been received or if a value matches a criterion. | |
| **User** | This task must always be completed by a human, like reviewing a proof or shipping a product. Your company may also define some types of errors to be user tasks, such as resolving an invoice that doesn’t match the expected amount. | |
| **Email** | This task sends an email, either internally or externally. | |
| **SMS** | This task sends an SMS text message. | |
| **Chat** | This task reads or sends a message in a chat window. | |
| **Quality Control (QC)** | A task that allows the output of the previous task to be double-checked by a human, like reviewing invoice data after it’s extracted by the OCR tool. | |
| **App** | Action taken by an external application, like sending email or creating a document. | |
| **OCR** | Optical character recognition to extract data from a scanned document. | |
| **RPA** | Robotic process automation to allow the software to mimic a human action in a web browser or desktop application, like filling in data in Quickbooks Online. | |
| **Machine Learning (ML)** | Tasks completed by specialized apps, like face or voice recognition, that build the application’s knowledge for future tasks. | |
| **Bot** | Automated, repetitive tasks like scheduling data backups or running a process at the same time every day. | |
| **SQL** | Tasks that interact with the database via reading, writing, or updating records. | |
| **Rule** | Validation of an item’s data against business rules and logical conditions. | |
| **Sub-Task** | A task (or set of tasks) that is started within another task, like looking up a recipient’s full name so it can be included in an automated email. | |
| **ERROR** | A system-generated task alerting a user to a failure in processing an automated step correctly. | N/A |
Examples of tasks:
* **Extract invoice data**. Receives a PDF of an invoice and extracts the data from it. (*Automated*)
* **Validate invoice data**. Compares the extracted invoice data to the business rules to determine if it’s correct, complete, and ready to process. (*Automated*)
* **Quality control check**. Shows an accounting user a proposed vendor payment and its backing documents to determine if it is OK for payment by funds transfer. (*QC*)
* **Resolve underwriting block**. Fill in missing data from a loan form after contacting the customer. (*User*)
* **No response from API**. Alerts accounting that an invoice was sent to the Odoo API, but the system did not receive a “Success” response. (*Error*)
### ***Stages***
Within each process, tasks are grouped into **stages**, which makes it easier for people to understand and communicate about the progress of the task.
A stage may contain just one task or can loop through multiple tasks and logic branches. The key is that it represents a meaningful part of the overall process in the way human users visualize the process.
**NOTE: Stages are NOT the same as statuses**. Statuses communicate the progress of an item through the various tasks within the process and report on the success or failure of the task. Stages are groupings of tasks within the process, like “validate” or “pay.”
Let’s look at part of the Bank Invoice Process example:
* The “**Extract**” stage receives the invoice from the vendor via email and processes it through OCR to extract the data from the document, organize it, and save it into the database. This stage has a single OCR task.
* The “**Validate**” stage in that flow first checks to make sure the invoice isn’t a duplicate or already paid or canceled, then does basic data validations on the invoice’s data fields. Once that’s complete, it moves the invoice into an automated Quality Control check to see whether it matches what was ordered, has the right unit prices, is billing for the correct quantity, and whether the total matches the allowed total for the PO. This stage has multiple Rules and Decisions, as well as the potential for User tasks.
## **Organizing Your Tasks**
At any time, many items are flowing through a process and its tasks and stages. In a typical workflow, you will only need to be aware of a few of them, so hiding the “noise” of the others is important. The modules and alerts in the dashboard are designed to help you focus on the items and tasks that require human attention while letting all of the others flow through the automation without distraction.
### ***Dashboard View***
The Task Master dashboard in Actionabl is divided into four modules that organize your tasks, plus two search tools and a process view. It looks something like this:
***Tasks***
A **task** is a single, specific action that occurs within the process. Tasks have a triggering event, item, action, outcome, and status. For example:
The **Validate Invoice Data** task in the Bank Invoice process looks at the total amount, items, and quantity data from the invoice and ensures:
1. If it’s a required field, it contains data
2. The data in each field is in the correct format (number, text, currency, etc.)
3. The data in each field is “valid.” For example, ZIP codes are validated against the USPS database, emails are in the appropriate format, vendor name and ID match against the company’s list of vendors, etc. Not all fields require this type of validation.
A task always has:
* **Triggering event**: Successful OCR scanning of invoice received from vendor
* **Item**: Invoice
* **Action**: Validate invoice data elements
* **Outcome**: Invoice moves into an automated quality check
* **Status**: Complete
Within Actionabl, tasks can have the following types:
| **Type** | **Definition** | **Icon** |
| :------------------------ | :------------------------------------------------------------------------------------------------------------------------------------------------------------------------------------------------------------------------------------ | :------- |
| **Decision** | Assess whether a condition has been met, like checking whether an email has been received or if a value matches a criterion. | |
| **User** | This task must always be completed by a human, like reviewing a proof or shipping a product. Your company may also define some types of errors to be user tasks, such as resolving an invoice that doesn’t match the expected amount. | |
| **Email** | This task sends an email, either internally or externally. | |
| **SMS** | This task sends an SMS text message. | |
| **Chat** | This task reads or sends a message in a chat window. | |
| **Quality Control (QC)** | A task that allows the output of the previous task to be double-checked by a human, like reviewing invoice data after it’s extracted by the OCR tool. | |
| **App** | Action taken by an external application, like sending email or creating a document. | |
| **OCR** | Optical character recognition to extract data from a scanned document. | |
| **RPA** | Robotic process automation to allow the software to mimic a human action in a web browser or desktop application, like filling in data in Quickbooks Online. | |
| **Machine Learning (ML)** | Tasks completed by specialized apps, like face or voice recognition, that build the application’s knowledge for future tasks. | |
| **Bot** | Automated, repetitive tasks like scheduling data backups or running a process at the same time every day. | |
| **SQL** | Tasks that interact with the database via reading, writing, or updating records. | |
| **Rule** | Validation of an item’s data against business rules and logical conditions. | |
| **Sub-Task** | A task (or set of tasks) that is started within another task, like looking up a recipient’s full name so it can be included in an automated email. | |
| **ERROR** | A system-generated task alerting a user to a failure in processing an automated step correctly. | N/A |
Examples of tasks:
* **Extract invoice data**. Receives a PDF of an invoice and extracts the data from it. (*Automated*)
* **Validate invoice data**. Compares the extracted invoice data to the business rules to determine if it’s correct, complete, and ready to process. (*Automated*)
* **Quality control check**. Shows an accounting user a proposed vendor payment and its backing documents to determine if it is OK for payment by funds transfer. (*QC*)
* **Resolve underwriting block**. Fill in missing data from a loan form after contacting the customer. (*User*)
* **No response from API**. Alerts accounting that an invoice was sent to the Odoo API, but the system did not receive a “Success” response. (*Error*)
### ***Stages***
Within each process, tasks are grouped into **stages**, which makes it easier for people to understand and communicate about the progress of the task.
A stage may contain just one task or can loop through multiple tasks and logic branches. The key is that it represents a meaningful part of the overall process in the way human users visualize the process.
**NOTE: Stages are NOT the same as statuses**. Statuses communicate the progress of an item through the various tasks within the process and report on the success or failure of the task. Stages are groupings of tasks within the process, like “validate” or “pay.”
Let’s look at part of the Bank Invoice Process example:
* The “**Extract**” stage receives the invoice from the vendor via email and processes it through OCR to extract the data from the document, organize it, and save it into the database. This stage has a single OCR task.
* The “**Validate**” stage in that flow first checks to make sure the invoice isn’t a duplicate or already paid or canceled, then does basic data validations on the invoice’s data fields. Once that’s complete, it moves the invoice into an automated Quality Control check to see whether it matches what was ordered, has the right unit prices, is billing for the correct quantity, and whether the total matches the allowed total for the PO. This stage has multiple Rules and Decisions, as well as the potential for User tasks.
## **Organizing Your Tasks**
At any time, many items are flowing through a process and its tasks and stages. In a typical workflow, you will only need to be aware of a few of them, so hiding the “noise” of the others is important. The modules and alerts in the dashboard are designed to help you focus on the items and tasks that require human attention while letting all of the others flow through the automation without distraction.
### ***Dashboard View***
The Task Master dashboard in Actionabl is divided into four modules that organize your tasks, plus two search tools and a process view. It looks something like this:
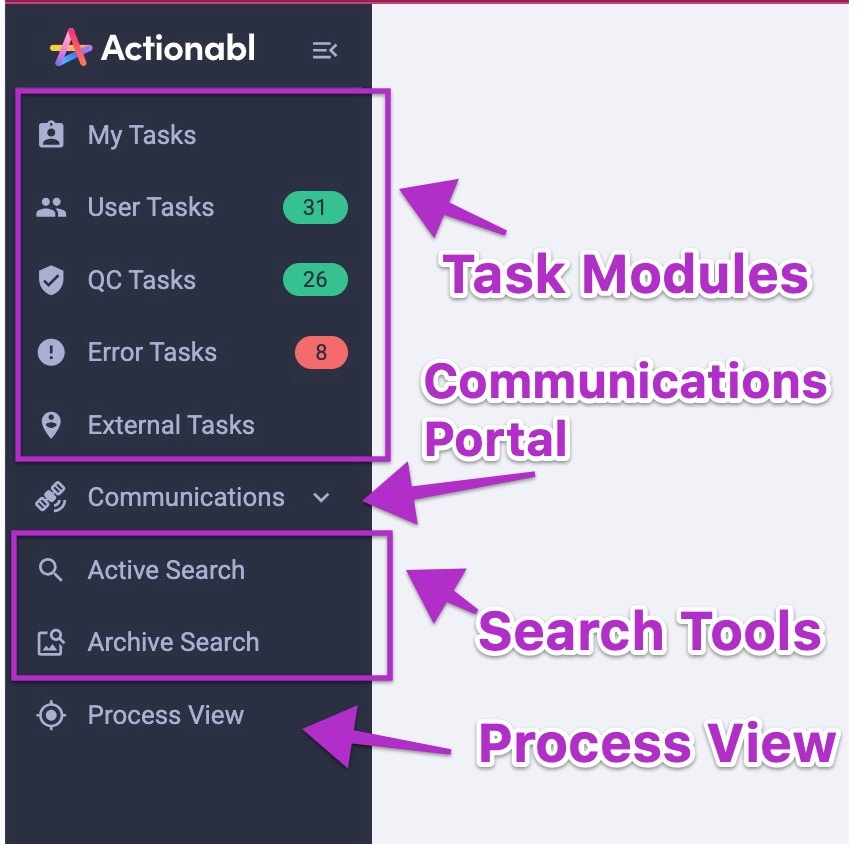 As an item moves through the process flow and reaches a human task (User, QC, or Error), it creates an alert and places it in the appropriate module. The colored bubble next to each module’s title shows the number of these tasks; if there are none in that module, no bubble is shown.
### ***Task Statuses***
Tasks can have the following statuses:
| **Status** | **Meaning** |
| :-------------- | :---------------------------------------------------------------------------------------------------------------------------------------------------------------------------------------------------------------------------------------------------------------------------- |
| **Open** | The task is actively in progress within the workflow. This includes not only active automation processes but also QC or User tasks that are waiting for human action. |
| **Error** | Something unexpected has occurred in the process. This can be a system problem (such as a missing API response or a failed document upload) or a business rule failure (like invalid or missing data). |
| **Completed** | The task was completed successfully. If this was done manually, it means that all automated steps in the process were either done manually or were not needed. |
| **Discarded** | A user explicitly eliminated this item from the workflow. For example, if the user processes invoices and “discards” one that is repeatedly erroring, that invoice is removed from the workflow. The item is still visible under Active Search with the status “discarded.” |
| **Resubmitted** | A user corrected an item’s data while processing an alert on this task and has resubmitted the item for automated execution. |
### ***Task Alerts***
As an item moves through the process, the system creates an alert when it reaches a task that requires human intervention (User, QC, or Error).
**HINT**: Regardless of where you view the alerts, you will only see tasks that are available to your user group.
#### **Modules and Alerts**
Alerts are automatically sorted into their appropriate module on the dashboard. The colored bubble next to each module's title shows the number of tasks across *all processes* in the system; if there are no tasks in that module, no bubble is shown.
Alerts for tasks you've claimed or a manager has assigned to you appear in your **My Tasks** view.
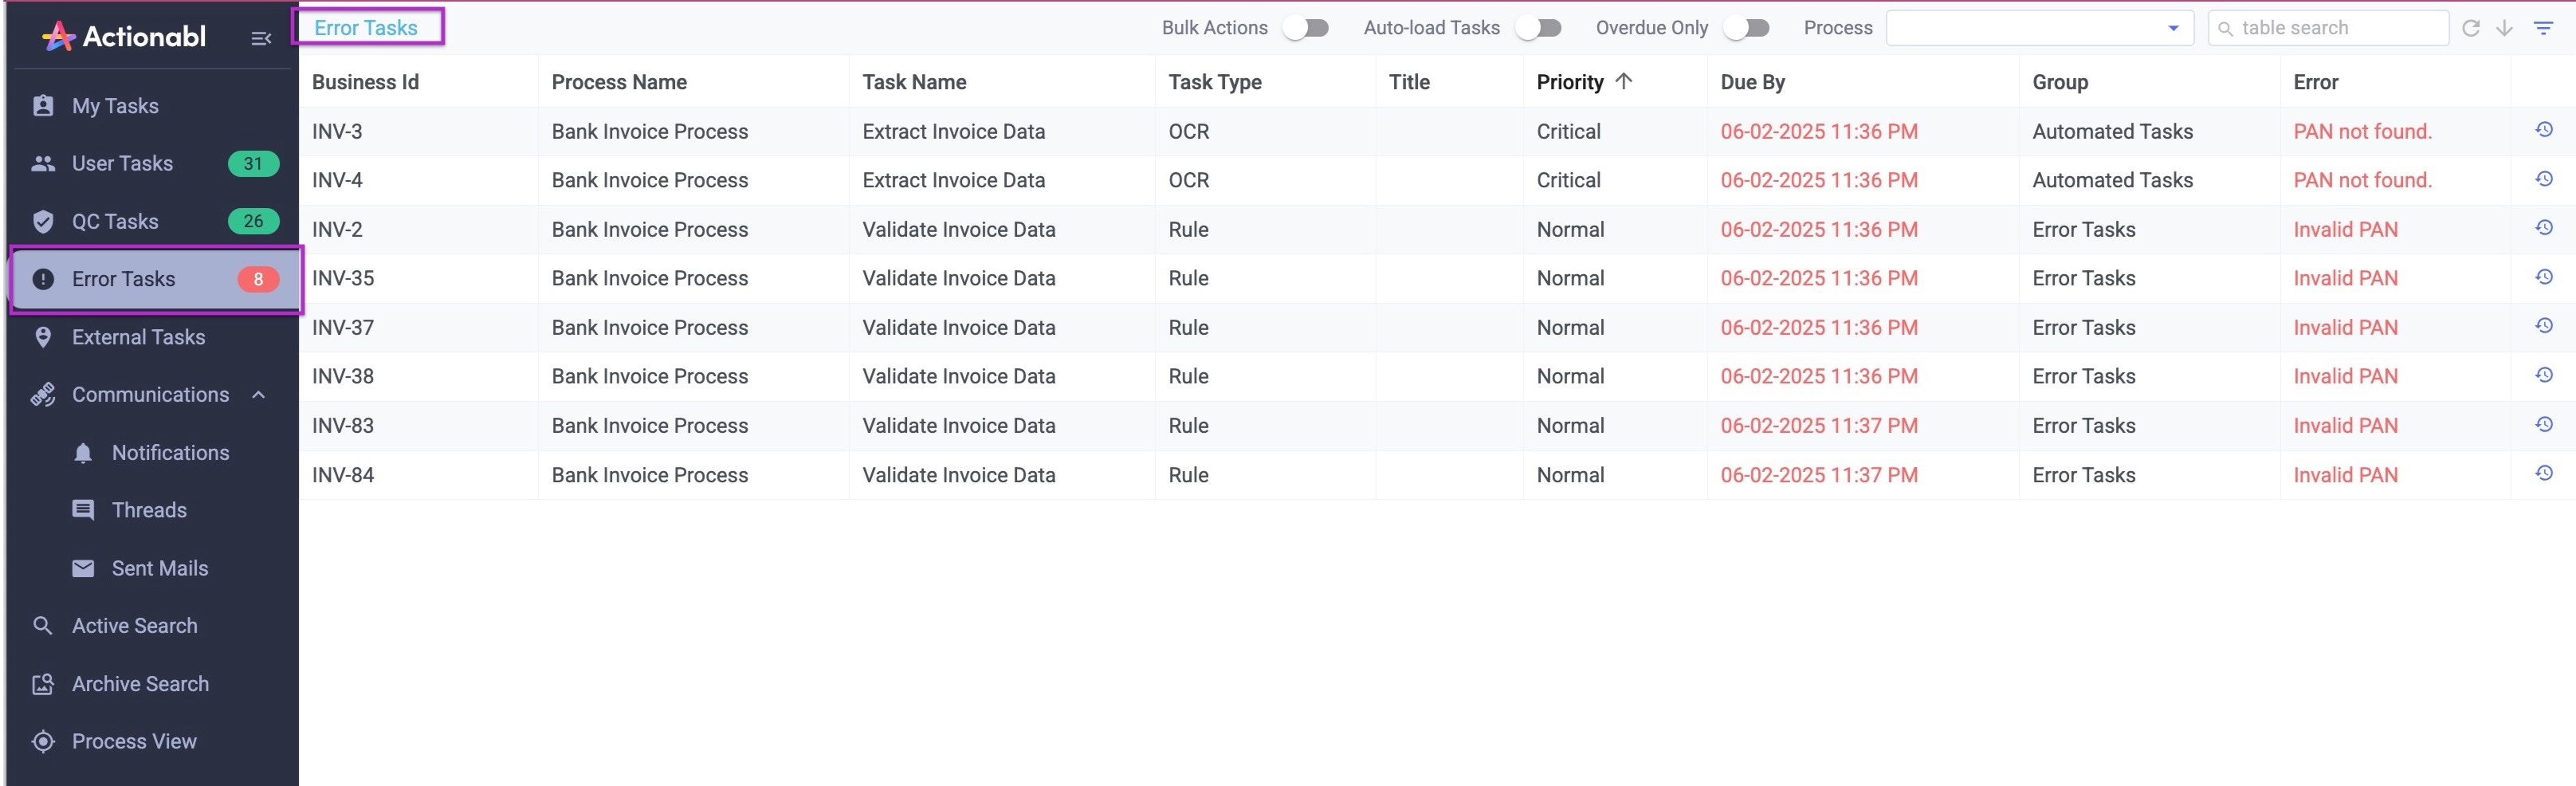
To see all tasks in a module, click the module's name or the bubble. Here's an example of the Error Tasks list.
As an item moves through the process flow and reaches a human task (User, QC, or Error), it creates an alert and places it in the appropriate module. The colored bubble next to each module’s title shows the number of these tasks; if there are none in that module, no bubble is shown.
### ***Task Statuses***
Tasks can have the following statuses:
| **Status** | **Meaning** |
| :-------------- | :---------------------------------------------------------------------------------------------------------------------------------------------------------------------------------------------------------------------------------------------------------------------------- |
| **Open** | The task is actively in progress within the workflow. This includes not only active automation processes but also QC or User tasks that are waiting for human action. |
| **Error** | Something unexpected has occurred in the process. This can be a system problem (such as a missing API response or a failed document upload) or a business rule failure (like invalid or missing data). |
| **Completed** | The task was completed successfully. If this was done manually, it means that all automated steps in the process were either done manually or were not needed. |
| **Discarded** | A user explicitly eliminated this item from the workflow. For example, if the user processes invoices and “discards” one that is repeatedly erroring, that invoice is removed from the workflow. The item is still visible under Active Search with the status “discarded.” |
| **Resubmitted** | A user corrected an item’s data while processing an alert on this task and has resubmitted the item for automated execution. |
### ***Task Alerts***
As an item moves through the process, the system creates an alert when it reaches a task that requires human intervention (User, QC, or Error).
**HINT**: Regardless of where you view the alerts, you will only see tasks that are available to your user group.
#### **Modules and Alerts**
Alerts are automatically sorted into their appropriate module on the dashboard. The colored bubble next to each module's title shows the number of tasks across *all processes* in the system; if there are no tasks in that module, no bubble is shown.
Alerts for tasks you've claimed or a manager has assigned to you appear in your **My Tasks** view.
To see all tasks in a module, click the module's name or the bubble. Here's an example of the Error Tasks list.
 **Process View Alerts**
Task alerts are also shown on the Process View, where they use the same color-coded bubbles. The count of items shown in the Process View is not expected to match those in the sidebar for two reasons. The Process View bubbles:
* Include only the alerts related to this specific process.
* May also include items that are in queue for automated processing, such as when there is a backlog of items in a particular step.
**Process View Alerts**
Task alerts are also shown on the Process View, where they use the same color-coded bubbles. The count of items shown in the Process View is not expected to match those in the sidebar for two reasons. The Process View bubbles:
* Include only the alerts related to this specific process.
* May also include items that are in queue for automated processing, such as when there is a backlog of items in a particular step.
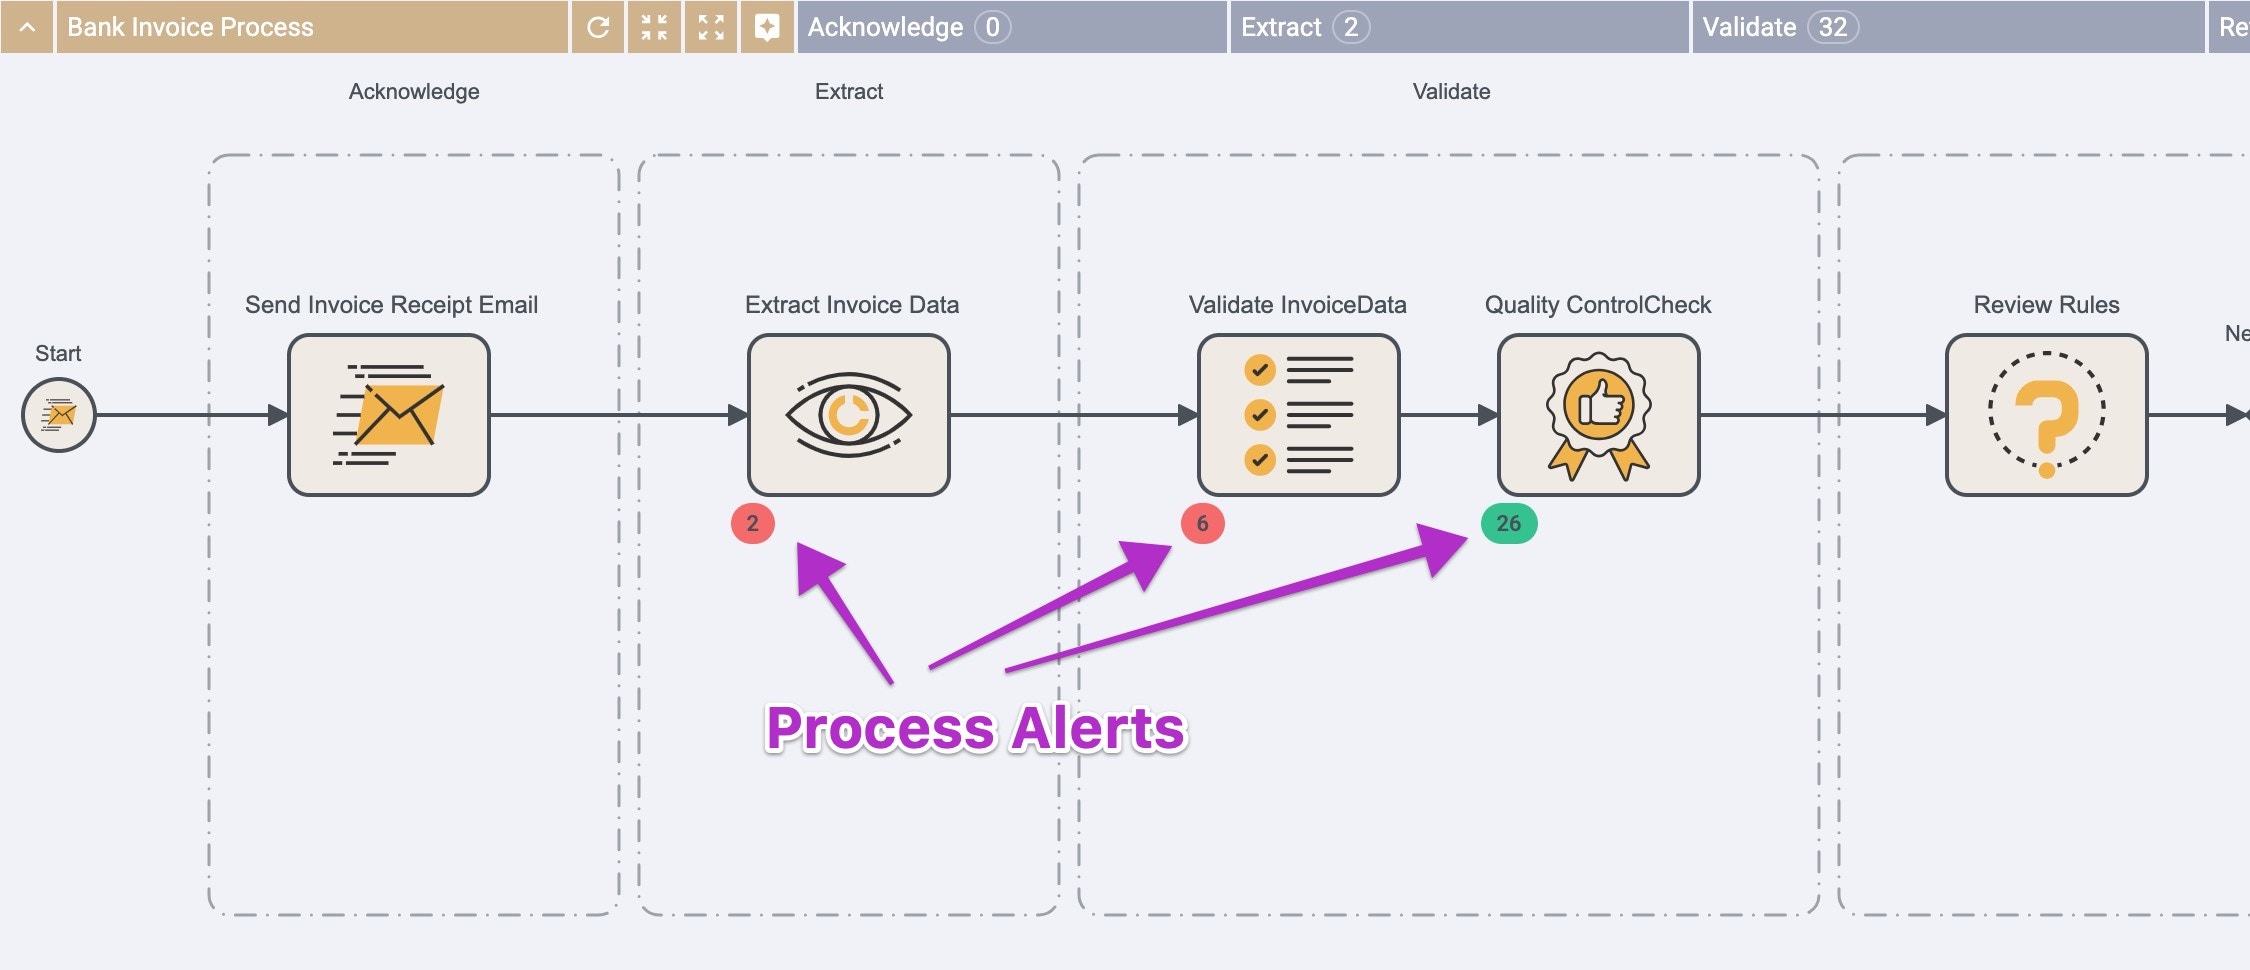 Click any colored bubble on the Process View to see the items for that specific task and process.
 ***Communications Portal***
The Communications portal on the sidebar is where you’ll see various notifications from the system.
***Communications Portal***
The Communications portal on the sidebar is where you’ll see various notifications from the system.
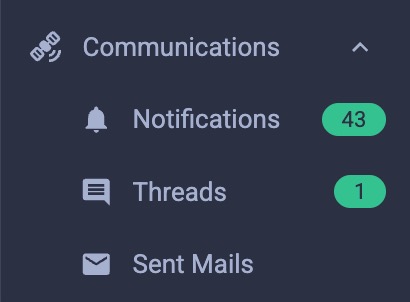 * **Notifications** are the process notifications generated by automations in the system, as well as incoming emails.
* **Threads** are internal messaging pertaining to specific tasks. They are also available in the Content & History section on the tasks themselves.
* **Sent Mails** shows the history of emails that you've sent through the system.
### ***Searching and Filtering***
It's frequently helpful to find a specific task or to narrow down a large list of tasks to ones that meet a set of criteria. Searching and filtering functions are designed to help you do this.
On any list of task alerts, you'll see Search and Filter icons at the top right. These are the "**Quick**" options.
The "full" search and filtering tools on the dashboard's menu are the Active Search and Archive Search.
* **Notifications** are the process notifications generated by automations in the system, as well as incoming emails.
* **Threads** are internal messaging pertaining to specific tasks. They are also available in the Content & History section on the tasks themselves.
* **Sent Mails** shows the history of emails that you've sent through the system.
### ***Searching and Filtering***
It's frequently helpful to find a specific task or to narrow down a large list of tasks to ones that meet a set of criteria. Searching and filtering functions are designed to help you do this.
On any list of task alerts, you'll see Search and Filter icons at the top right. These are the "**Quick**" options.
The "full" search and filtering tools on the dashboard's menu are the Active Search and Archive Search.
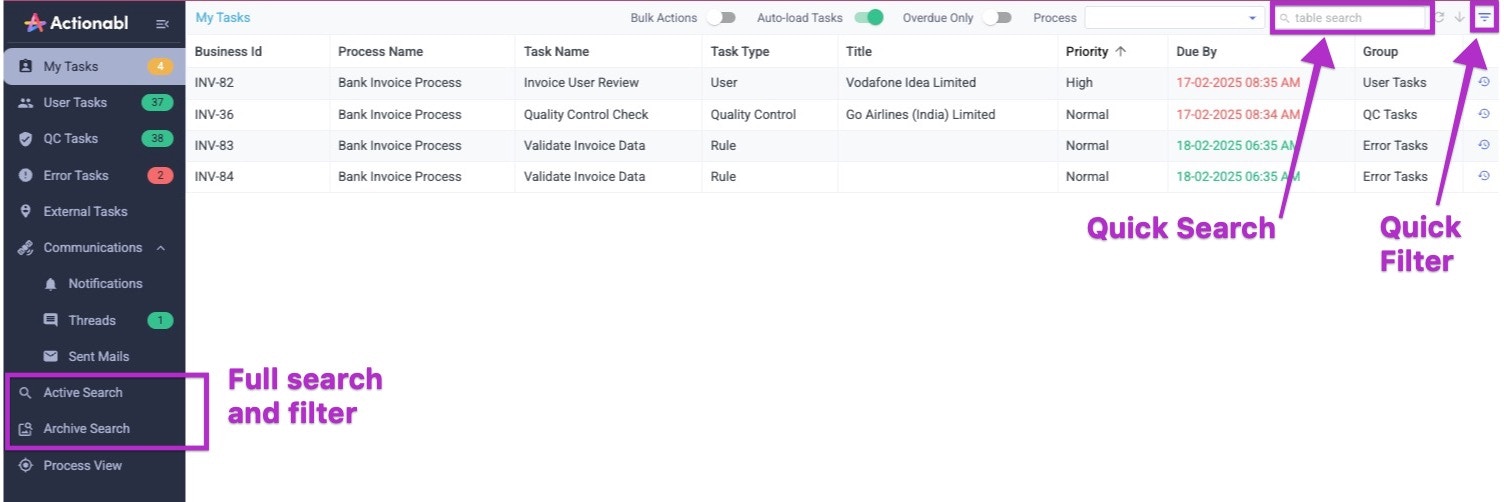 The scope of information searched by these tools differs.
| **Quick Search and Filter** | **Full Search and Filter** |
| :--------------------------------------------------------------------- | :------------------------------------ |
| Searches **only** the columns (fields) currently displayed on the list | Can search ALL columns in the record. |
If a list being searched has multiple pages of results, both the Quick and Full searches automatically sort through them.
#### **Searching and Filtering On Lists**
Each list view has three or more functions to narrow down the results shown.
**Overdue Only** is a toggle in the top center section. Turning it on immediately filters the results to show only items with a past due date.
The scope of information searched by these tools differs.
| **Quick Search and Filter** | **Full Search and Filter** |
| :--------------------------------------------------------------------- | :------------------------------------ |
| Searches **only** the columns (fields) currently displayed on the list | Can search ALL columns in the record. |
If a list being searched has multiple pages of results, both the Quick and Full searches automatically sort through them.
#### **Searching and Filtering On Lists**
Each list view has three or more functions to narrow down the results shown.
**Overdue Only** is a toggle in the top center section. Turning it on immediately filters the results to show only items with a past due date.
 The **Process Filter** is at the top right. Selecting a process from the list will only show tasks that are part of that process.
 **Quick Search** is on the top right of each page. It is a dynamic and immediate search function that finds matches across all pages of the displayed list. You can use it in combination with the Process Filter or by itself. It shows matches immediately as you type.
**NOTE**: Quick Search only looks through the data in columns that are visually displayed in the list.
**Quick Search** is on the top right of each page. It is a dynamic and immediate search function that finds matches across all pages of the displayed list. You can use it in combination with the Process Filter or by itself. It shows matches immediately as you type.
**NOTE**: Quick Search only looks through the data in columns that are visually displayed in the list.
 To **clear** a search term from these views, click the X in the box next to the term. For the Process Filter, you must hover over the field to see the X.
 **Quick Filter** is on the top right of each task list. It helps you build more complex filters for the result set including boolean logic (AND/OR) conditions. If you have not yet specified a process in the Process Filter, you must select one here as the first step because the filterable fields available to you are process-specific.
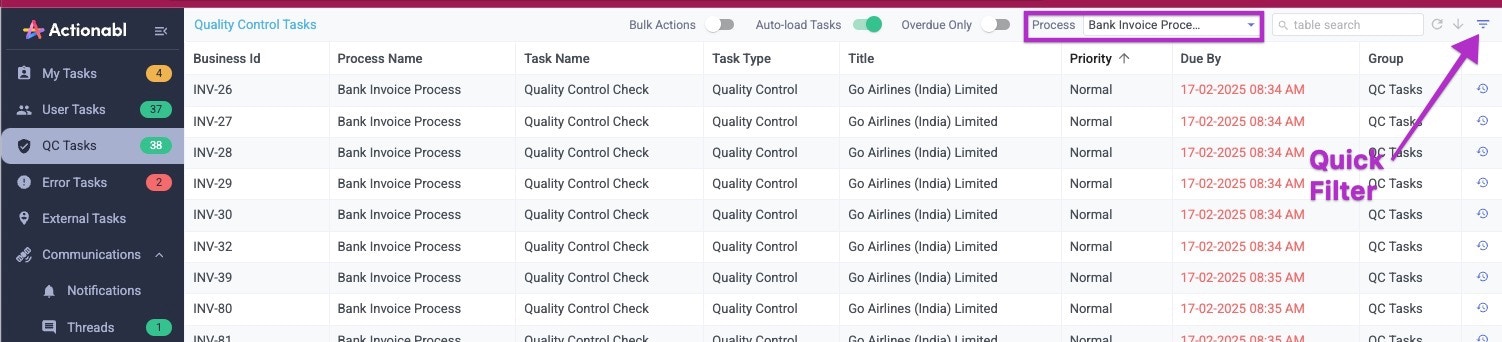
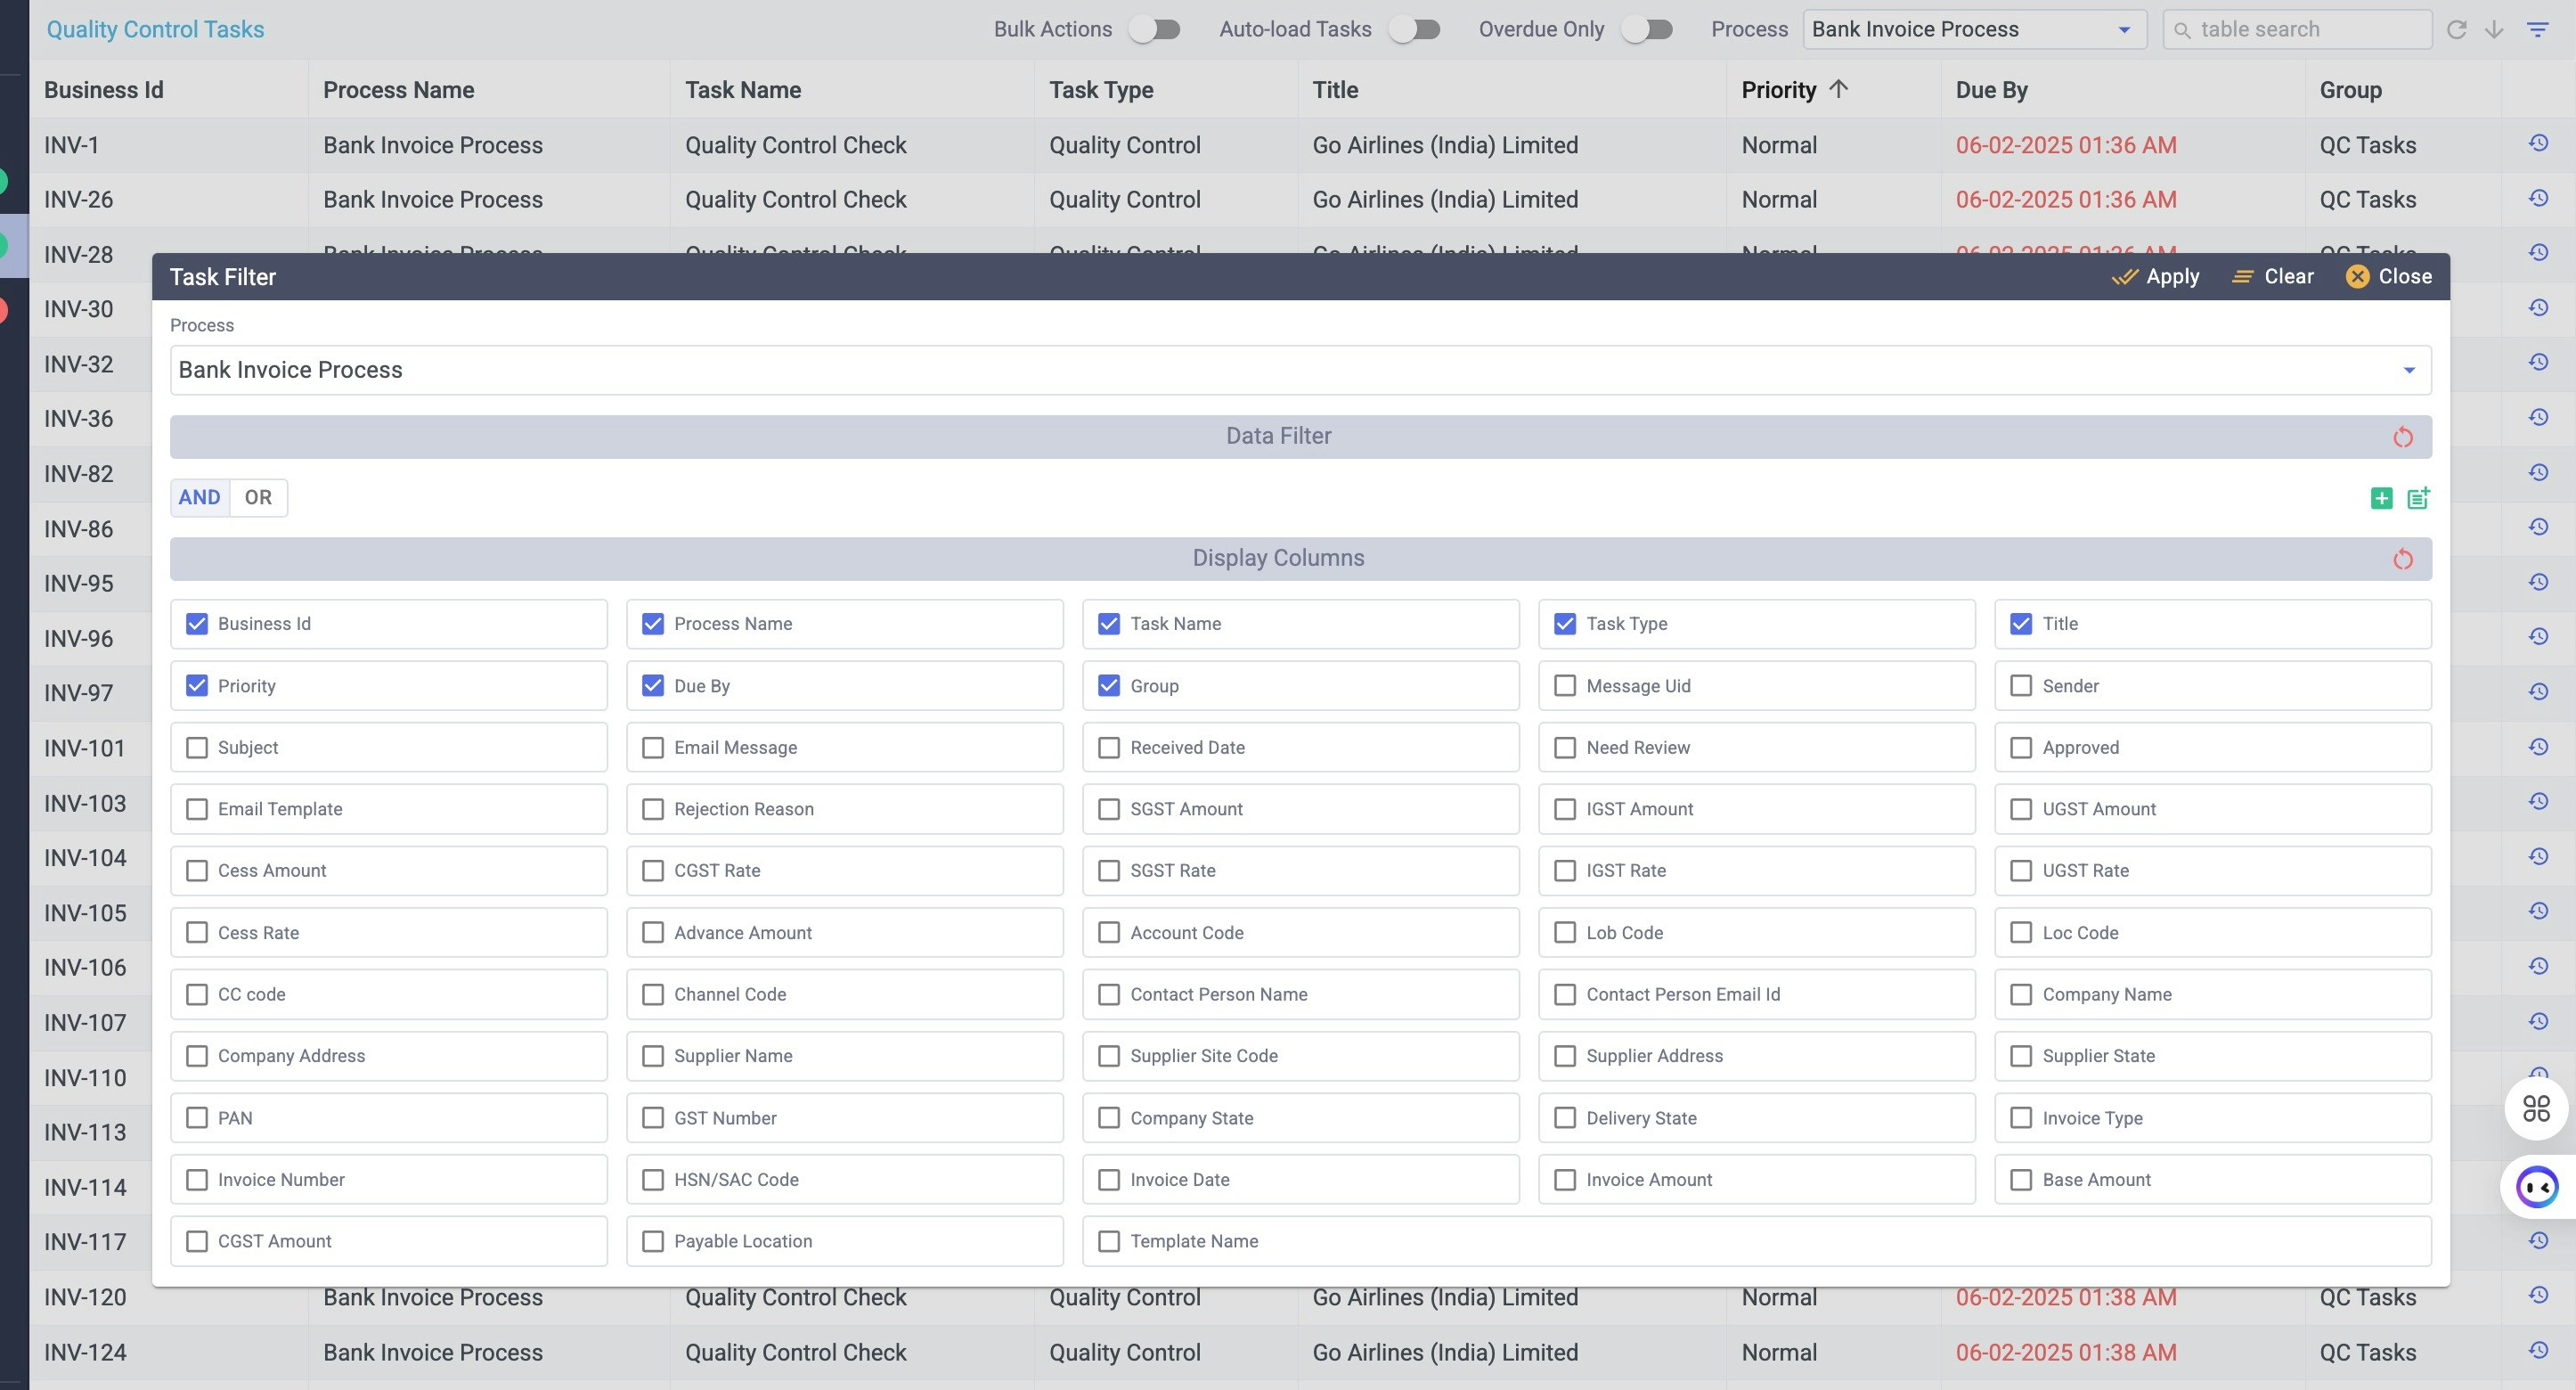 When you've entered your criteria, click **Apply** at the top right to filter the list.
 **Full Searching and Filtering Tools**
In the Dashboard menu, you'll see **Active Search** and **Archive Search**, which are the "Full" versions of these tools. They enable you to search across processes, statuses, and types of tasks to create a customized list that you can interact with and/or download.
These two tools act identically, with the exception that Archive Search looks only at data that is in an Archived state. Data is archived automatically based on how each process is defined and can also be manually archived. Archived data is *not* included when you use Active Search and vice versa.
The full search and filtering tools automatically look at all of the data fields stored for any item, regardless of that field's display status. If a match is found, the item is included in the search results even if the field containing that data isn't displayed on the list.
The Search Tool has three tabs at the top: **Process Search**, **Task Search**, and **Custom Search**. By default, Process Search is displayed when you open the tool. These tabs specify the span of data to be searched - in all cases, what is returned is a list of tasks that match the criteria.
Selecting a **Process Search** allows you to specify only a process and then other criteria at the process level. Selecting **Task Search** lets you specify a specific task within a process, further narrowing the data returned.
**Custom Search** starts with a blank slate and enables you to build a complex query with boolean logic and save that query for future use.
On the Process and Task Search tools, select two or more criteria (in addition to the Process) to use for searching. The screen matches against ALL criteria.
HINT: **Start with minimal criteria** and then add more if needed. This strategy helps you avoid missing any data by being too narrow with your search terms. If you are not sure what to use for your second criterion, consider Status or Created Date.
HINT: **You must select two or more items in this section**. Criteria entered in the Advanced Options section do not count toward this minimum.
#### **Advanced Options**
Once you select a process, the Process Search and Task Search tabs offer advanced options. Click Advanced Options to narrow things down further or look for items that match a data point not shown at the top of the screen.
**Full Searching and Filtering Tools**
In the Dashboard menu, you'll see **Active Search** and **Archive Search**, which are the "Full" versions of these tools. They enable you to search across processes, statuses, and types of tasks to create a customized list that you can interact with and/or download.
These two tools act identically, with the exception that Archive Search looks only at data that is in an Archived state. Data is archived automatically based on how each process is defined and can also be manually archived. Archived data is *not* included when you use Active Search and vice versa.
The full search and filtering tools automatically look at all of the data fields stored for any item, regardless of that field's display status. If a match is found, the item is included in the search results even if the field containing that data isn't displayed on the list.
The Search Tool has three tabs at the top: **Process Search**, **Task Search**, and **Custom Search**. By default, Process Search is displayed when you open the tool. These tabs specify the span of data to be searched - in all cases, what is returned is a list of tasks that match the criteria.
Selecting a **Process Search** allows you to specify only a process and then other criteria at the process level. Selecting **Task Search** lets you specify a specific task within a process, further narrowing the data returned.
**Custom Search** starts with a blank slate and enables you to build a complex query with boolean logic and save that query for future use.
On the Process and Task Search tools, select two or more criteria (in addition to the Process) to use for searching. The screen matches against ALL criteria.
HINT: **Start with minimal criteria** and then add more if needed. This strategy helps you avoid missing any data by being too narrow with your search terms. If you are not sure what to use for your second criterion, consider Status or Created Date.
HINT: **You must select two or more items in this section**. Criteria entered in the Advanced Options section do not count toward this minimum.
#### **Advanced Options**
Once you select a process, the Process Search and Task Search tabs offer advanced options. Click Advanced Options to narrow things down further or look for items that match a data point not shown at the top of the screen.
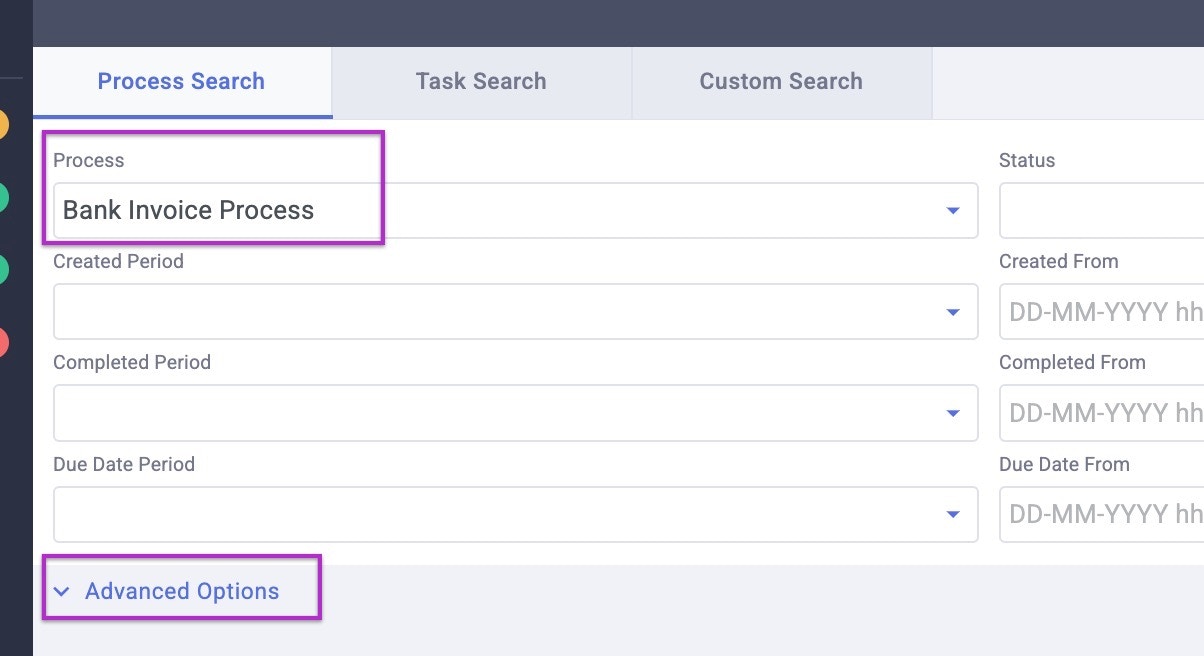 This expanded view gives you access to all of the data fields available in the selected process and allows you to build a more complex search query.
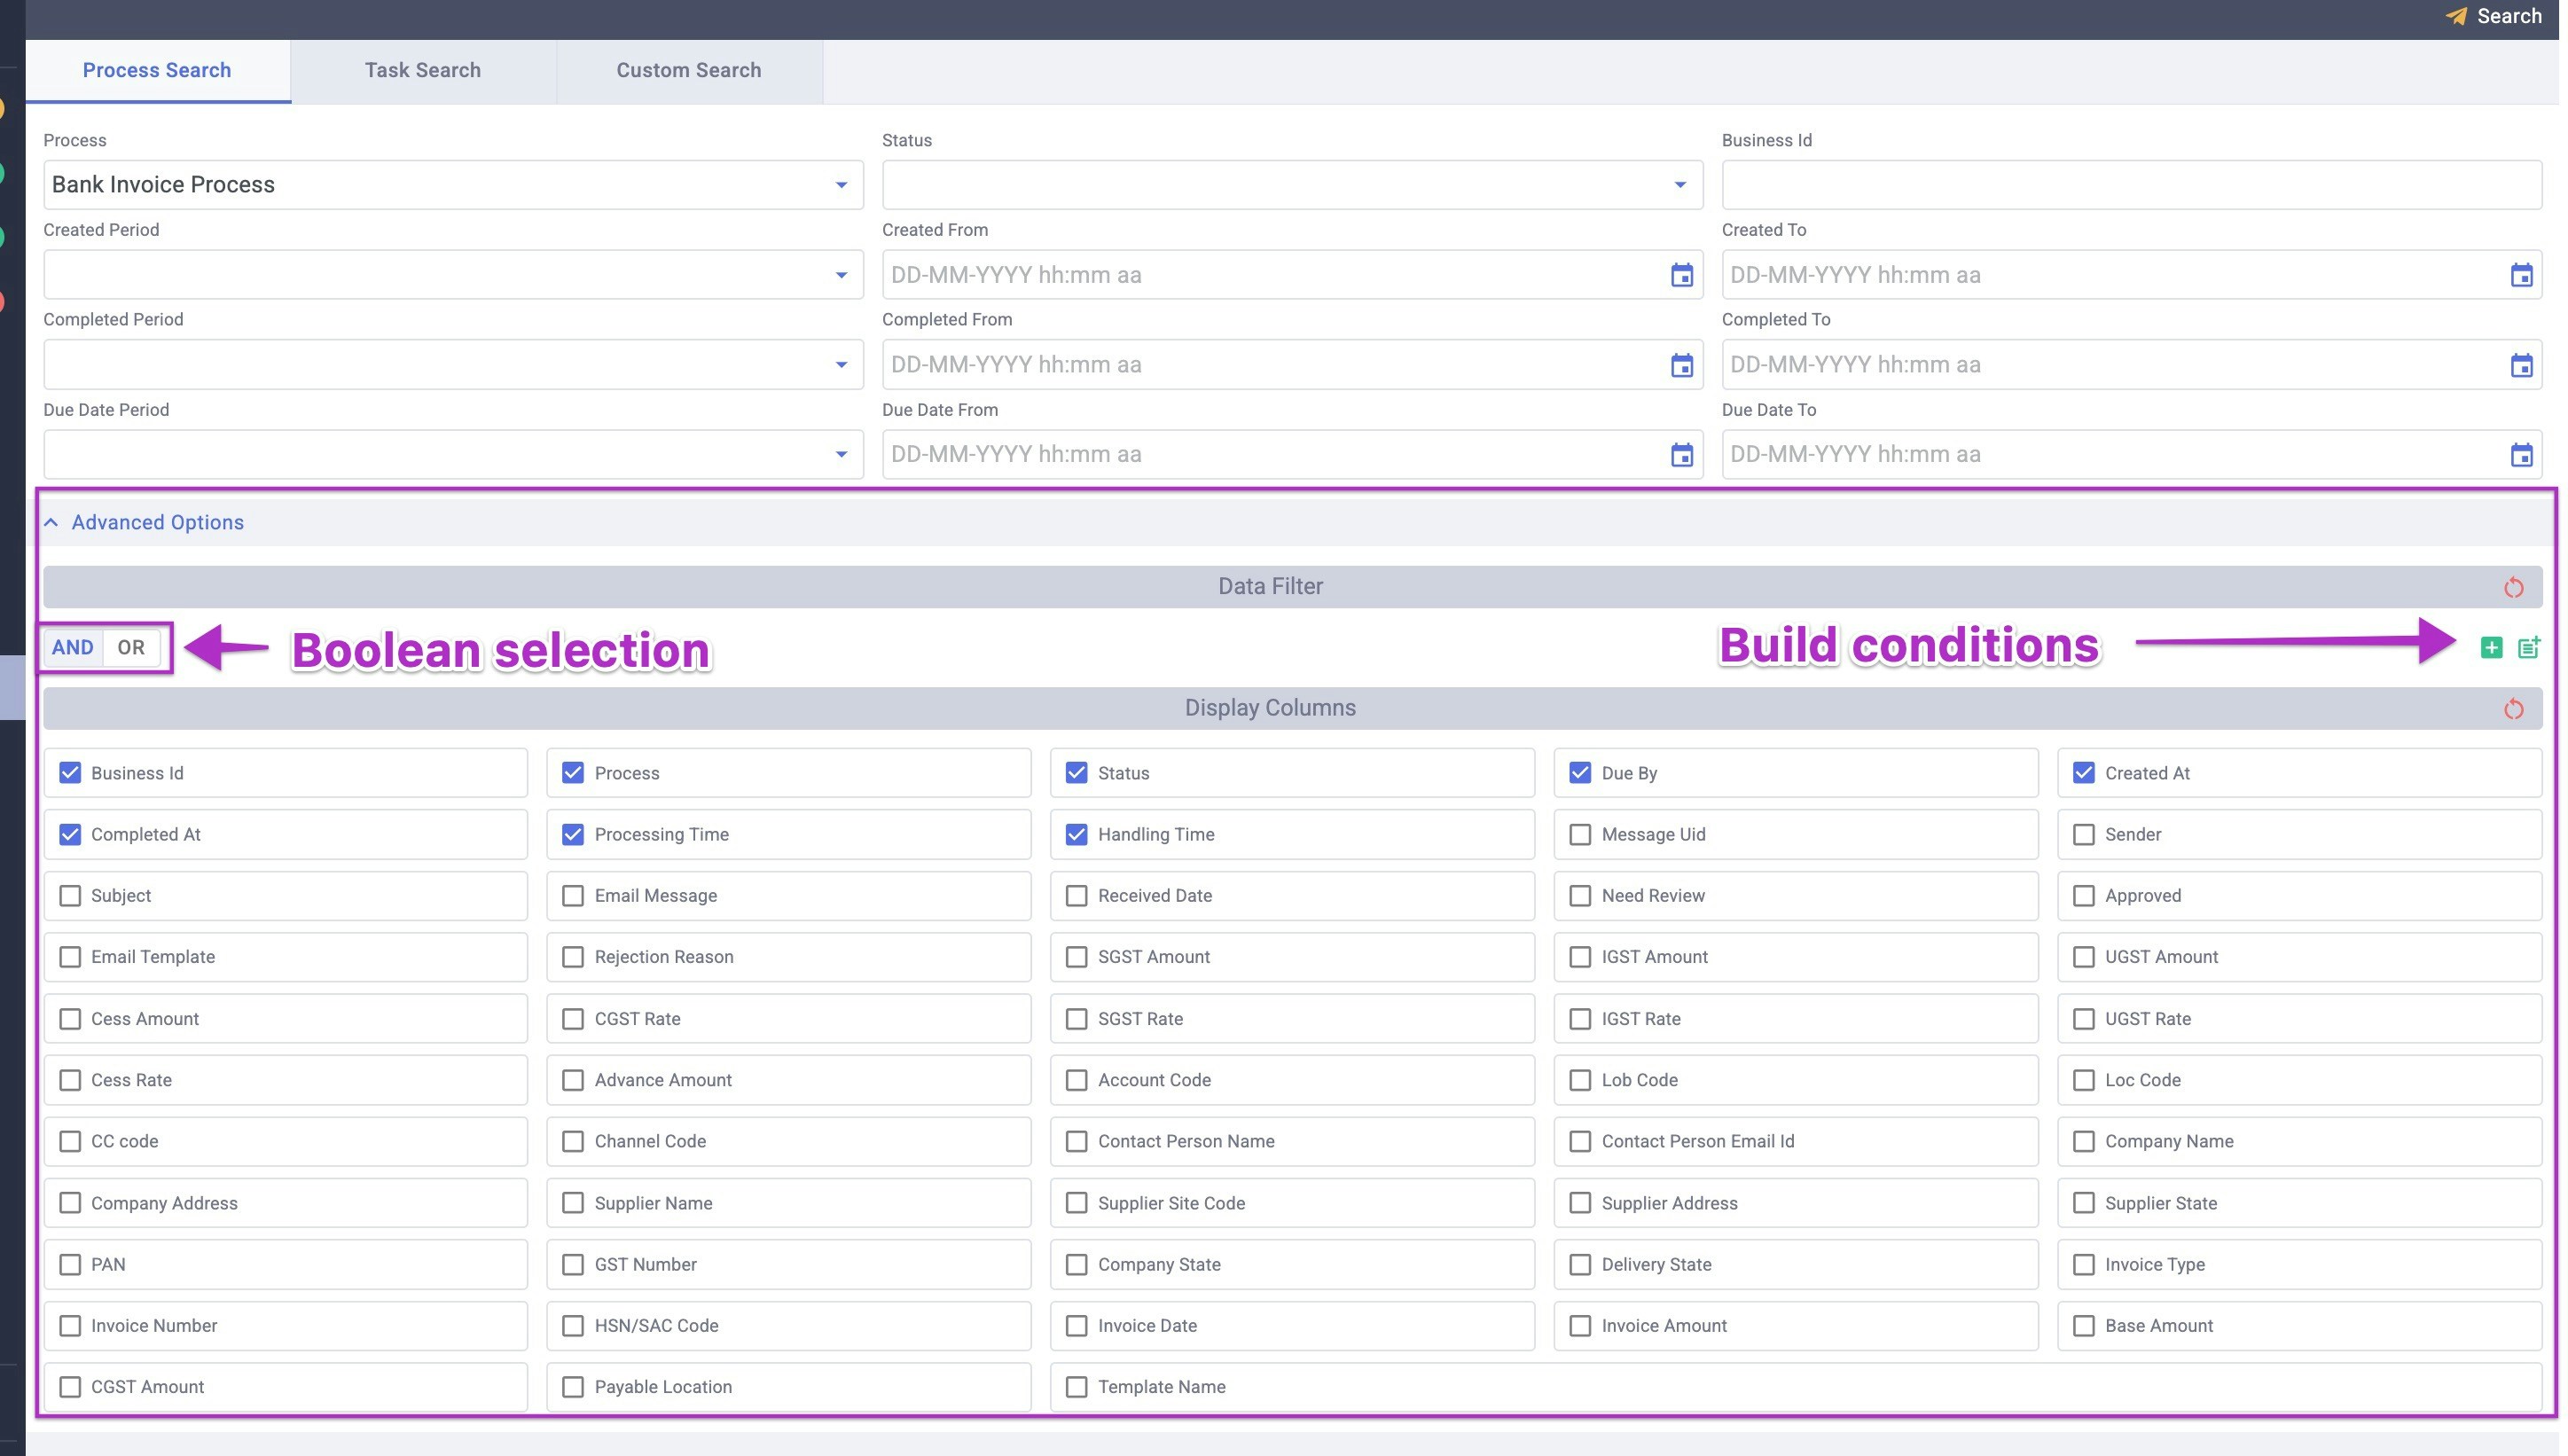 ***Customizing the data displayed in the results***
At the bottom of the screen is the **Display Columns** area containing a list of all of the fields, with checkboxes beside each one.
1. Click the box beside each column to turn it on or off in the results display. You cannot change the order of the columns in the display.
2. Click the reset icon on the gray Display Columns bar to reset the selection to default settings.
***Building a complex query***
The center section of the page is the **Data Filter** construction area, where you build more complex search queries.
1.
***Customizing the data displayed in the results***
At the bottom of the screen is the **Display Columns** area containing a list of all of the fields, with checkboxes beside each one.
1. Click the box beside each column to turn it on or off in the results display. You cannot change the order of the columns in the display.
2. Click the reset icon on the gray Display Columns bar to reset the selection to default settings.
***Building a complex query***
The center section of the page is the **Data Filter** construction area, where you build more complex search queries.
1.  Click the green plus box to add the **first query criterion**. Your screen should look like this:
 2. Select the first field to be searched from the list in the **Field Name** box. This list contains all fields in the process selected at the top of the screen.
3. Select the **Match Type**. The match type governs how the contents of the Field Name is compared with the data in the Match Value field. The match types available relate directly to the type of data in the Field Name being searched.
* **Text and ID fields** are expected to contain only letters and numbers. However, if numbers are present, they cannot be used in any math or processing. They might be a numeric ID or a SKU code, for example, but not a price or a date.
> Assume the data being searched is the following five records:\
> *The Civil War*\
> *Civility 101* \
> *life as a civilian* \
> *civil litigation* \
> *civil*
| **Match Type** | **Meaning** | **Search For** | **RESULT** |
| :----------------------- | :------------------------------------------------------------------------------------------------------------------------------------------------------------------------------------------------------------------------------------------------------------------------------------ | :------------- | :--------------------------------------------------------------------------------------- |
| **Equals** | The full data in the field exactly matches the search string, including case and leading/trailing spaces. | Civil | Nothing found |
| **Equals ignore case** | The full data in the field exactly matches the search string, including leading and trailing spaces. However, the content's capitalization is ignored. | Civil | *civil* |
| **Includes** | The data in the field contains an exact match for the search string, including its capitalization. However, that string may be anywhere in the field, not just at the beginning. Leading and trailing spaces are ignored. Partial-word matches are found when using “Includes.” | Civil | *Civil* \ *The Civil War* \ *Civility 101* |
| **Includes ignore case** | The data in the field contains an exact match for the search string, regardless of its capitalization. However, that string may be anywhere in the field, not just at the beginning. Leading and trailing spaces are ignored. Partial-word matches are found when using “Includes.” | Civil | *The Civil War* \ *civil litigation* \ *Civil* \ *Civility 101* \ *life as a civilian* |
| **Is not null** | The field contains any content. | BLANK | *The Civil War* \ *Civility 101* \ *life as a civilian* \ *civil litigation*\ *civil* |
| **Is null** | The field is completely empty. It doesn’t contain spaces or invisible special characters. | BLANK | Nothing found |
* **Numeric fields** contain only numbers, which may include decimals. The field cannot contain dollar signs or other currency symbols. The numbers may be positive or negative.
> Assume the data being searched is these four records:\
> *10.00*\
> *0.5897*\
> *-130.45* \
> *123*
| **Match Type** | **Meaning** | **Search For** | **RESULT** |
| :------------------------ | :---------------------------------------------------------------------------------------------------------------------------------------------------------------------------------------------------------------------------------------- | :------------- | :----------------------------------- |
| **Equals** | The field’s value is exactly equal to the Match Value. | 0.5897 | 0.5897 |
| **Greater than or equal** | The field’s value is either equal to or greater than the Match Value. | -131 | *-130.45* \ *0.5897*\ *10.00*\ *23* |
| **Less than or equal** | The field’s value is either less than or equal to the Match Value. | 10 - 125 | *10.00* \ *0.5897* \ *-130.45* |
| **Between** | The field’s value must be between two values entered in the Match Value field. The search considers the terms to be greater/less than or equal to the match value, so the values entered in the Match Value are included in the matches. | 10 - 125 | *10.00*\ *123* |
| **Is not null** | The field contains any value. | **BLANK** | All records |
| **Is null** | The field is completely empty. It doesn’t contain spaces or invisible special characters. | **BLANK** | Nothing found |
* **Date fields** are special types of numeric fields that evaluate dates entered as *DD-MM-YYYY hh:mm aa* (*Day-Month-Year hours:minutes am/pm*).
* Hours are entered in 12-hour format (since AM/PM is appended to the string).
* **You must specify a time in addition to a date**. To select a full day, use:
**Start** : DD-MM-YYYY 12:00 AM\
**End**: DD-MM-YYYY 12:59 PM
* All dates in the system use the server’s **time zone** setting, which your system administrator sets when they configure the environment. If you are not sure what the time zone is set to, please contact your admin, as it may differ from your local working time zone. (For example, you may work in Pacific time, but the server is on Eastern time.)
> Assume the data being searched is these three records:\
> *13-12-1968 09:26 AM*\
> *07-07-2023 12:26 PM* \
> *02-15-1995 01:47 PM*
| **Match Type** | **Meaning** | **Search For** | **RESULT** |
| :------------------------ | :------------------------------------------------------------------------------------------------------------------------------ | :-------------------------------------------------- | :------------------------------------------- |
| **Equals** | The field’s value is exactly equal to the Match Value. | 02-15-1995 12:00 AM | 02-15-1995 12:00 AM |
| **Greater than or equal** | The field’s value is either equal to or greater than the Match Value. | 02-15-1995 12:00 AM | *07-07-2023 12:26 PM*\ *02-15-1995 01:47 PM* |
| **Less than or equal** | The field’s value is either less than or equal to the Match Value. | 02-15-1995 12:00 AM | *13-12-1968 09:26 AM* |
| **Between** | The field’s value must be between two values entered in the Match Value field, inclusive. | 02-15-1995 12:00 AM ***to*** 07-07-2023 12:30 PM | *07-07-2023 12:26 PM*\ *02-15-1995 01:47 PM* |
| **Past current time** | When the user clicks Search, the field’s value must be later than the *DD-MM-YYYY hh:mm.* Otherwise, no match value is entered. | **If Current time is**: *07-07-2023 12:25 PM* | *07-07-2023 12:26 PM* |
| **Is not null** | The field contains any value. | **BLANK** | All records |
| **Is null** | The field is completely empty. It doesn’t contain spaces or invisible special characters. | **BLANK** | Nothing found |
* **Boolean fields** allow only true-false content. You should not enter a Match Value for these fields. (For practical purposes, Yes = True, No = False)
| **Selection** | **Meaning** |
| :-------------- | :--------------------------------------- |
| **Is true** | The field’s value is True. |
| **Is false** | The field’s value is False. |
| **Is not null** | The field contains either True or False. |
| **Is null** | The field is completely empty. |
* Next, input the value to be searched for in the **Match Value** field.
If you need additional criteria, click the green plus symbol to add another line, and build that criterion just as you did the first one. (You can continue clicking the plus and adding search criteria as needed.)
HINT: **The criteria in this section do not count toward the minimum of two items required for the search**. Select two or more items in the main Search section (above Advanced Options).
1. Indicate the way that these search phrases should be evaluated: as boolean **AND** or **OR** statements.\
\
Boolean **AND** means that both searches must evaluate as TRUE, which translates to returning only the records that match both searches. **OR** means that either search can be TRUE, so it returns all results that match one or the other (or both) of the criteria.
> **Example**\
> Criteria 1 **Field Name**: Active | **Match Type**: Is TRUE\
> Criteria 2 **Field Name**: Due Date | **Match Type**: Past Current Time
\
**AND** returns all records that are Active and also have a Due Date that is past the current time. \
\
**OR** returns all active records (including those with due dates in the past) plus all records with future due dates (even if the record is Inactive).
Click **Search** at the top right of the page to execute the Search.
***Query Grouping (Grouped Conditions)***
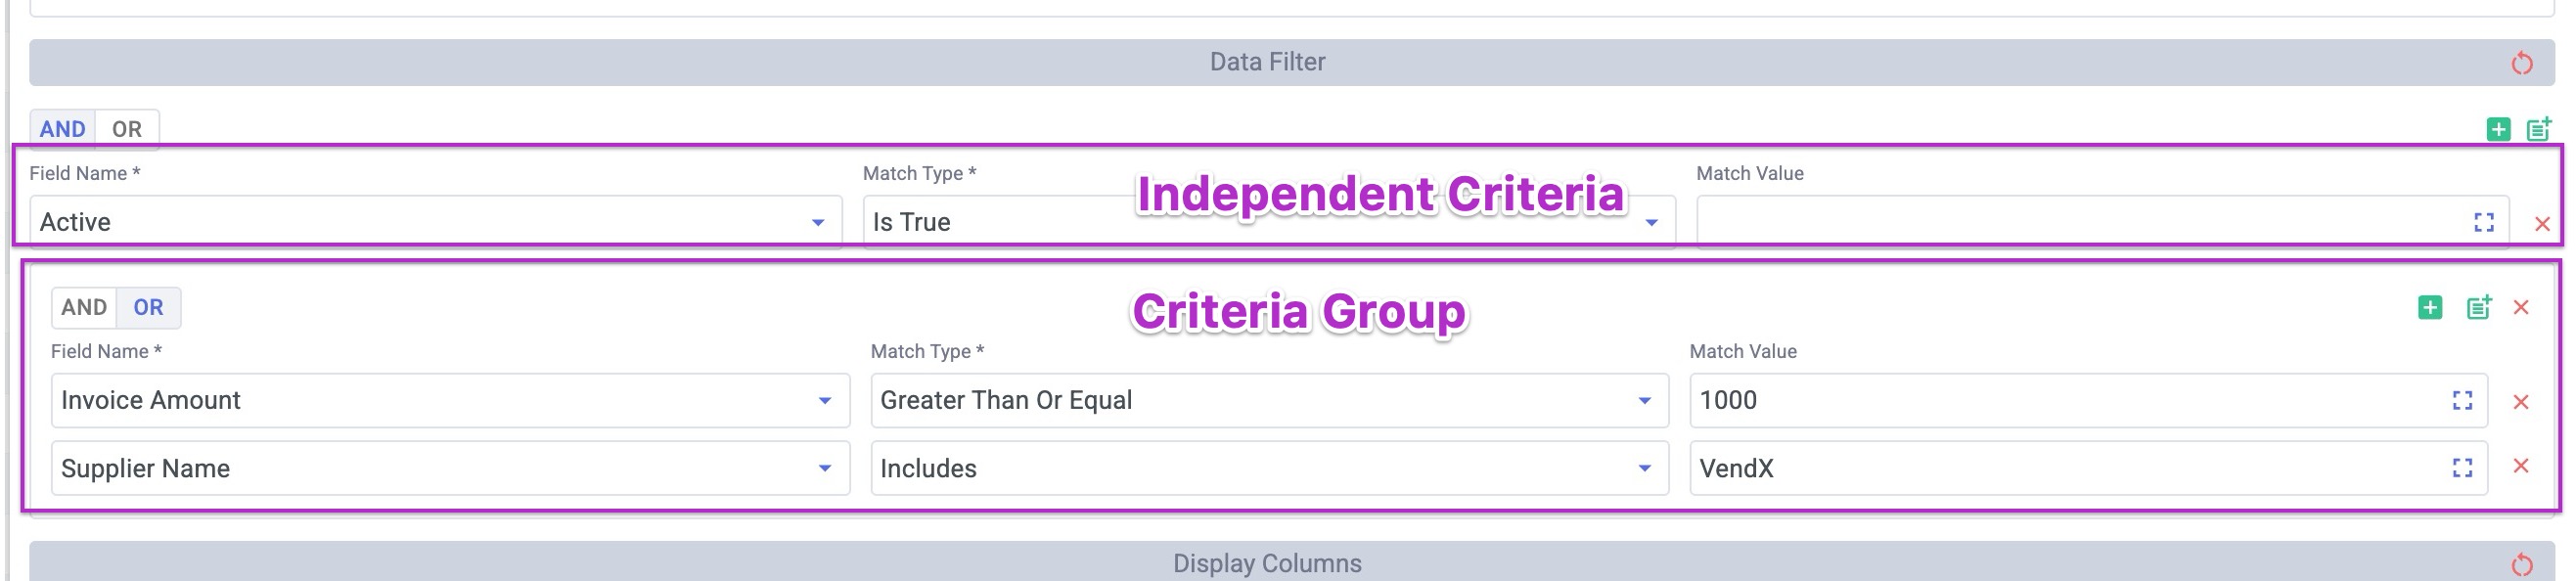
You can build increasingly complex queries by using **query grouping**.
Click the **group** button and the system will add a box to build a nested group of query criteria.
To better visualize how to use this, consider the following goal.
Find all invoices in the system that meet the following criteria:
* Haven’t been paid
* Are dated as received within the last 30 days
* Originate with vendors A or B and are greater than \$1000, OR that originate with vendors C or H and are greater than \$5000
We would group these conditions like this:
```
(Invoice = unpaid) AND
(Invoice age >= 30 days) AND
[ (Vendor = A) OR (Vendor = B) AND amount > $1000 ] OR
[ (Vendor = C) OR (Vendor = H) AND amount > $5000 ]
```
Query groups are most useful in two circumstances:
* You need to mix AND and OR statements within a larger set of criteria, such as the differing monetary thresholds for vendors here.
* You have many criteria, and grouping may give you some efficiency in organizing or managing the data.
##
2. Select the first field to be searched from the list in the **Field Name** box. This list contains all fields in the process selected at the top of the screen.
3. Select the **Match Type**. The match type governs how the contents of the Field Name is compared with the data in the Match Value field. The match types available relate directly to the type of data in the Field Name being searched.
* **Text and ID fields** are expected to contain only letters and numbers. However, if numbers are present, they cannot be used in any math or processing. They might be a numeric ID or a SKU code, for example, but not a price or a date.
> Assume the data being searched is the following five records:\
> *The Civil War*\
> *Civility 101* \
> *life as a civilian* \
> *civil litigation* \
> *civil*
| **Match Type** | **Meaning** | **Search For** | **RESULT** |
| :----------------------- | :------------------------------------------------------------------------------------------------------------------------------------------------------------------------------------------------------------------------------------------------------------------------------------ | :------------- | :--------------------------------------------------------------------------------------- |
| **Equals** | The full data in the field exactly matches the search string, including case and leading/trailing spaces. | Civil | Nothing found |
| **Equals ignore case** | The full data in the field exactly matches the search string, including leading and trailing spaces. However, the content's capitalization is ignored. | Civil | *civil* |
| **Includes** | The data in the field contains an exact match for the search string, including its capitalization. However, that string may be anywhere in the field, not just at the beginning. Leading and trailing spaces are ignored. Partial-word matches are found when using “Includes.” | Civil | *Civil* \ *The Civil War* \ *Civility 101* |
| **Includes ignore case** | The data in the field contains an exact match for the search string, regardless of its capitalization. However, that string may be anywhere in the field, not just at the beginning. Leading and trailing spaces are ignored. Partial-word matches are found when using “Includes.” | Civil | *The Civil War* \ *civil litigation* \ *Civil* \ *Civility 101* \ *life as a civilian* |
| **Is not null** | The field contains any content. | BLANK | *The Civil War* \ *Civility 101* \ *life as a civilian* \ *civil litigation*\ *civil* |
| **Is null** | The field is completely empty. It doesn’t contain spaces or invisible special characters. | BLANK | Nothing found |
* **Numeric fields** contain only numbers, which may include decimals. The field cannot contain dollar signs or other currency symbols. The numbers may be positive or negative.
> Assume the data being searched is these four records:\
> *10.00*\
> *0.5897*\
> *-130.45* \
> *123*
| **Match Type** | **Meaning** | **Search For** | **RESULT** |
| :------------------------ | :---------------------------------------------------------------------------------------------------------------------------------------------------------------------------------------------------------------------------------------- | :------------- | :----------------------------------- |
| **Equals** | The field’s value is exactly equal to the Match Value. | 0.5897 | 0.5897 |
| **Greater than or equal** | The field’s value is either equal to or greater than the Match Value. | -131 | *-130.45* \ *0.5897*\ *10.00*\ *23* |
| **Less than or equal** | The field’s value is either less than or equal to the Match Value. | 10 - 125 | *10.00* \ *0.5897* \ *-130.45* |
| **Between** | The field’s value must be between two values entered in the Match Value field. The search considers the terms to be greater/less than or equal to the match value, so the values entered in the Match Value are included in the matches. | 10 - 125 | *10.00*\ *123* |
| **Is not null** | The field contains any value. | **BLANK** | All records |
| **Is null** | The field is completely empty. It doesn’t contain spaces or invisible special characters. | **BLANK** | Nothing found |
* **Date fields** are special types of numeric fields that evaluate dates entered as *DD-MM-YYYY hh:mm aa* (*Day-Month-Year hours:minutes am/pm*).
* Hours are entered in 12-hour format (since AM/PM is appended to the string).
* **You must specify a time in addition to a date**. To select a full day, use:
**Start** : DD-MM-YYYY 12:00 AM\
**End**: DD-MM-YYYY 12:59 PM
* All dates in the system use the server’s **time zone** setting, which your system administrator sets when they configure the environment. If you are not sure what the time zone is set to, please contact your admin, as it may differ from your local working time zone. (For example, you may work in Pacific time, but the server is on Eastern time.)
> Assume the data being searched is these three records:\
> *13-12-1968 09:26 AM*\
> *07-07-2023 12:26 PM* \
> *02-15-1995 01:47 PM*
| **Match Type** | **Meaning** | **Search For** | **RESULT** |
| :------------------------ | :------------------------------------------------------------------------------------------------------------------------------ | :-------------------------------------------------- | :------------------------------------------- |
| **Equals** | The field’s value is exactly equal to the Match Value. | 02-15-1995 12:00 AM | 02-15-1995 12:00 AM |
| **Greater than or equal** | The field’s value is either equal to or greater than the Match Value. | 02-15-1995 12:00 AM | *07-07-2023 12:26 PM*\ *02-15-1995 01:47 PM* |
| **Less than or equal** | The field’s value is either less than or equal to the Match Value. | 02-15-1995 12:00 AM | *13-12-1968 09:26 AM* |
| **Between** | The field’s value must be between two values entered in the Match Value field, inclusive. | 02-15-1995 12:00 AM ***to*** 07-07-2023 12:30 PM | *07-07-2023 12:26 PM*\ *02-15-1995 01:47 PM* |
| **Past current time** | When the user clicks Search, the field’s value must be later than the *DD-MM-YYYY hh:mm.* Otherwise, no match value is entered. | **If Current time is**: *07-07-2023 12:25 PM* | *07-07-2023 12:26 PM* |
| **Is not null** | The field contains any value. | **BLANK** | All records |
| **Is null** | The field is completely empty. It doesn’t contain spaces or invisible special characters. | **BLANK** | Nothing found |
* **Boolean fields** allow only true-false content. You should not enter a Match Value for these fields. (For practical purposes, Yes = True, No = False)
| **Selection** | **Meaning** |
| :-------------- | :--------------------------------------- |
| **Is true** | The field’s value is True. |
| **Is false** | The field’s value is False. |
| **Is not null** | The field contains either True or False. |
| **Is null** | The field is completely empty. |
* Next, input the value to be searched for in the **Match Value** field.
If you need additional criteria, click the green plus symbol to add another line, and build that criterion just as you did the first one. (You can continue clicking the plus and adding search criteria as needed.)
HINT: **The criteria in this section do not count toward the minimum of two items required for the search**. Select two or more items in the main Search section (above Advanced Options).
1. Indicate the way that these search phrases should be evaluated: as boolean **AND** or **OR** statements.\
\
Boolean **AND** means that both searches must evaluate as TRUE, which translates to returning only the records that match both searches. **OR** means that either search can be TRUE, so it returns all results that match one or the other (or both) of the criteria.
> **Example**\
> Criteria 1 **Field Name**: Active | **Match Type**: Is TRUE\
> Criteria 2 **Field Name**: Due Date | **Match Type**: Past Current Time
\
**AND** returns all records that are Active and also have a Due Date that is past the current time. \
\
**OR** returns all active records (including those with due dates in the past) plus all records with future due dates (even if the record is Inactive).
Click **Search** at the top right of the page to execute the Search.
***Query Grouping (Grouped Conditions)***
You can build increasingly complex queries by using **query grouping**.
Click the **group** button and the system will add a box to build a nested group of query criteria.
To better visualize how to use this, consider the following goal.
Find all invoices in the system that meet the following criteria:
* Haven’t been paid
* Are dated as received within the last 30 days
* Originate with vendors A or B and are greater than \$1000, OR that originate with vendors C or H and are greater than \$5000
We would group these conditions like this:
```
(Invoice = unpaid) AND
(Invoice age >= 30 days) AND
[ (Vendor = A) OR (Vendor = B) AND amount > $1000 ] OR
[ (Vendor = C) OR (Vendor = H) AND amount > $5000 ]
```
Query groups are most useful in two circumstances:
* You need to mix AND and OR statements within a larger set of criteria, such as the differing monetary thresholds for vendors here.
* You have many criteria, and grouping may give you some efficiency in organizing or managing the data.
##  ***Task Lists***
Task lists are where you select, view, and act on tasks. All the matching items are presented in a table.
#### **Sorting Task Lists**
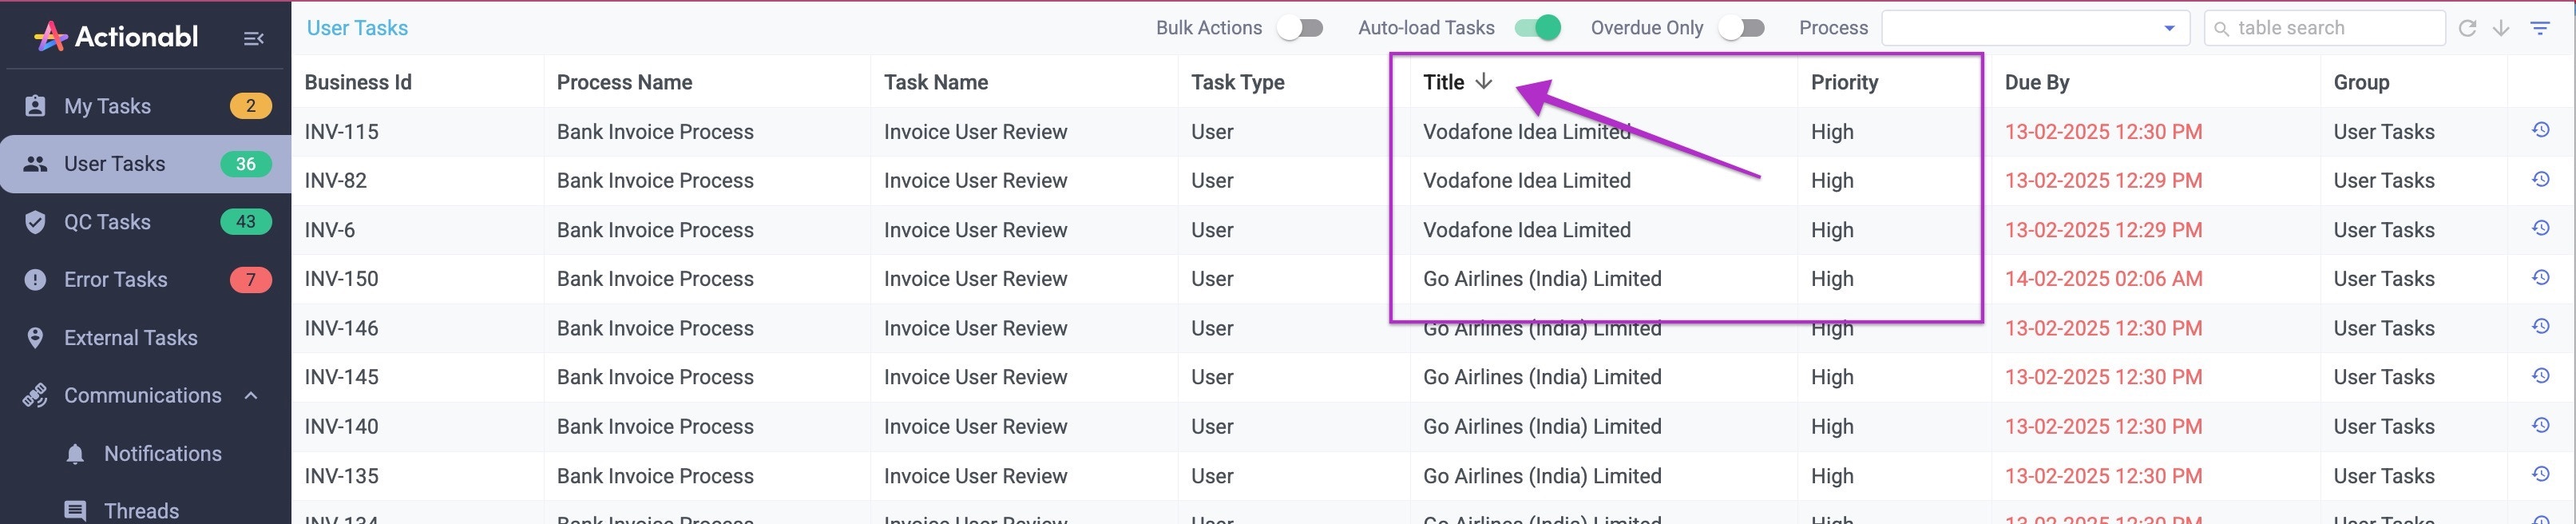
By default, tasks are sorted with the highest priority at the top of the list (as shown by the up-arrow next to Priority in the column name) and then by their ID in ascending order.
You can sort “up” or “down” by any column by clicking on the column’s name at the top. You will then see an arrow by the column name indicating that it’s the sort column (and the sort direction).
***Task Lists***
Task lists are where you select, view, and act on tasks. All the matching items are presented in a table.
#### **Sorting Task Lists**
By default, tasks are sorted with the highest priority at the top of the list (as shown by the up-arrow next to Priority in the column name) and then by their ID in ascending order.
You can sort “up” or “down” by any column by clicking on the column’s name at the top. You will then see an arrow by the column name indicating that it’s the sort column (and the sort direction).
 **Overdue Only**
Toggling the **Overdue Only** button in the top center of the page allows you to quickly view only overdue items.
**Overdue Only**
Toggling the **Overdue Only** button in the top center of the page allows you to quickly view only overdue items.
 **Bulk Actions**
The Bulk Actions toggle turns on the ability to select multiple items from the list and take action on all of them at once. Details on this function are found under **Taking Action on Tasks**.
#### **Auto-load Tasks**
The **Auto-load Tasks** toggle in the top center of the page turns on the ability to scroll through all of the detail pages for the tasks on the list without returning to the list view to select the next task.
**Bulk Actions**
The Bulk Actions toggle turns on the ability to select multiple items from the list and take action on all of them at once. Details on this function are found under **Taking Action on Tasks**.
#### **Auto-load Tasks**
The **Auto-load Tasks** toggle in the top center of the page turns on the ability to scroll through all of the detail pages for the tasks on the list without returning to the list view to select the next task.
 1. Click to turn on **Auto-load Tasks**.
2. Click the first task you want to see. Its details screen opens.
3. Besides the regular action items in the menu, you’ll see a **Skip** button. Click that button to load the next task from the list.
4.
1. Click to turn on **Auto-load Tasks**.
2. Click the first task you want to see. Its details screen opens.
3. Besides the regular action items in the menu, you’ll see a **Skip** button. Click that button to load the next task from the list.
4. 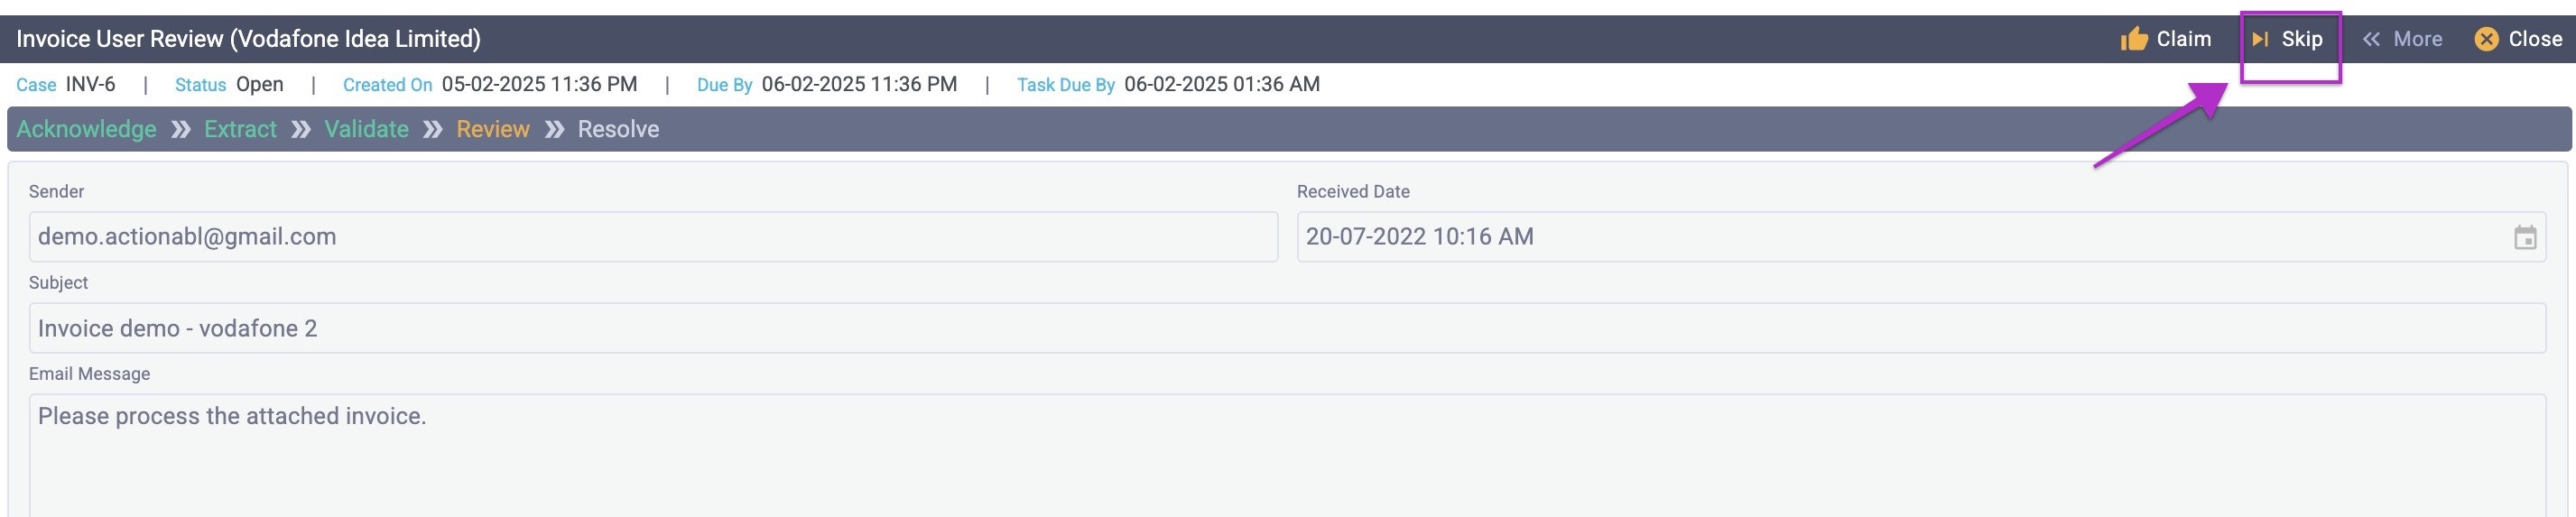 After scrolling through tasks, click **Close** to return to the task list.
## **Understanding The Task Detail View**
Click any task in a list to open its **Task Detail** view.
### ***Details***
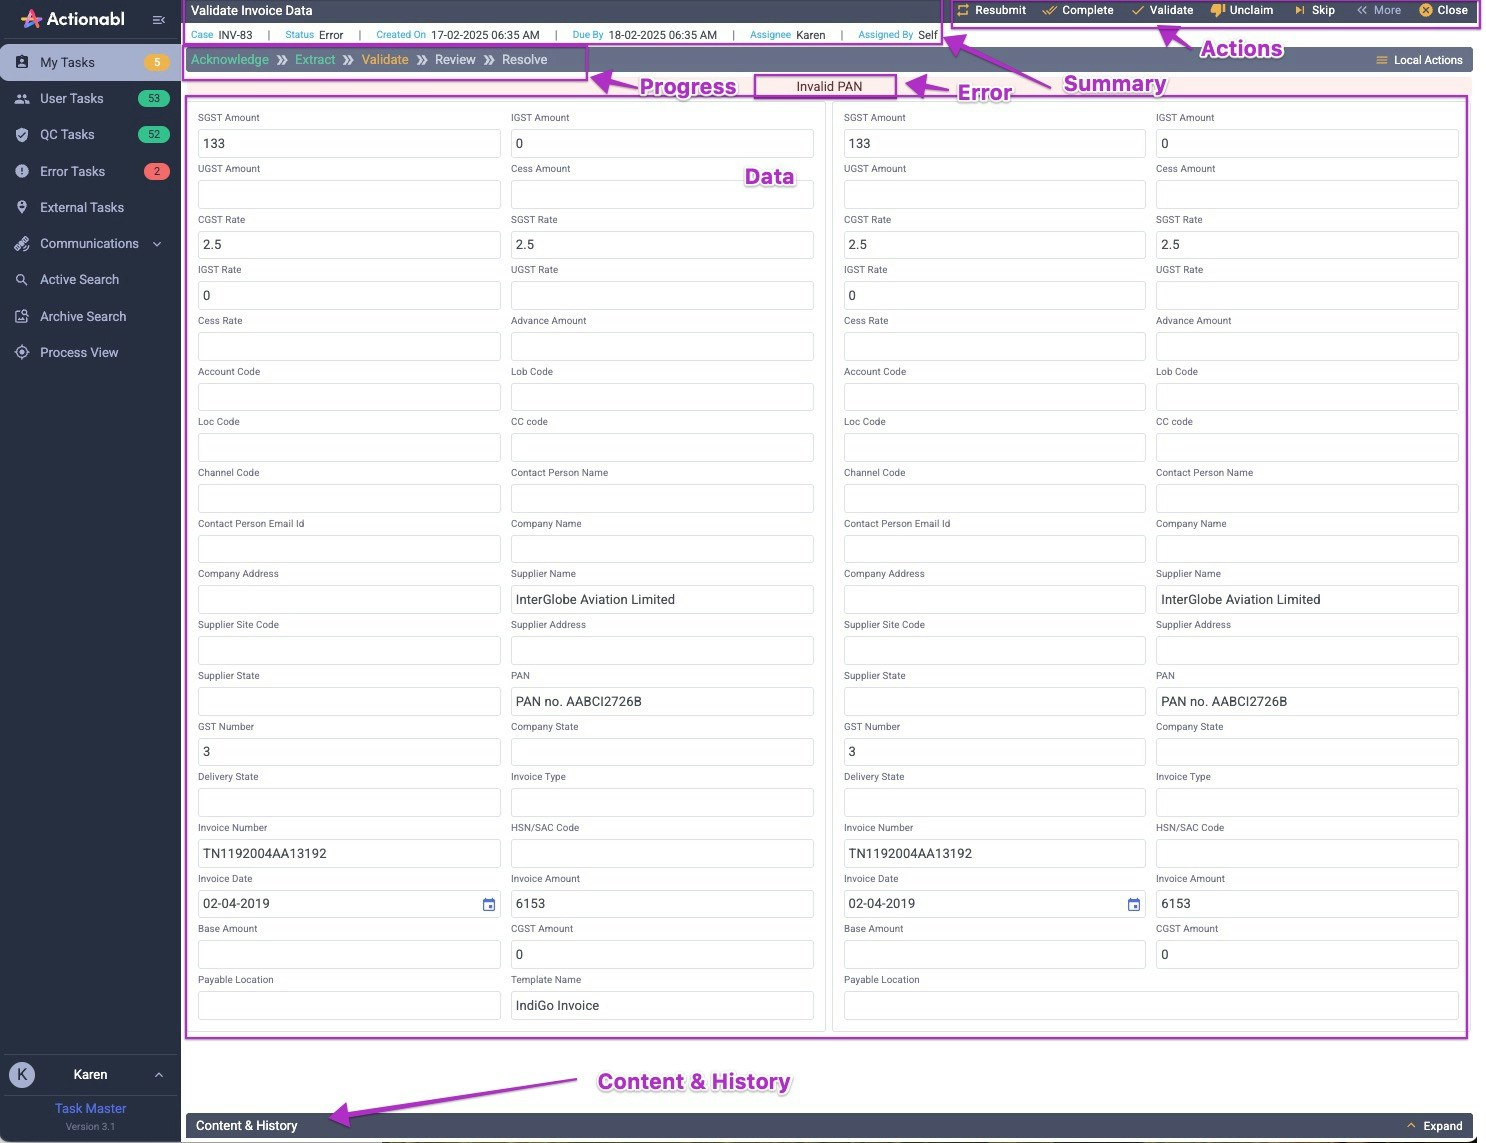
The Task Detail view has six main sections: **Actions**, **Summary**, **Progress**, **Error**, **Data**, and **Content & History**.
After scrolling through tasks, click **Close** to return to the task list.
## **Understanding The Task Detail View**
Click any task in a list to open its **Task Detail** view.
### ***Details***
The Task Detail view has six main sections: **Actions**, **Summary**, **Progress**, **Error**, **Data**, and **Content & History**.
 | **Section** | **Definition** |
| :---------------------- | :------------------------------------------------------------------------------------------------------------------------------------------------------------------------------------------------------------------------------------------------------------------------------------------------------------------------------------------------------------------------------------------------- |
| **Actions** | The actions you can take on this record will vary depending on the item being displayed, its status, and your role. |
| **Summary** | This summary summarizes the item’s ID, due date, created and updated dates, who last updated it, and its status. |
| **Progress** | Shows which stage the item is in in the overall process workflow. |
| **Error Description** | If the item is in an error state, the error message and any descriptive information are shown here. Otherwise, this section does not appear. |
| **Data** | The current state of the item’s data. Comparing this to any error message may quickly highlight the problem and how to fix it. |
| **Content and History** | Clicking on the bar to expand this section shows multiple tabs: **Document**, **Notes**, **Emails**, **Local Actions**, **Threads**, **Task History**, **Data History**, and **Watch Data**. Taken together, this shows all of the content related to this item and how it has changed throughout the process so far. This is the same view shown by clicking the “clock” icon from the task list. |
### ***Task Content and History***
There are two ways to access a task’s history and content:
1. **From any task listing**. To quickly see the history of a task’s execution without going into its detail view, click the clock icon on the far right of the task. By default, you’ll see the **Emails** tab.
2. **On the Task Detail view**. Click the **Content & History** bar at the bottom of the view to expand the view and see all of the tabs.
There are multiple tabs available: Attachments, Notes, Emails, Task History, and Data History.
###
| **Section** | **Definition** |
| :---------------------- | :------------------------------------------------------------------------------------------------------------------------------------------------------------------------------------------------------------------------------------------------------------------------------------------------------------------------------------------------------------------------------------------------- |
| **Actions** | The actions you can take on this record will vary depending on the item being displayed, its status, and your role. |
| **Summary** | This summary summarizes the item’s ID, due date, created and updated dates, who last updated it, and its status. |
| **Progress** | Shows which stage the item is in in the overall process workflow. |
| **Error Description** | If the item is in an error state, the error message and any descriptive information are shown here. Otherwise, this section does not appear. |
| **Data** | The current state of the item’s data. Comparing this to any error message may quickly highlight the problem and how to fix it. |
| **Content and History** | Clicking on the bar to expand this section shows multiple tabs: **Document**, **Notes**, **Emails**, **Local Actions**, **Threads**, **Task History**, **Data History**, and **Watch Data**. Taken together, this shows all of the content related to this item and how it has changed throughout the process so far. This is the same view shown by clicking the “clock” icon from the task list. |
### ***Task Content and History***
There are two ways to access a task’s history and content:
1. **From any task listing**. To quickly see the history of a task’s execution without going into its detail view, click the clock icon on the far right of the task. By default, you’ll see the **Emails** tab.
2. **On the Task Detail view**. Click the **Content & History** bar at the bottom of the view to expand the view and see all of the tabs.
There are multiple tabs available: Attachments, Notes, Emails, Task History, and Data History.
###  **Documents**
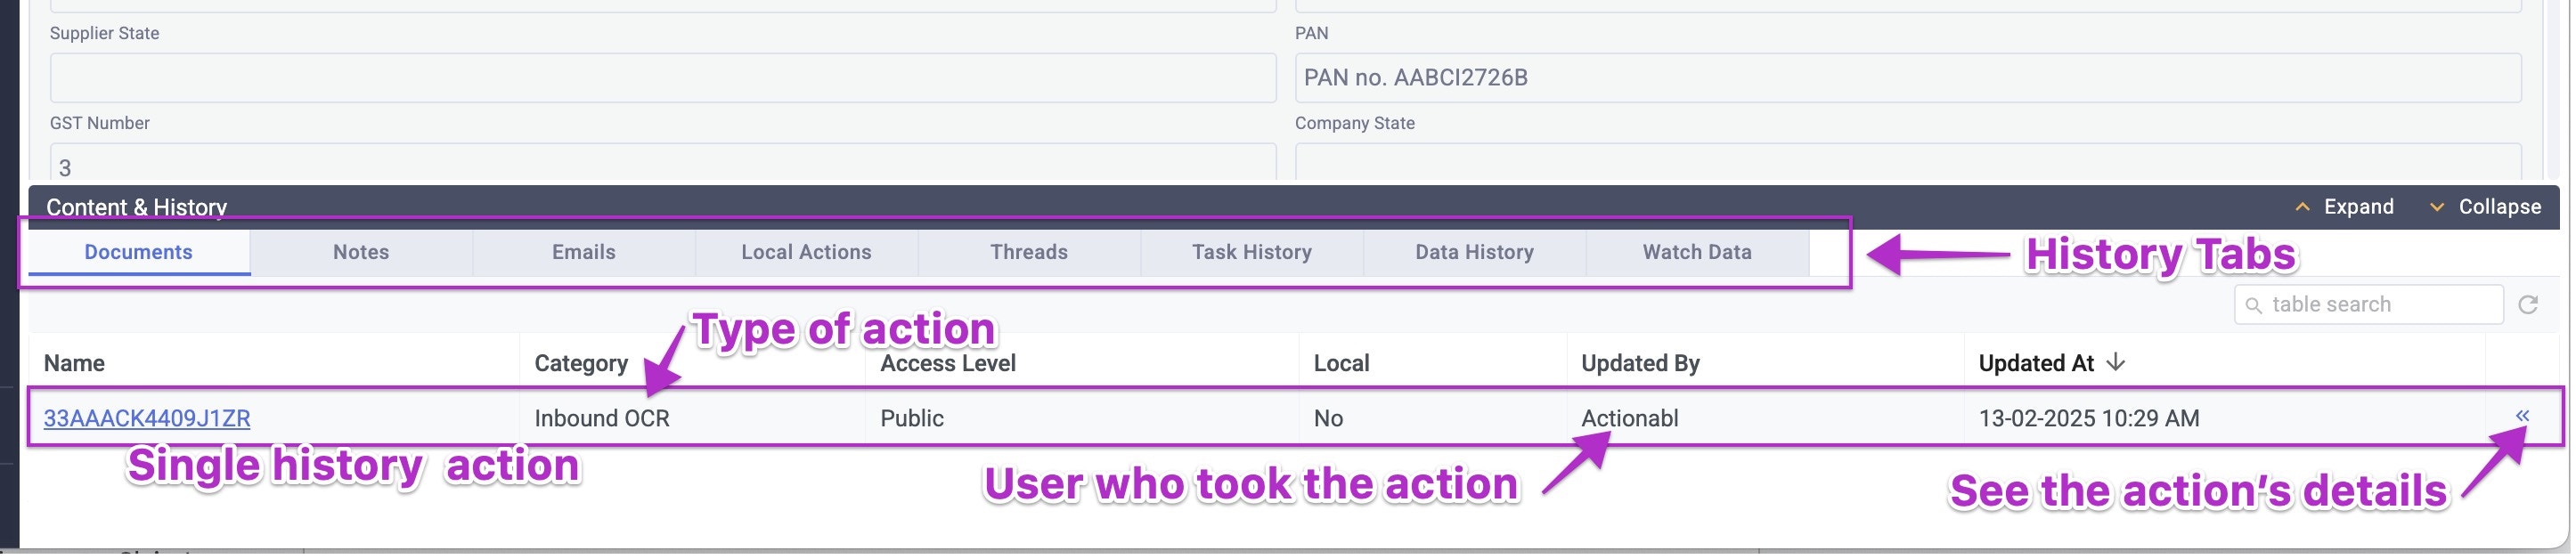
The **Documents** list shows all items that have been connected to this record since it was received into the system. These could be files from an email, something uploaded into a system, OCR scanned documents, etc.
You will only see attachments that you have permission to View and Download. Any others will be hidden from the list.
To see the details of an attachment, click the expand icon to its right. This opens the menu that allows you to View or Download the attachment.
**Documents**
The **Documents** list shows all items that have been connected to this record since it was received into the system. These could be files from an email, something uploaded into a system, OCR scanned documents, etc.
You will only see attachments that you have permission to View and Download. Any others will be hidden from the list.
To see the details of an attachment, click the expand icon to its right. This opens the menu that allows you to View or Download the attachment.
 **Notes**
 are optional annotations that are added to the record by users at any point as the item moves through the workflow. Notes have specific access levels that control who can read them, so you only see the ones that you have permission to read.
**Notes**
**Notes** are optional annotations that are added to the record by users at any point as the item moves through the workflow. Notes have specific access levels that control who can read them, so you only see the ones that you have permission to read.
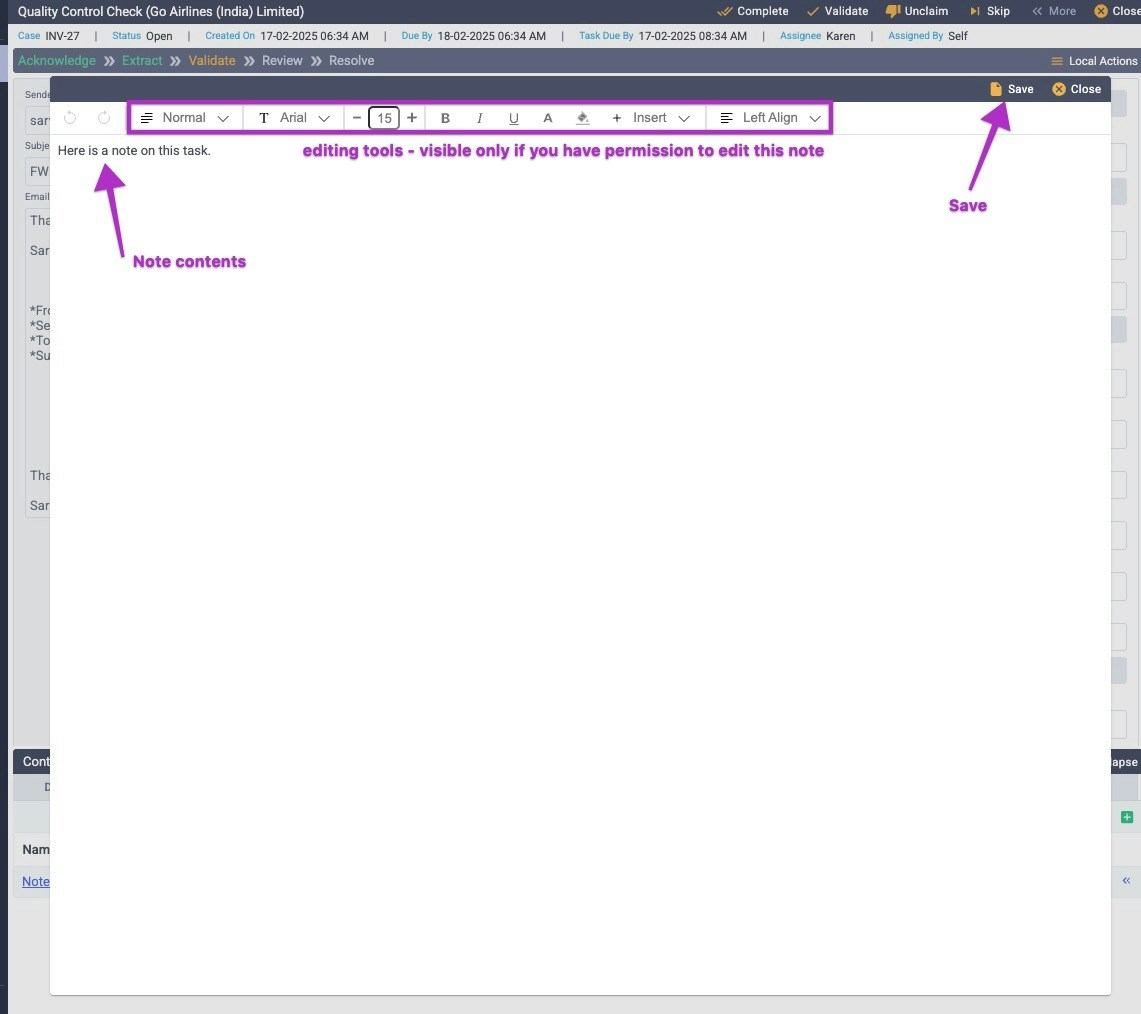
 To see a note’s contents, click its **Name**. This will open the popup where you can view the note. If you were the creator of the note or have claimed the item, you may also have permission to edit it.
 **Emails**
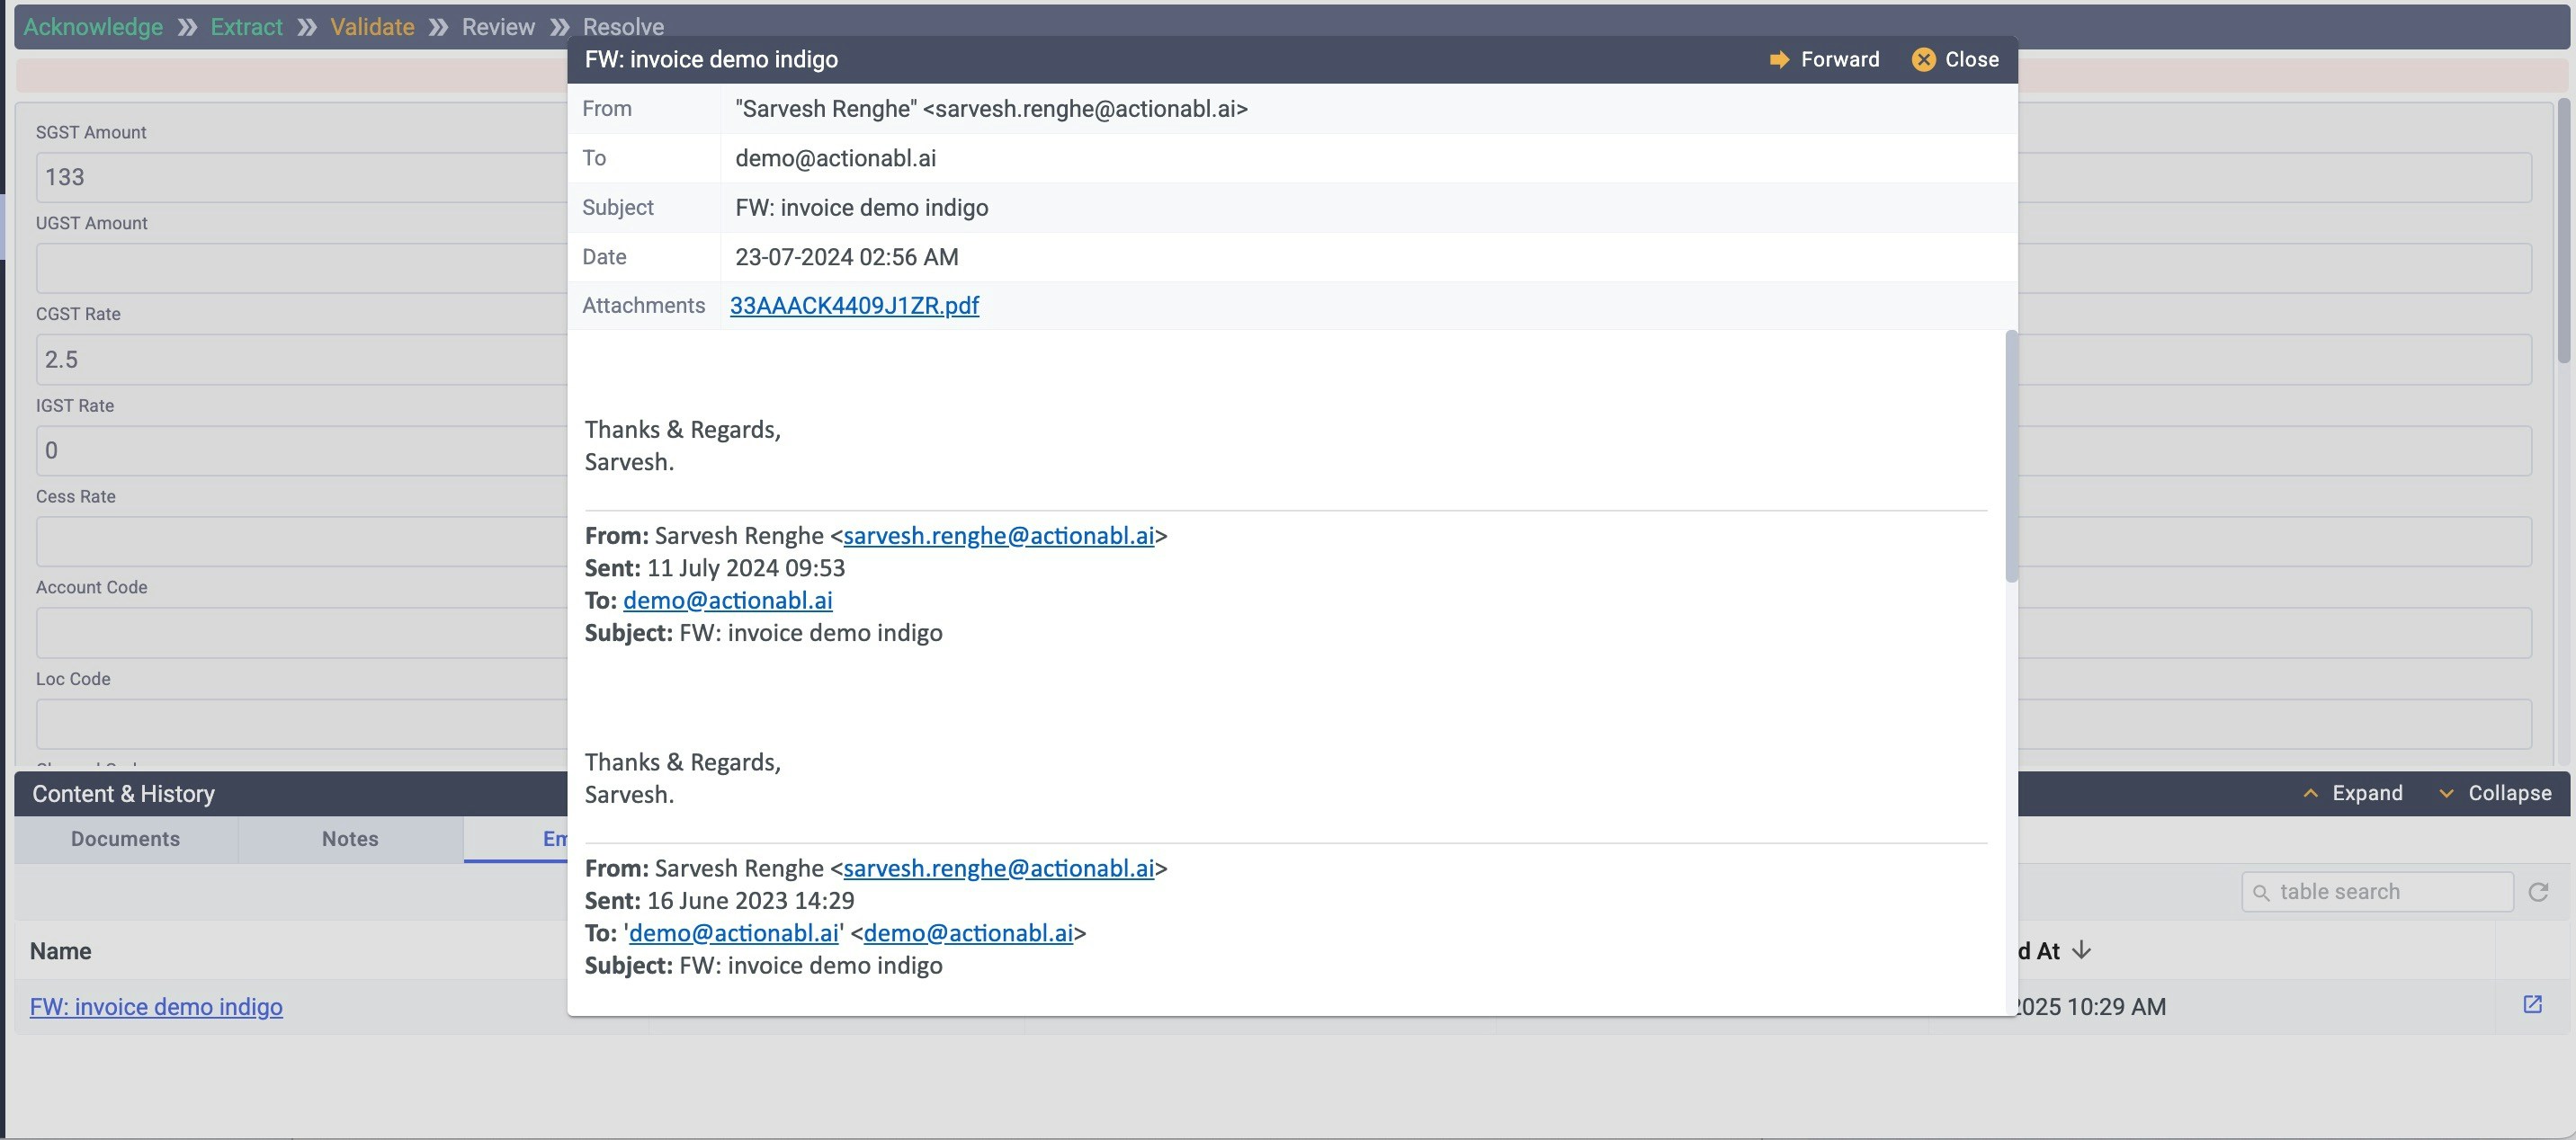
You will see a history of the emails sent and received regarding this item throughout its workflow. As with Notes and Attachments, each email has an Access Level that determines who can see it.
Click the document button to the right of any email to open it in a pop-up window.
**Emails**
You will see a history of the emails sent and received regarding this item throughout its workflow. As with Notes and Attachments, each email has an Access Level that determines who can see it.
Click the document button to the right of any email to open it in a pop-up window.
 **Local Actions**
The Local Actions available are small, granular events that can help you complete the task. They do not change the status of the task itself or move it along in the workflow, and can be optional. For example, a local action could be used when the user simply needs to ask for clarification from another department or the customer.
There are 2 types of Local Actions: Static Forms and Dynamic Forms
* **Static forms** enable the user to select an existing form and send it to the recipient. This is typically used for very common requests with few data points.
* **Dynamic forms** are built on the fly when the user selects the fields to be included.
In either case, the form’s recipient receives a link that opens the form and presents the fields to be filled out. When they submit the form, the fields are updated and the form is available for further processing on that task.
#### **Threads**
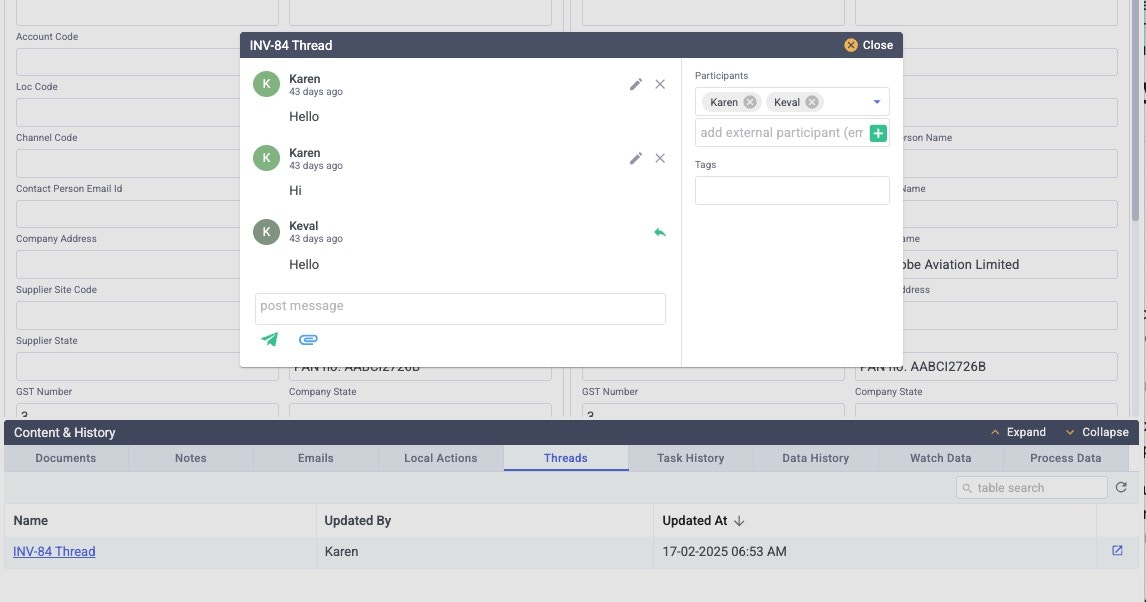
Threads are the internal messaging about this specific task. They can include text and attachments.
To open a thread, click its **Name** or the pop-out icon on the right.
**Local Actions**
The Local Actions available are small, granular events that can help you complete the task. They do not change the status of the task itself or move it along in the workflow, and can be optional. For example, a local action could be used when the user simply needs to ask for clarification from another department or the customer.
There are 2 types of Local Actions: Static Forms and Dynamic Forms
* **Static forms** enable the user to select an existing form and send it to the recipient. This is typically used for very common requests with few data points.
* **Dynamic forms** are built on the fly when the user selects the fields to be included.
In either case, the form’s recipient receives a link that opens the form and presents the fields to be filled out. When they submit the form, the fields are updated and the form is available for further processing on that task.
#### **Threads**
Threads are the internal messaging about this specific task. They can include text and attachments.
To open a thread, click its **Name** or the pop-out icon on the right.

 **Task History**
The **Task History** tab shows every step this item has completed so far, along with the step’s status, number of attempts, and who completed it. Click the **Download** button to download this table.
You’re able to select between Excel, CSV, Text, and JSON formats for your download.
**Task History**
The **Task History** tab shows every step this item has completed so far, along with the step’s status, number of attempts, and who completed it. Click the **Download** button to download this table.
You’re able to select between Excel, CSV, Text, and JSON formats for your download.
 **Data History**
The **Data History** provides details of the precise content in each field at the end of each task, making it invaluable in troubleshooting. A hash sign (#) means the data is unchanged from the previous step.
As with the Task History, you can download this table for offline review.
**HINT**: You must scroll across to the right to see the data for all fields in the records.
**Data History**
The **Data History** provides details of the precise content in each field at the end of each task, making it invaluable in troubleshooting. A hash sign (#) means the data is unchanged from the previous step.
As with the Task History, you can download this table for offline review.
**HINT**: You must scroll across to the right to see the data for all fields in the records.
 **Understanding The Process View**
The workflow that items move through in the Actionabl system is called a **Process**. It’s best visualized as a flowchart, containing items that move through steps, decisions, and loops to achieve a well-defined goal.
In **The Process / Task / Stage Structure**, we explored the meaning and relationship between a process and its tasks and stages. The Process View module is where you see the flow in its entirety and can navigate to tasks within each step in the flow.
Most Actionabl users will see multiple processes on the Process View. Each row on this view represents a single Process. The tan column is the name of the process, the gray columns are the stages within the process, and the numbers next to each are the number of alerts currently in the queue for that stage.
**Understanding The Process View**
The workflow that items move through in the Actionabl system is called a **Process**. It’s best visualized as a flowchart, containing items that move through steps, decisions, and loops to achieve a well-defined goal.
In **The Process / Task / Stage Structure**, we explored the meaning and relationship between a process and its tasks and stages. The Process View module is where you see the flow in its entirety and can navigate to tasks within each step in the flow.
Most Actionabl users will see multiple processes on the Process View. Each row on this view represents a single Process. The tan column is the name of the process, the gray columns are the stages within the process, and the numbers next to each are the number of alerts currently in the queue for that stage.
 Click any process to expand the workflow and see details about each task.
The alerts for each step are color-coded to indicate their type:
* **Yellow tasks** are **owned by someone** ( you or someone else), so are seen as “in progress” within the system. The ones you own will appear in your My Tasks module. When you click a yellow icon, you’ll see the complete list, including yours and everyone else’s.
* **Green tasks** are in the queue. In most cases, these are either **User** or **QC** tasks, such as reviewing a proof or authorizing a payment, that are not yet owned. On automated steps (such as Extract Invoice Data), you may occasionally see a green bubble if there are a number of tasks in a backlog for the system to process.
* **Red tasks** are unclaimed **Error Tasks**, where the system has encountered something unexpected and needs a user to review and provide direction to proceed. These can be things like missing documents, invalid data, or a problem with a system process like an API call.
**HINT**: Click an alert indicator within the flow to go to a filtered view that includes only the alerts of that type and for that task.
# TAKING ACTION ON TASKS
Most people use Actionabl to respond to alerts and take action on a task. Now that you understand how the information is organized and displayed in the system, let’s examine how to take action.
There are three basic categories of actions:
* **Assignments** specify the user who owns (is responsible for) the task \
*(Claim/Unclaim/Reassign/Assign/Unassign)*
* **Editing** makes changes to the task or its data to move it forward in the process or resolve an error \
(*Edit/Validate/Save/Complete/Resubmit/Discard)*
* **Annotating** adds notes to help other task users or provide historic context to the task \
(*Notes*)
## **Assignments: Claim/Unclaim/Reassign and Assign/Unassign**
Assignment of a task to a user can either be through a user **claiming** a task or from someone else **assigning** it to them.
* Users with the appropriate supervisory permissions can assign or reassign a task to a user.
* Users can claim tasks for themselves or, if they have permission, reassign a task they own to someone else. They can also unclaim a task they currently own.
### ***SLA - Service Level Agreements***
Each process and task in the system has a service-level agreement – referred to as an SLA – associated with it. The SLA timer sets a due date/time for each task. When an item moves into a task step, the SLA’s timer starts; if the time runs out, the item on the task list will show a status of “OVERDUE” and its due date will be red. Completion time is logged for all tasks to provide reporting, as well.
When you **claim** a task, the SLA timer starts as soon as you click Claim. If you **unclaim** a task, the timer stops and is reset to zero for the next claimant of that task. The timer restarts when the item is Claimed by someone else.
If someone else assigns you a task, such as a supervisor using the **Assign** button or another assignee using the **Reassign** button, **your timer on that task does not start until you click the Start button** on the task detail page.
### ***Claiming a Task for Yourself***
1. Click to open the task detail view from any task list.
2. Click **Claim** in the top menu bar.
Click any process to expand the workflow and see details about each task.
The alerts for each step are color-coded to indicate their type:
* **Yellow tasks** are **owned by someone** ( you or someone else), so are seen as “in progress” within the system. The ones you own will appear in your My Tasks module. When you click a yellow icon, you’ll see the complete list, including yours and everyone else’s.
* **Green tasks** are in the queue. In most cases, these are either **User** or **QC** tasks, such as reviewing a proof or authorizing a payment, that are not yet owned. On automated steps (such as Extract Invoice Data), you may occasionally see a green bubble if there are a number of tasks in a backlog for the system to process.
* **Red tasks** are unclaimed **Error Tasks**, where the system has encountered something unexpected and needs a user to review and provide direction to proceed. These can be things like missing documents, invalid data, or a problem with a system process like an API call.
**HINT**: Click an alert indicator within the flow to go to a filtered view that includes only the alerts of that type and for that task.
# TAKING ACTION ON TASKS
Most people use Actionabl to respond to alerts and take action on a task. Now that you understand how the information is organized and displayed in the system, let’s examine how to take action.
There are three basic categories of actions:
* **Assignments** specify the user who owns (is responsible for) the task \
*(Claim/Unclaim/Reassign/Assign/Unassign)*
* **Editing** makes changes to the task or its data to move it forward in the process or resolve an error \
(*Edit/Validate/Save/Complete/Resubmit/Discard)*
* **Annotating** adds notes to help other task users or provide historic context to the task \
(*Notes*)
## **Assignments: Claim/Unclaim/Reassign and Assign/Unassign**
Assignment of a task to a user can either be through a user **claiming** a task or from someone else **assigning** it to them.
* Users with the appropriate supervisory permissions can assign or reassign a task to a user.
* Users can claim tasks for themselves or, if they have permission, reassign a task they own to someone else. They can also unclaim a task they currently own.
### ***SLA - Service Level Agreements***
Each process and task in the system has a service-level agreement – referred to as an SLA – associated with it. The SLA timer sets a due date/time for each task. When an item moves into a task step, the SLA’s timer starts; if the time runs out, the item on the task list will show a status of “OVERDUE” and its due date will be red. Completion time is logged for all tasks to provide reporting, as well.
When you **claim** a task, the SLA timer starts as soon as you click Claim. If you **unclaim** a task, the timer stops and is reset to zero for the next claimant of that task. The timer restarts when the item is Claimed by someone else.
If someone else assigns you a task, such as a supervisor using the **Assign** button or another assignee using the **Reassign** button, **your timer on that task does not start until you click the Start button** on the task detail page.
### ***Claiming a Task for Yourself***
1. Click to open the task detail view from any task list.
2. Click **Claim** in the top menu bar.
 3. The task detail screen opens for you to take action, and the item is now listed in your My Tasks module on the dashboard. You now own this task.
 ***Claiming Multiple Tasks At Once***
1. On the task list that shows the items you want to claim, click **Bulk Actions**.
***Claiming Multiple Tasks At Once***
1. On the task list that shows the items you want to claim, click **Bulk Actions**.
 2. Click the checkboxes next to each task you wish to claim, then click **Actions**.\\
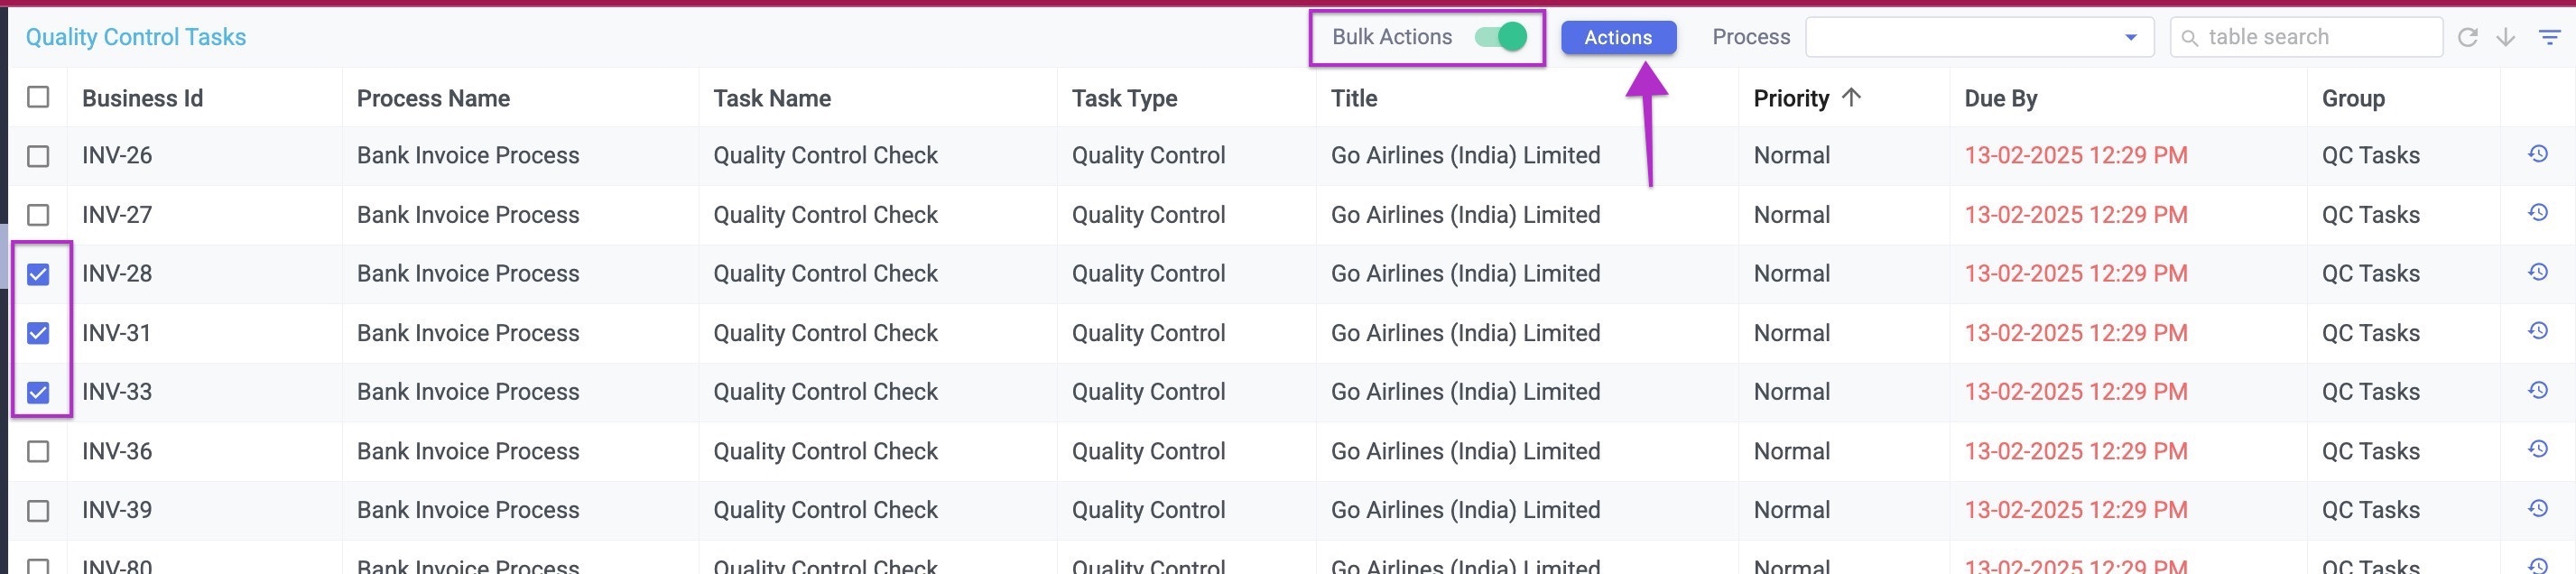 3. Click **Claim** in the pop-up.\\
 4. The items disappear from the list view displayed and are added to the count for your My Tasks list.
### ***Unclaiming Tasks You Own***
When you own a task, you can either Unclaim it or, if you have permission, Reassign it to someone else.
* **Unclaiming** removes the assignment from your queue and leaves the task unassigned, ready for someone else to claim it.
* **Reassigning** places it into someone else’s My Tasks queue. They are not notified of the action, but they will see the task when they look at their queue.
You can do this either through the Task Detail view for a single task or by using Bulk Actions in your My Tasks list.
#### **Unclaim a single task**
In the task detail view, click **Unclaim** in the top action bar to unassign the task.
4. The items disappear from the list view displayed and are added to the count for your My Tasks list.
### ***Unclaiming Tasks You Own***
When you own a task, you can either Unclaim it or, if you have permission, Reassign it to someone else.
* **Unclaiming** removes the assignment from your queue and leaves the task unassigned, ready for someone else to claim it.
* **Reassigning** places it into someone else’s My Tasks queue. They are not notified of the action, but they will see the task when they look at their queue.
You can do this either through the Task Detail view for a single task or by using Bulk Actions in your My Tasks list.
#### **Unclaim a single task**
In the task detail view, click **Unclaim** in the top action bar to unassign the task.
 **Reassign a single task**
1. Click **\<\< More** in the top action bar to open the expanded action menu.\\
**Reassign a single task**
1. Click **\<\< More** in the top action bar to open the expanded action menu.\\
 2. Click **Reassign**, select the user to receive the task from the dropdown list in the popup menu, then click **Submit**. You will only see the Reassign option if you have the appropriate permission level in this process.

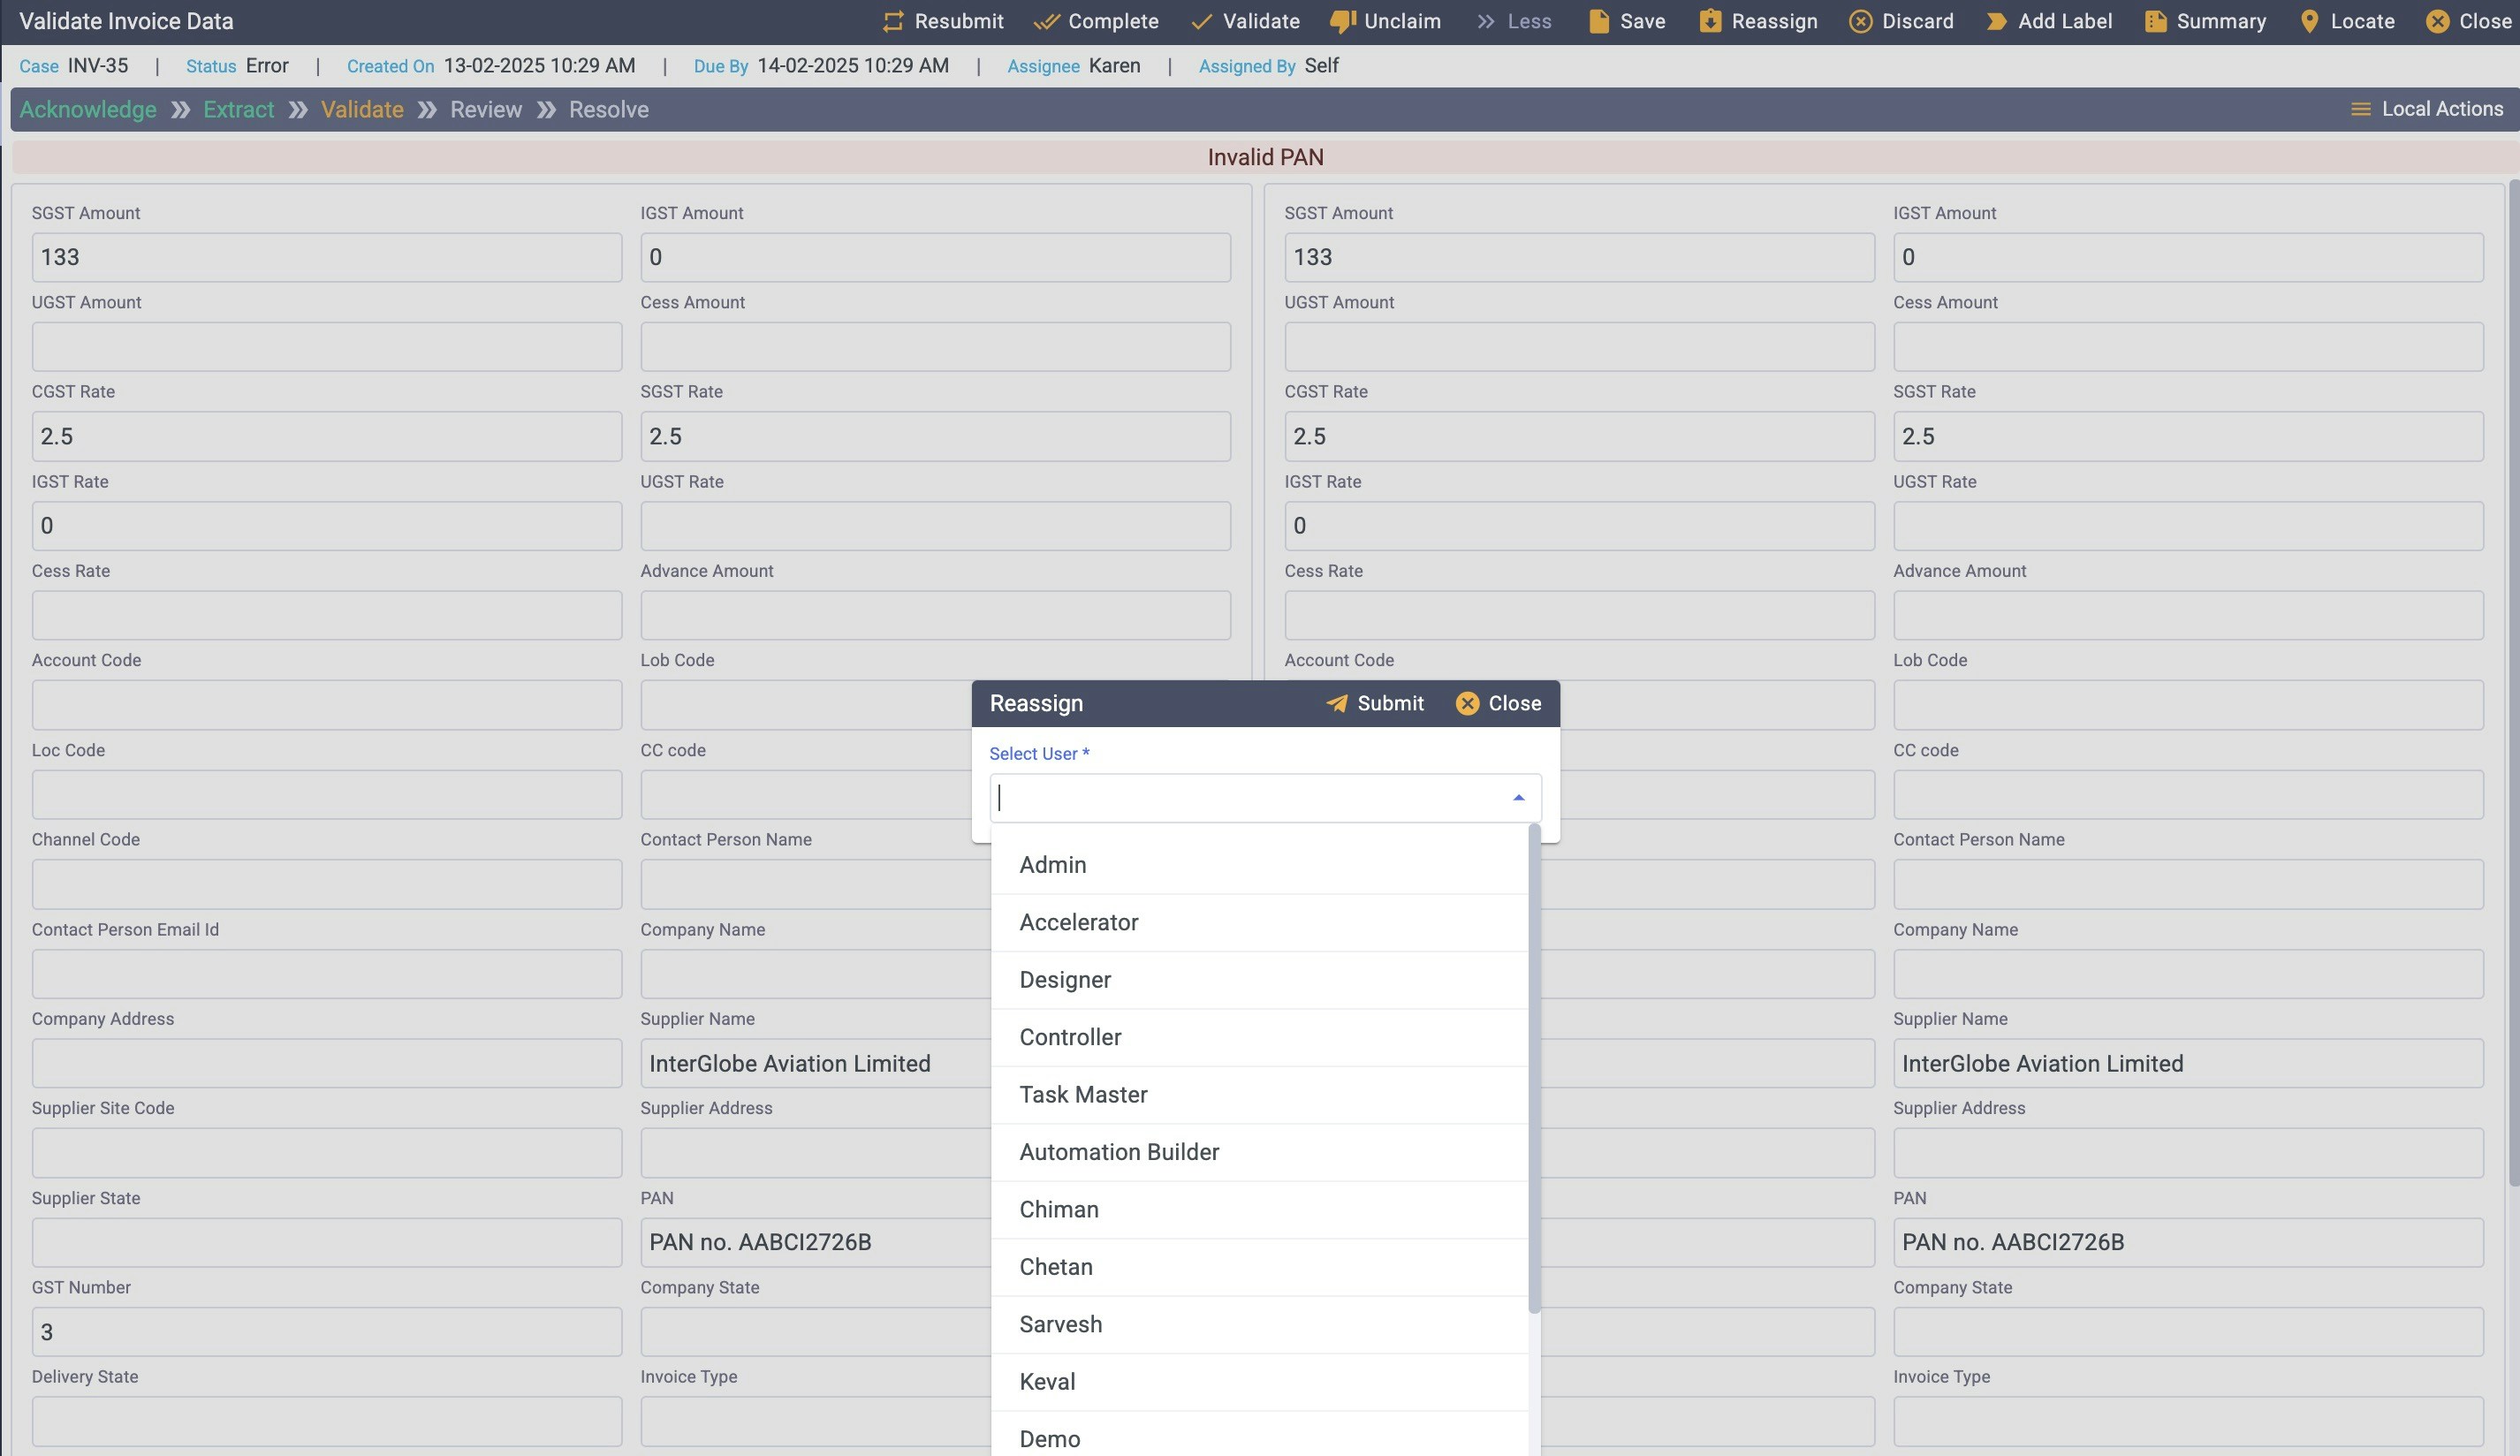 **Unclaim Multiple Tasks**
1. On the My Tasks list, click **Bulk Action** and check the checkboxes next to the items you wish to unassign. Then click the blue Actions button at the top.\\
**Unclaim Multiple Tasks**
1. On the My Tasks list, click **Bulk Action** and check the checkboxes next to the items you wish to unassign. Then click the blue Actions button at the top.\\
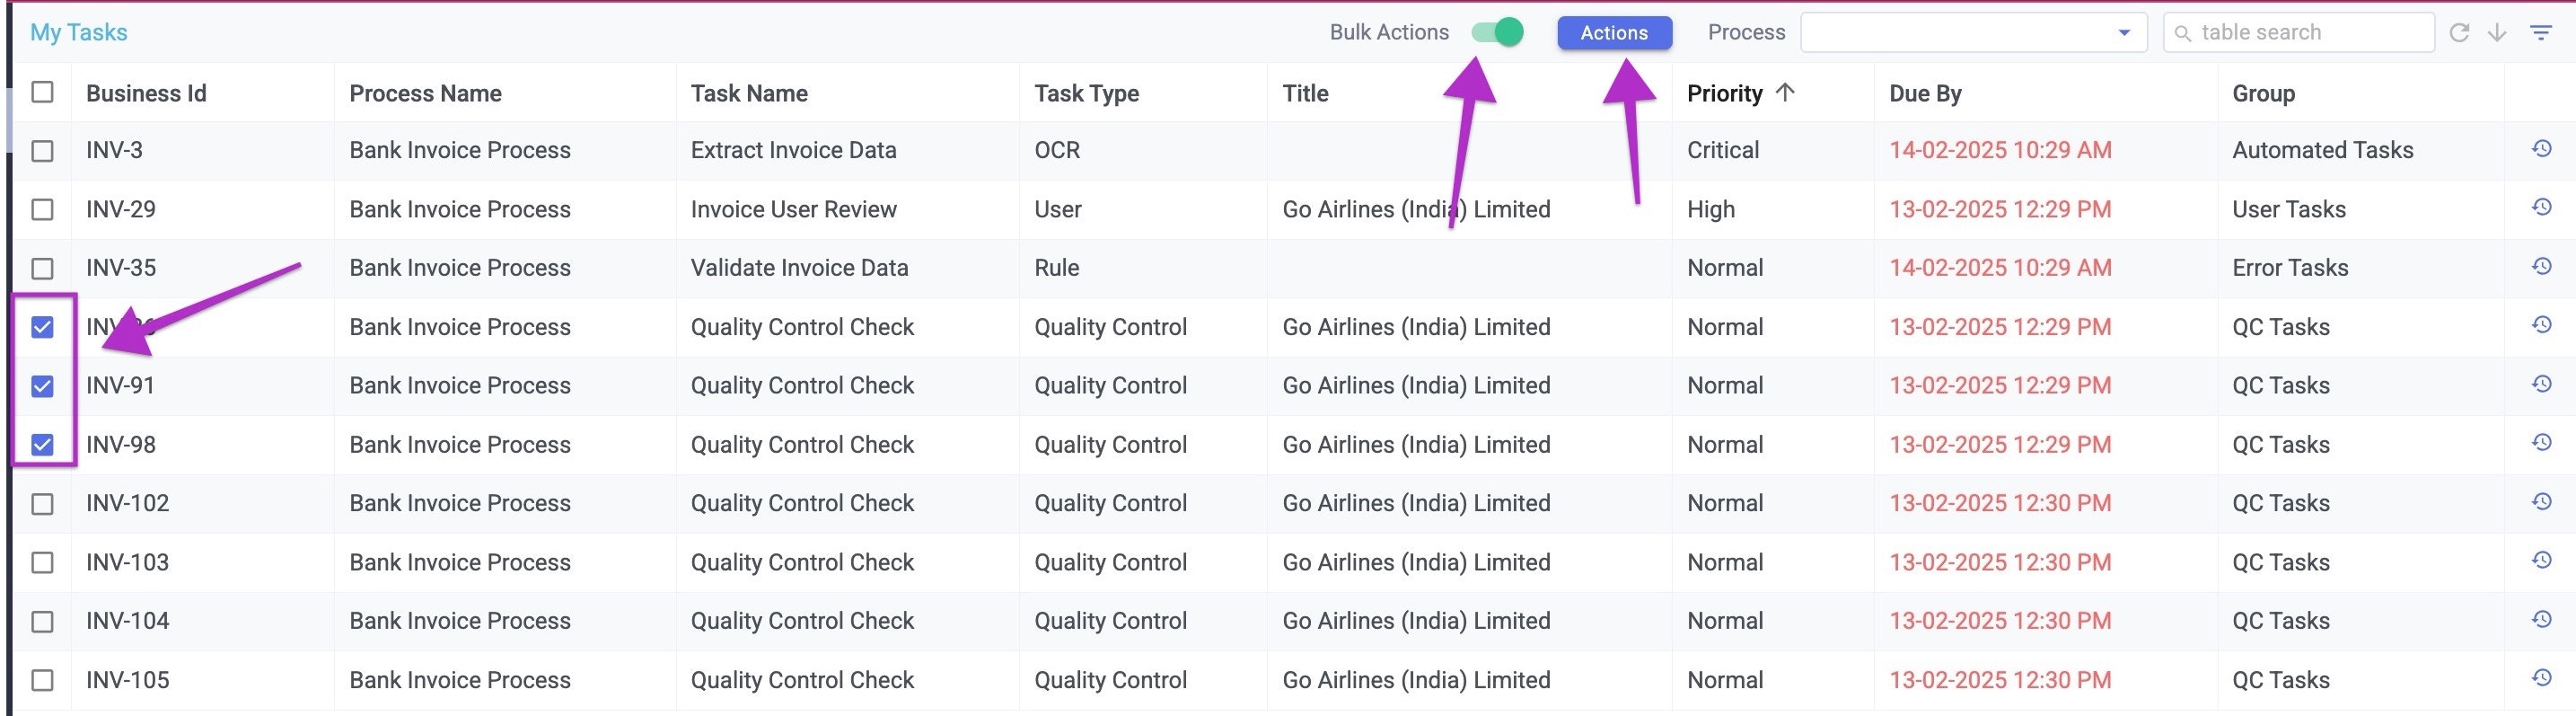 2. Confirm in the popup that you’ve selected the right tasks, then click **Unclaim**. The tasks disappear from your My Tasks listing and are added back to the appropriate task queue(s).
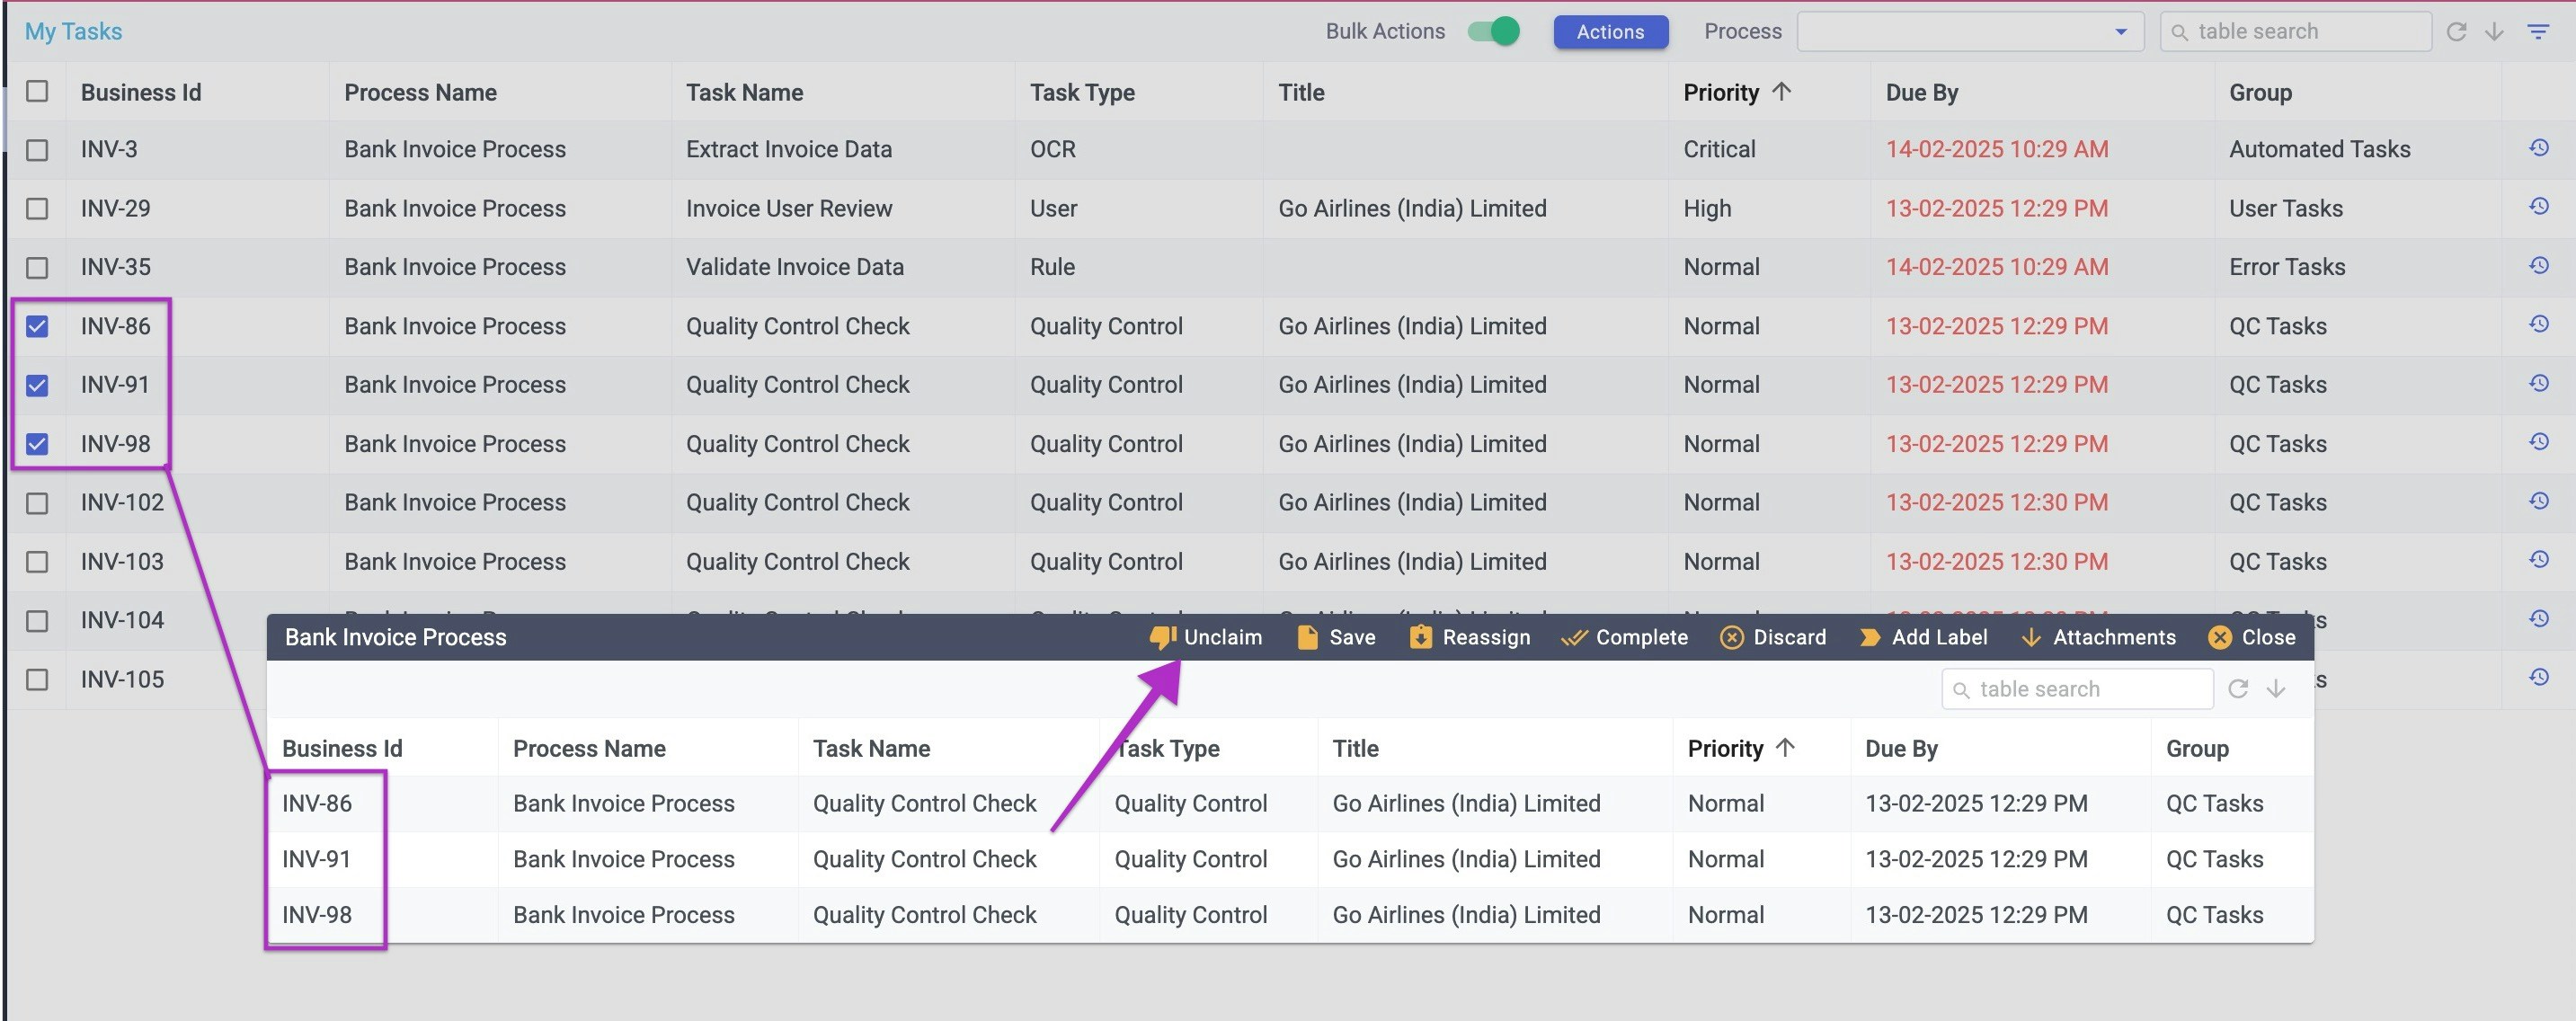 **Reassign Multiple Tasks**
1. On the My Tasks list, click **Bulk Action** and check the checkboxes next to the items you wish to unassign. Then click the blue Actions button at the top.\\
2. Confirm in the popup that you’ve selected the right tasks, click **Reassign**, then select the appropriate assignee in the popup’s dropdown list. Click **Submit** to save the reassignment.\\
**Reassign Multiple Tasks**
1. On the My Tasks list, click **Bulk Action** and check the checkboxes next to the items you wish to unassign. Then click the blue Actions button at the top.\\
2. Confirm in the popup that you’ve selected the right tasks, click **Reassign**, then select the appropriate assignee in the popup’s dropdown list. Click **Submit** to save the reassignment.\\
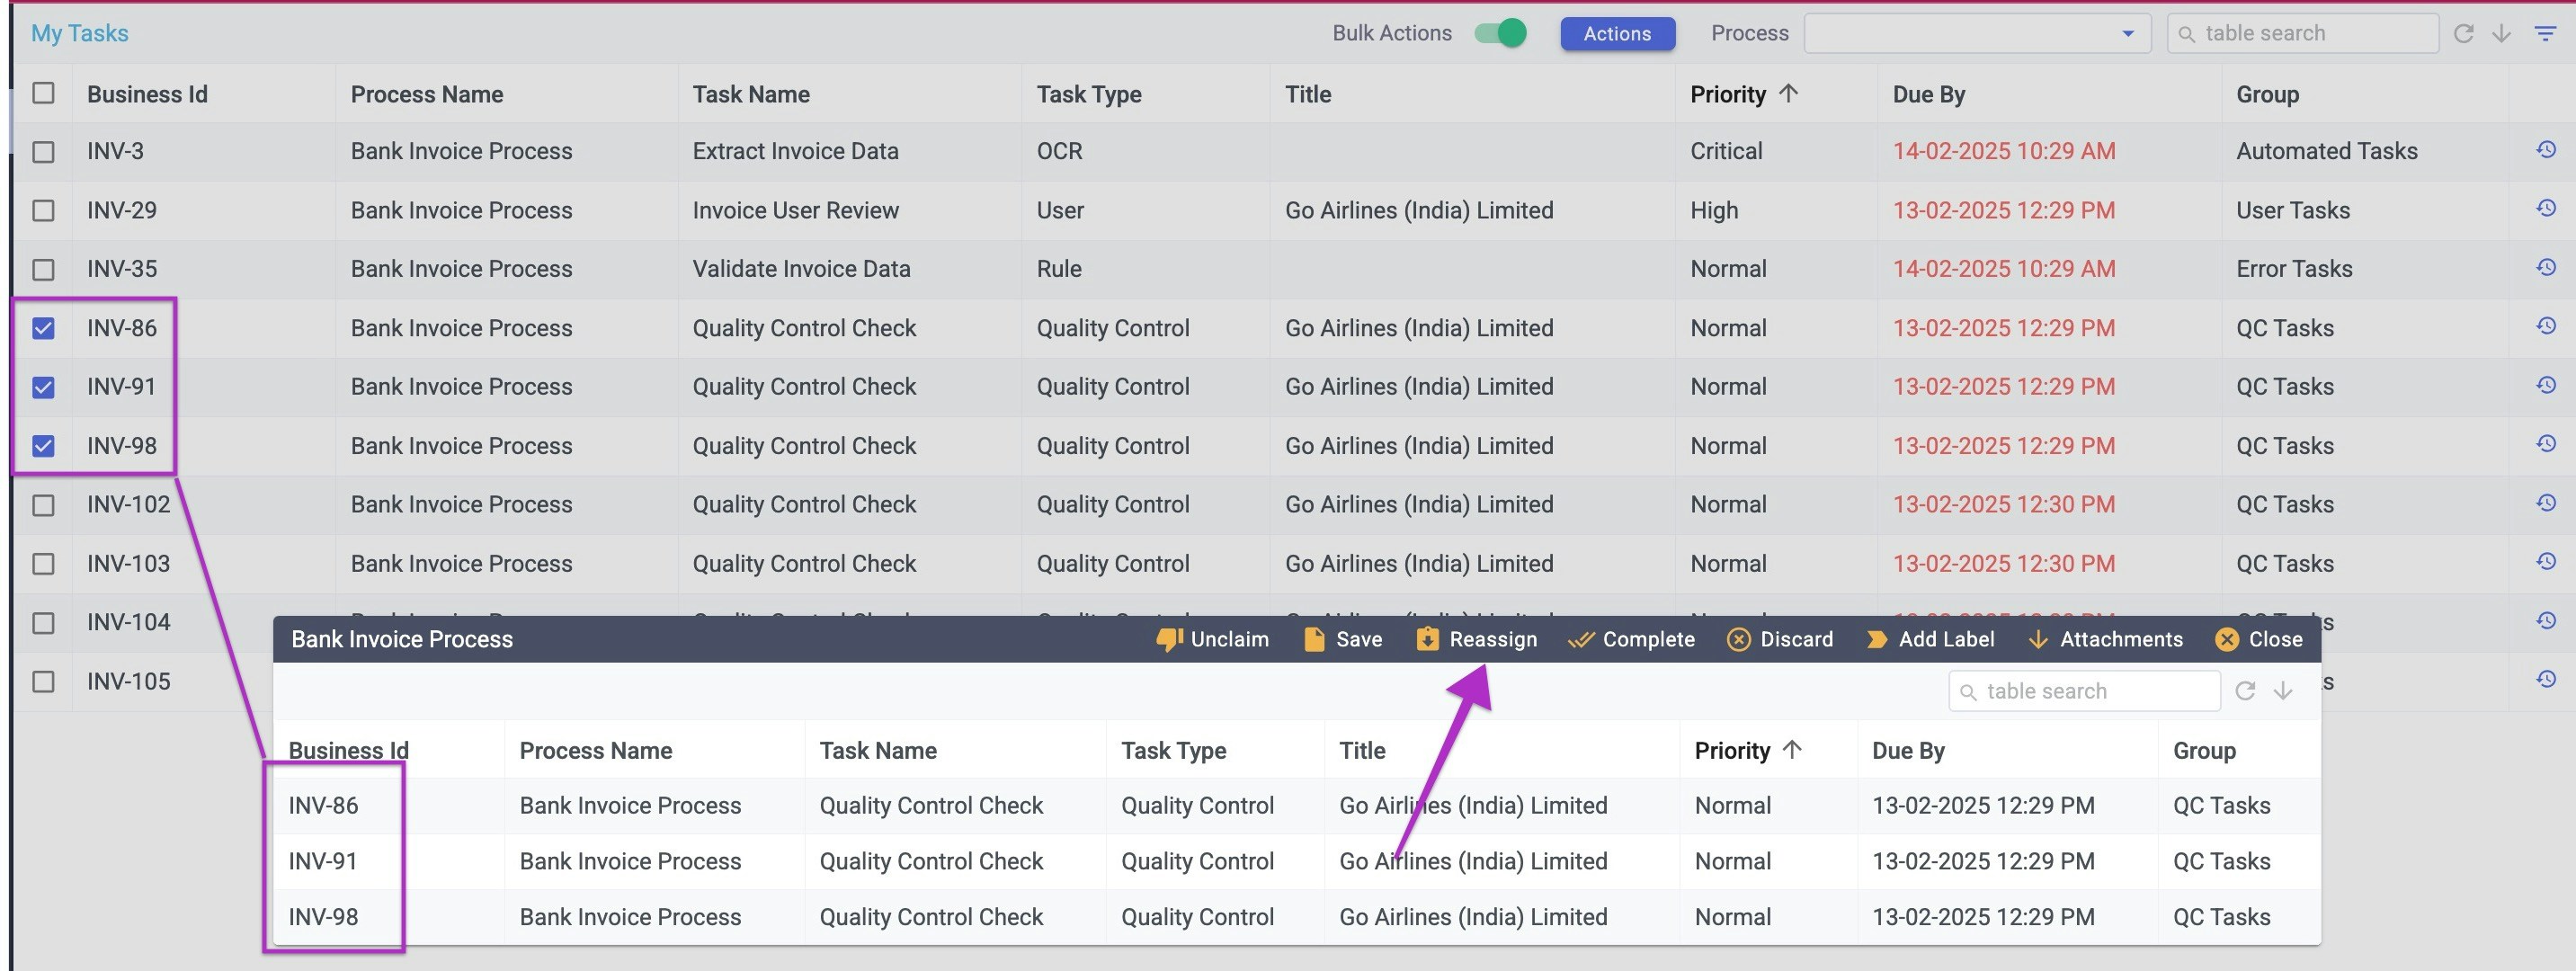
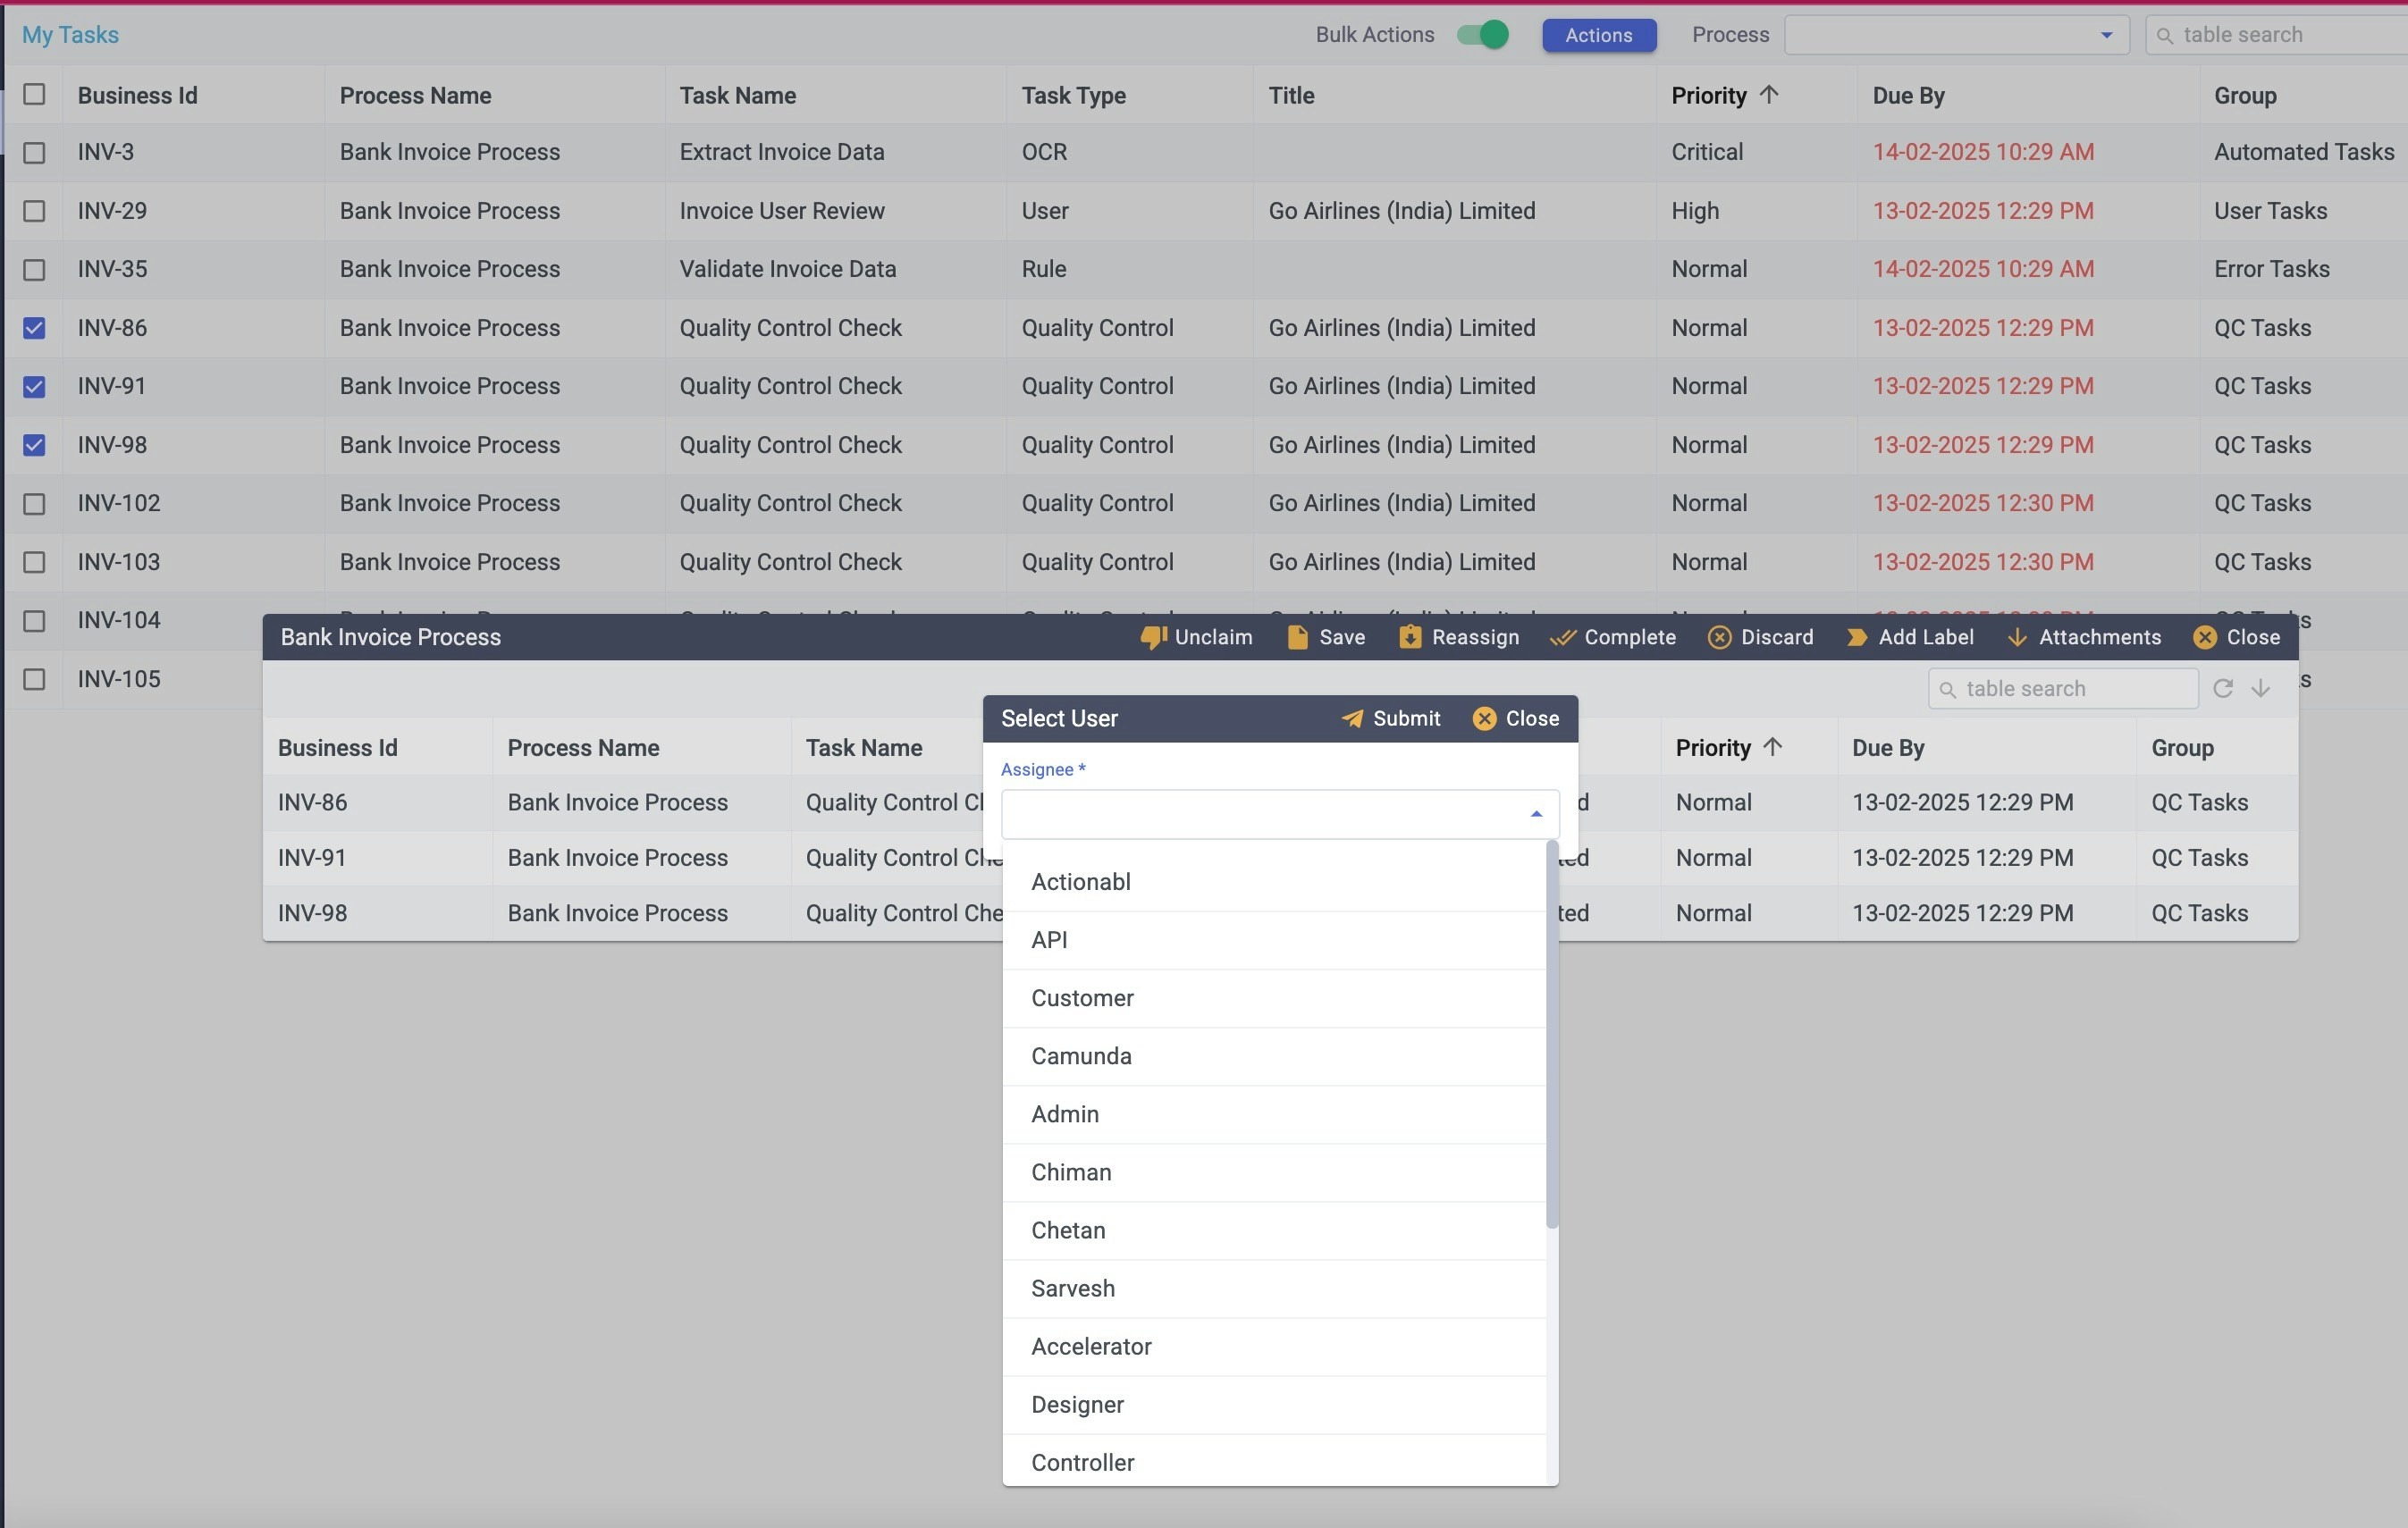 3. Click **Close** to exit the popup, then **Close** again to exit the bulk actions popup.
### ***Assigning Tasks to Other Users***
If you have supervisory rights in the system, you can assign tasks to other users. This works exactly like reassigning items that you own.
#### **Assigning a single task to a user**
1. From the detail screen of any unassigned task, click **\<\< More** to expand the action menu.\\
3. Click **Close** to exit the popup, then **Close** again to exit the bulk actions popup.
### ***Assigning Tasks to Other Users***
If you have supervisory rights in the system, you can assign tasks to other users. This works exactly like reassigning items that you own.
#### **Assigning a single task to a user**
1. From the detail screen of any unassigned task, click **\<\< More** to expand the action menu.\\
 2. Click **Assign**.\\
 3. Select the assignee from the dropdown in the popup, then click **Submit**.\\
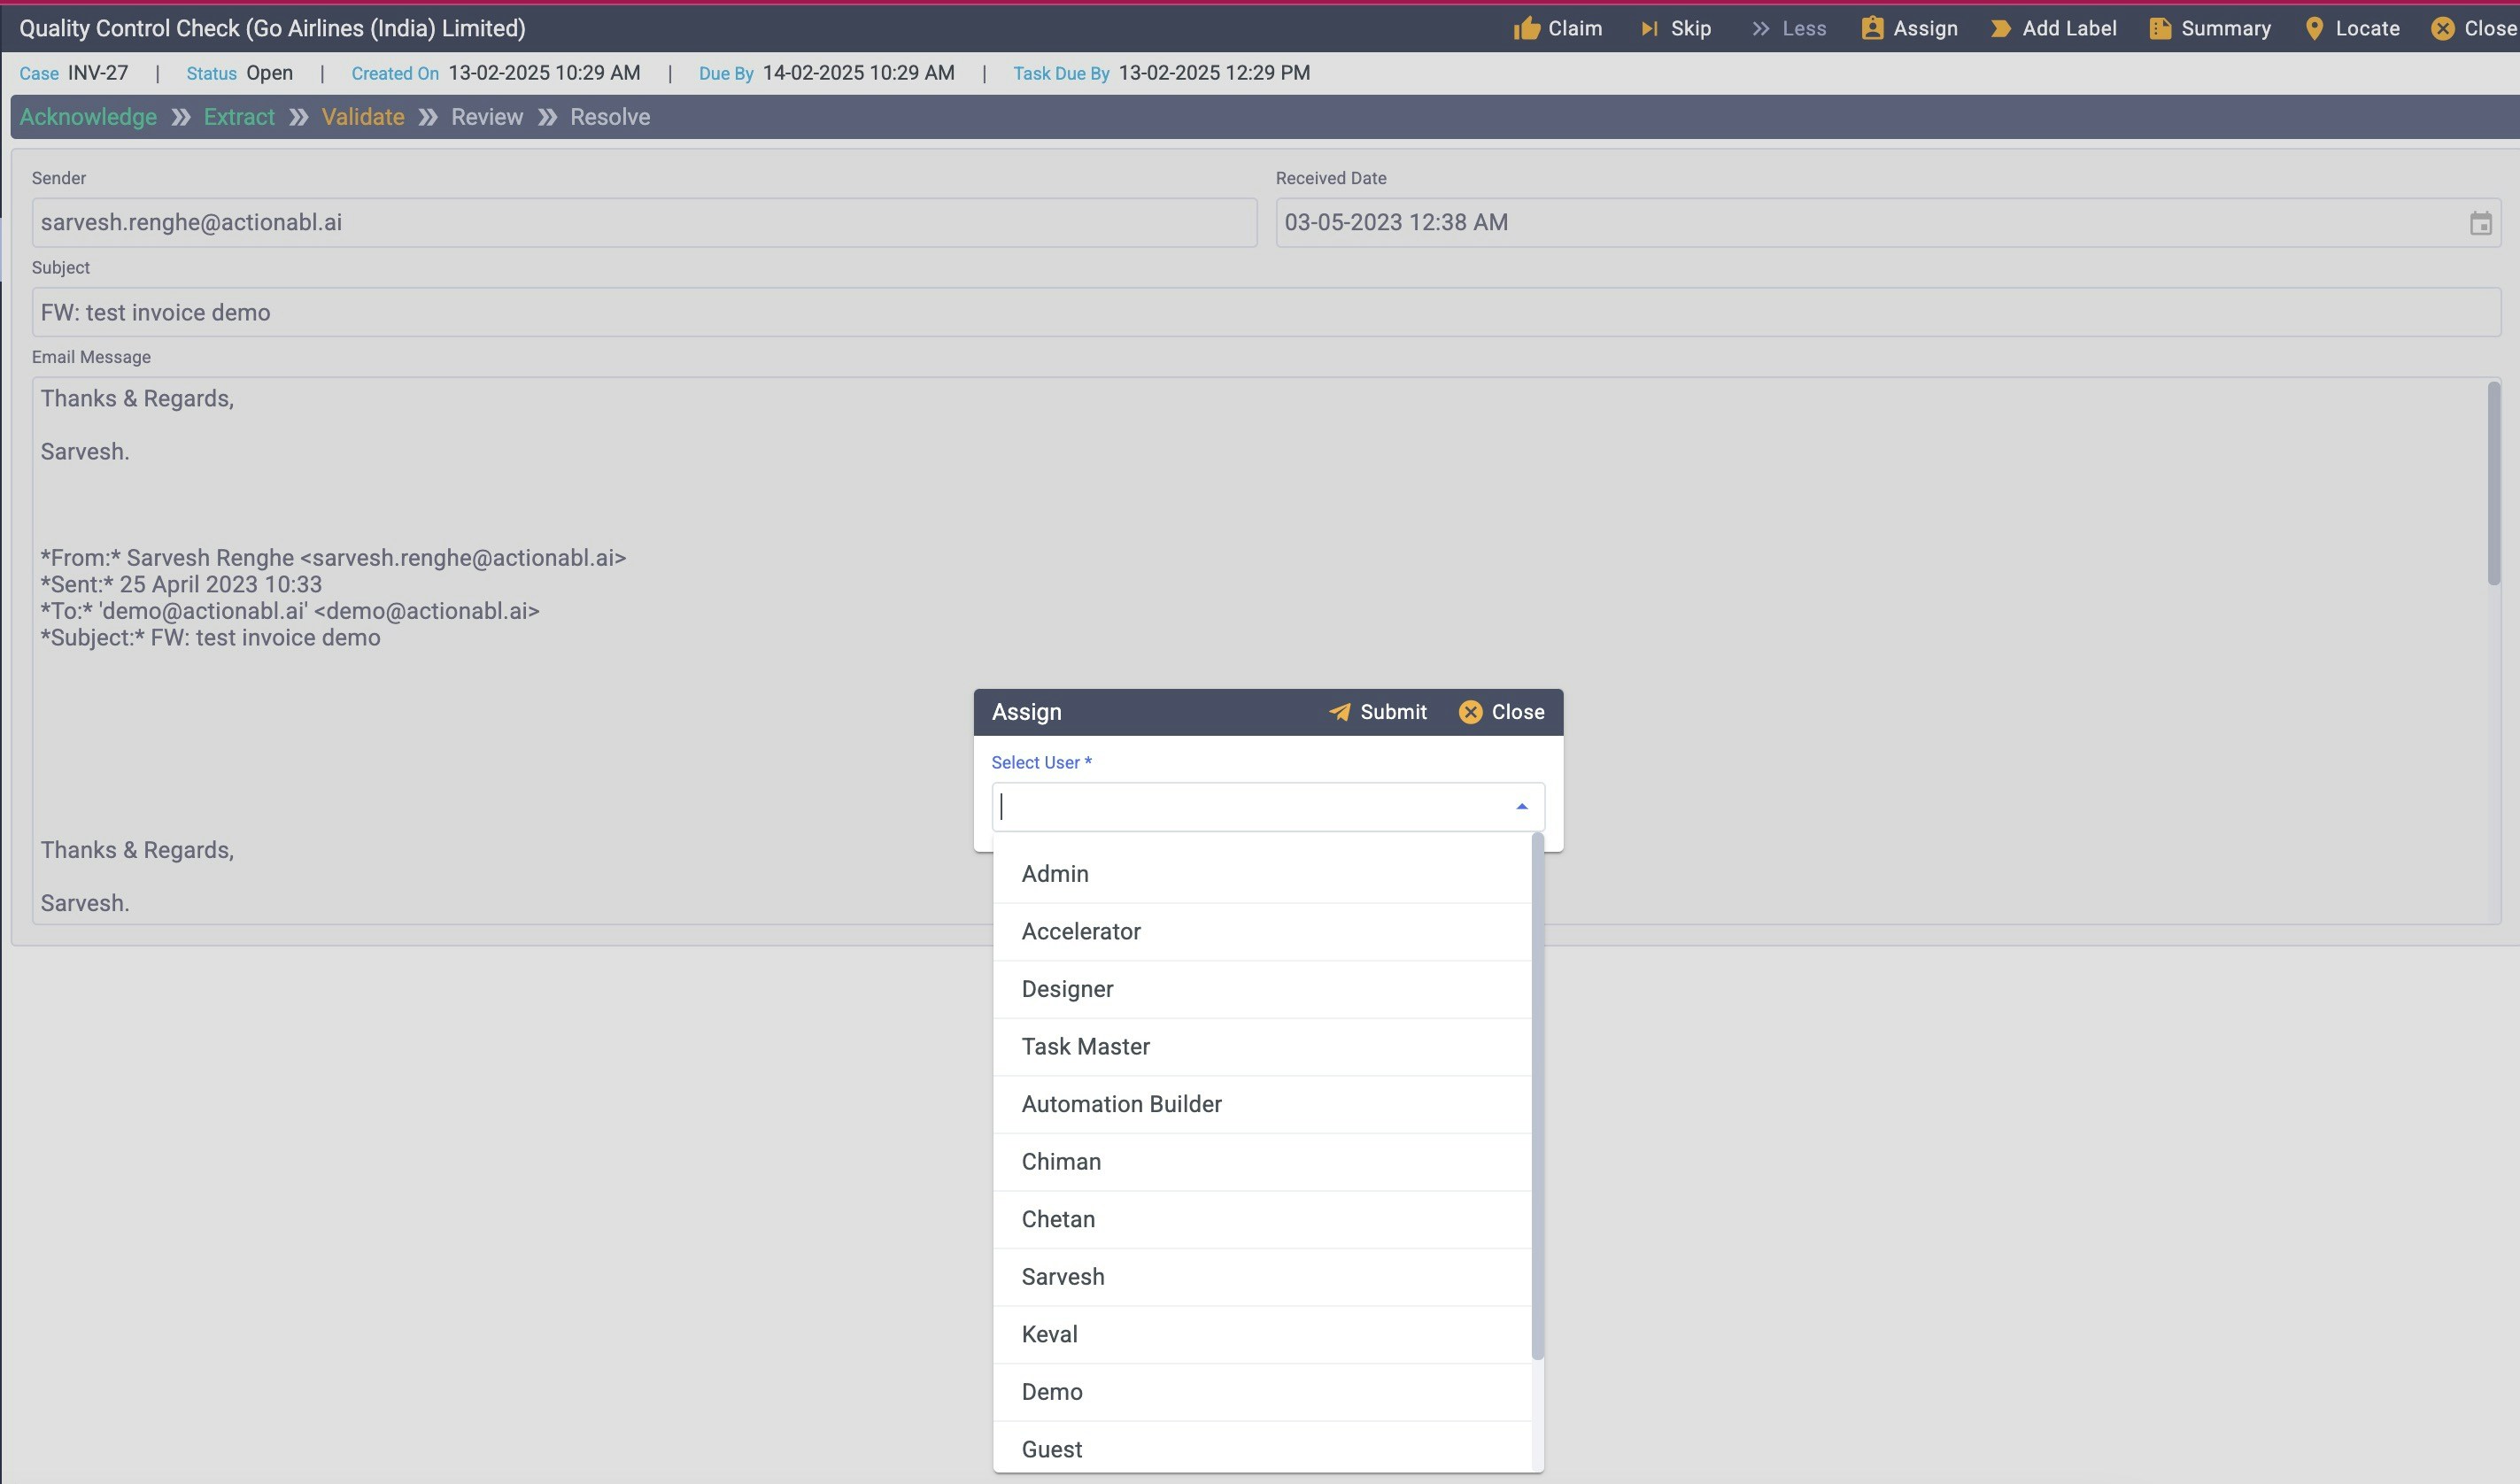 # **Assigning multiple tasks to a user**
You can assign tasks to other users from the general task lists or you can reassign them from the tasks that you have claimed.
1. On the Task List, click **Bulk Action** and click the checkboxes next to the items you wish to assign. Then, click the blue Actions button at the top.\\
# **Assigning multiple tasks to a user**
You can assign tasks to other users from the general task lists or you can reassign them from the tasks that you have claimed.
1. On the Task List, click **Bulk Action** and click the checkboxes next to the items you wish to assign. Then, click the blue Actions button at the top.\\
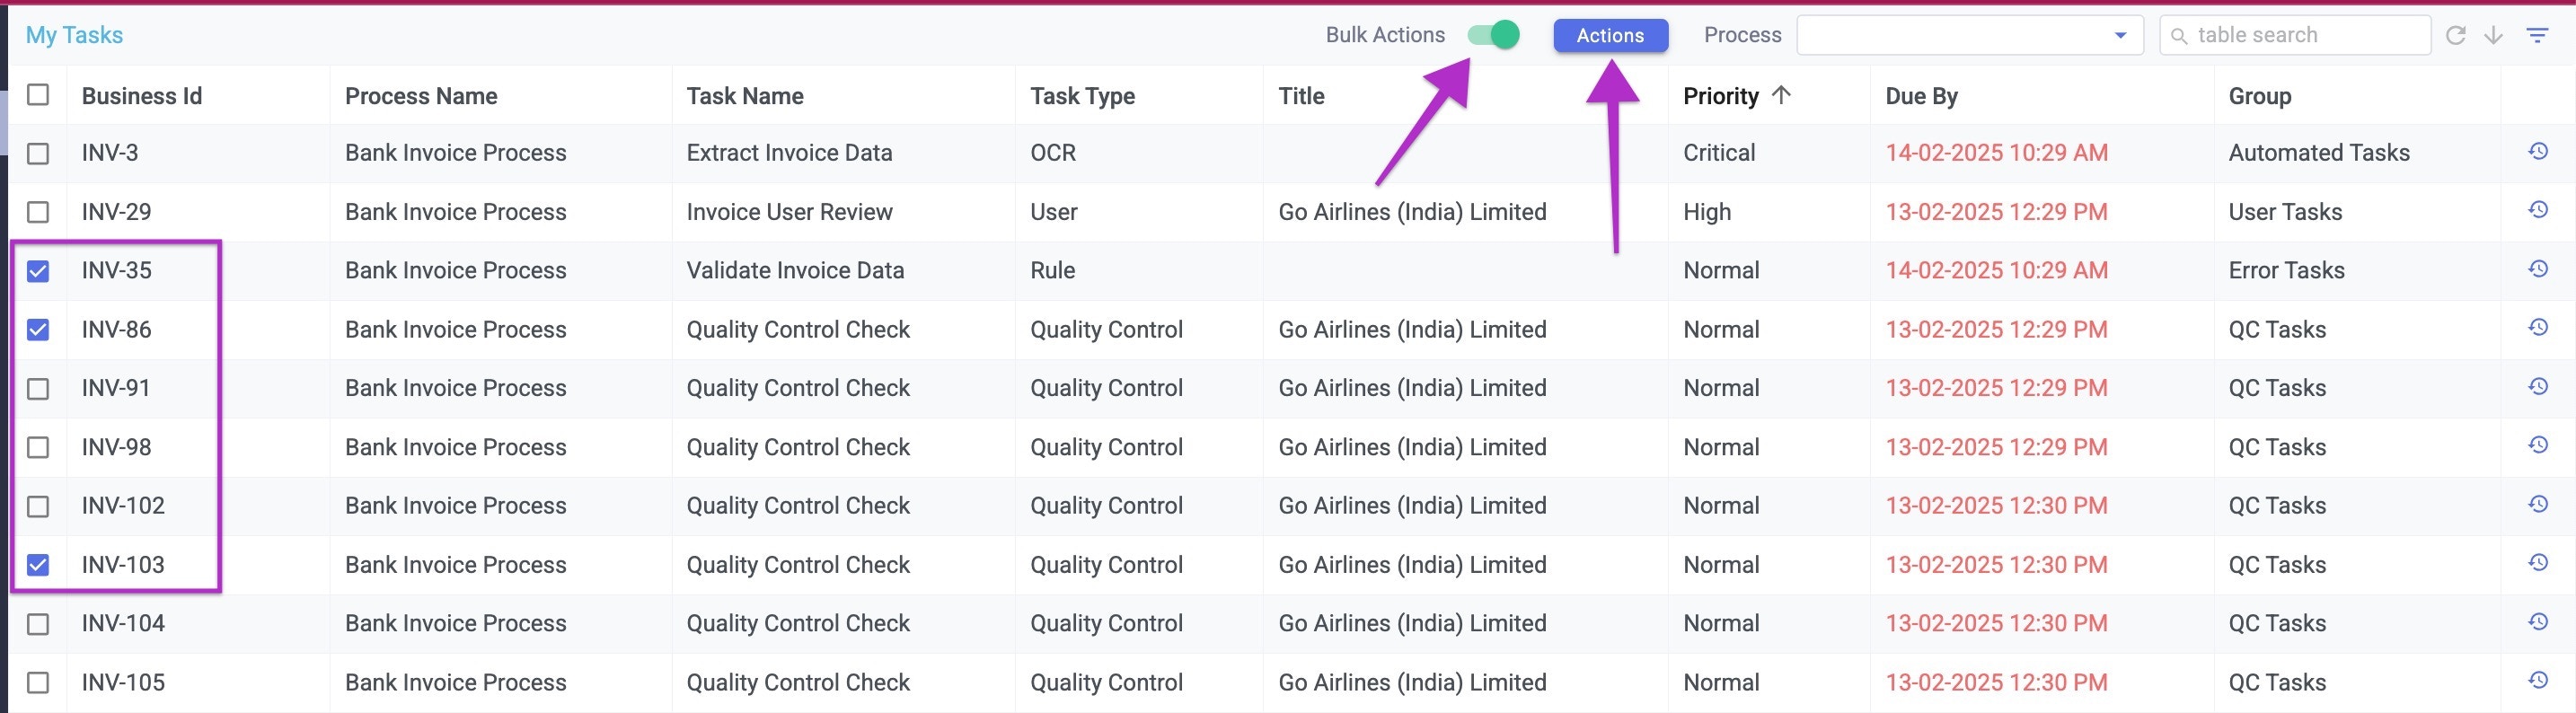 2. Confirm in the popup that you’ve selected the right tasks, click **Assign** (or **Reassign** if you’ve previously claimed them), then select the appropriate assignee in the popup’s dropdown list. Click **Submit** to save the assignment.\\
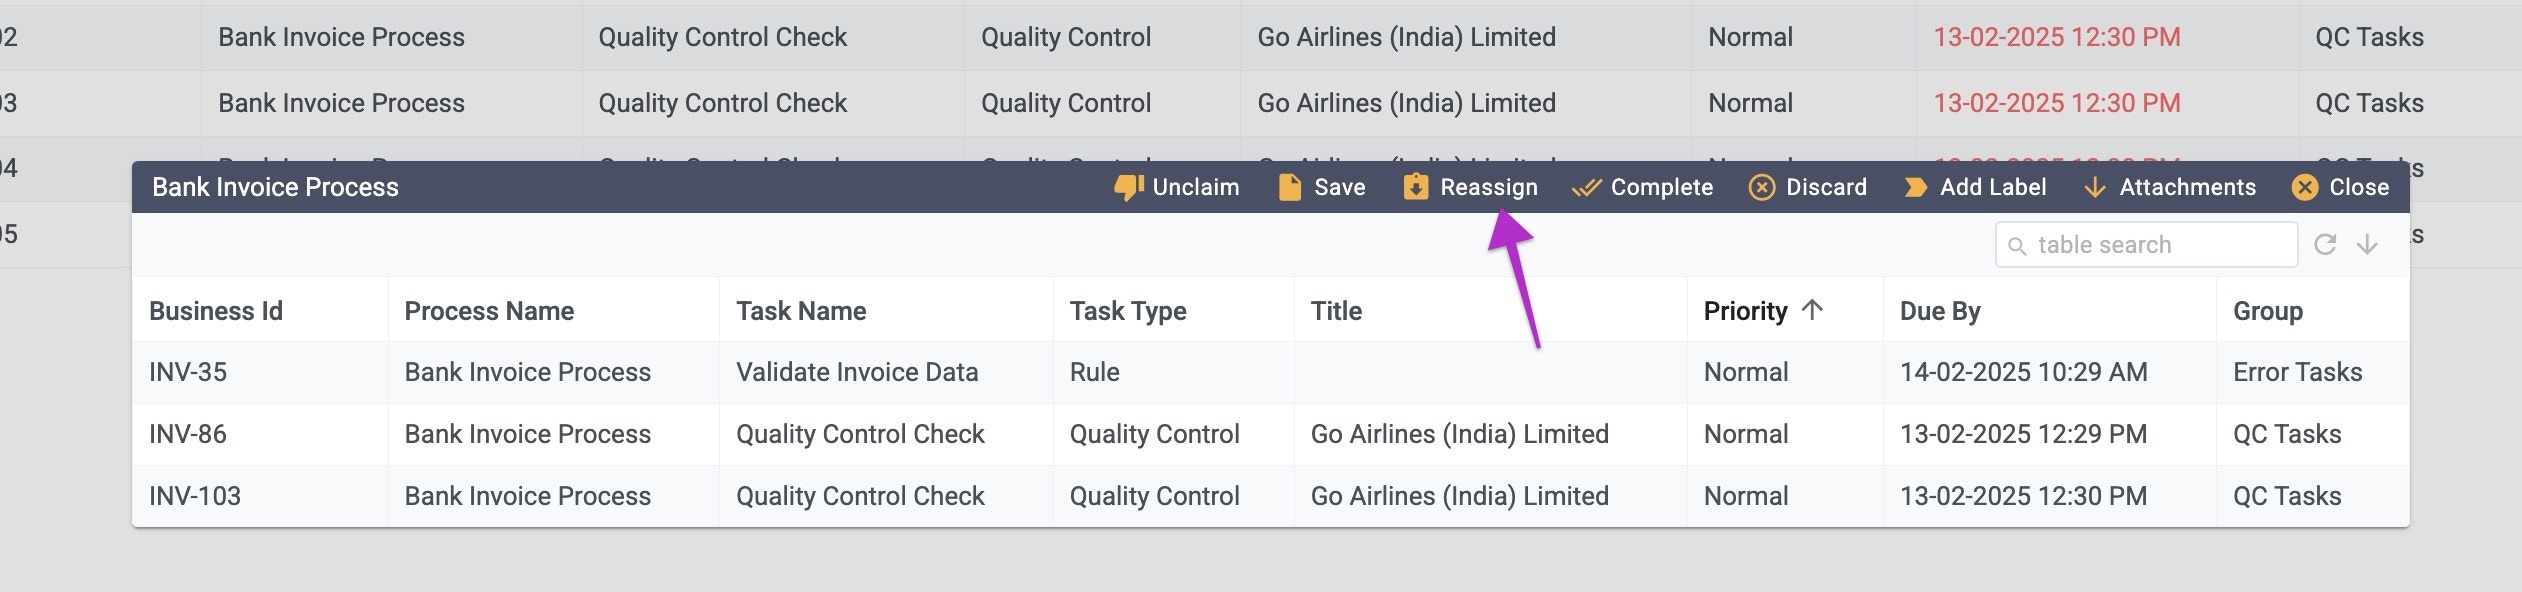 3. Click **Close** to exit the popup, then **Close** again to exit the bulk actions popup.
## **Editing Task Data**
You may need to edit the data of an item that you own to resolve an error or move it forward through the process.
1. Open the task detail for the item you own. (If you do not already own the item, you must first **Claim** it.)
2. If you claimed this task for yourself, you go directly into an editable view. If you were assigned this task by someone else, you must click **Start** in the top menu to begin working on it.
### ***Side By Side Edit View***
For Error tasks, you will see a side-by-side editing view that looks something like this:
3. Click **Close** to exit the popup, then **Close** again to exit the bulk actions popup.
## **Editing Task Data**
You may need to edit the data of an item that you own to resolve an error or move it forward through the process.
1. Open the task detail for the item you own. (If you do not already own the item, you must first **Claim** it.)
2. If you claimed this task for yourself, you go directly into an editable view. If you were assigned this task by someone else, you must click **Start** in the top menu to begin working on it.
### ***Side By Side Edit View***
For Error tasks, you will see a side-by-side editing view that looks something like this:
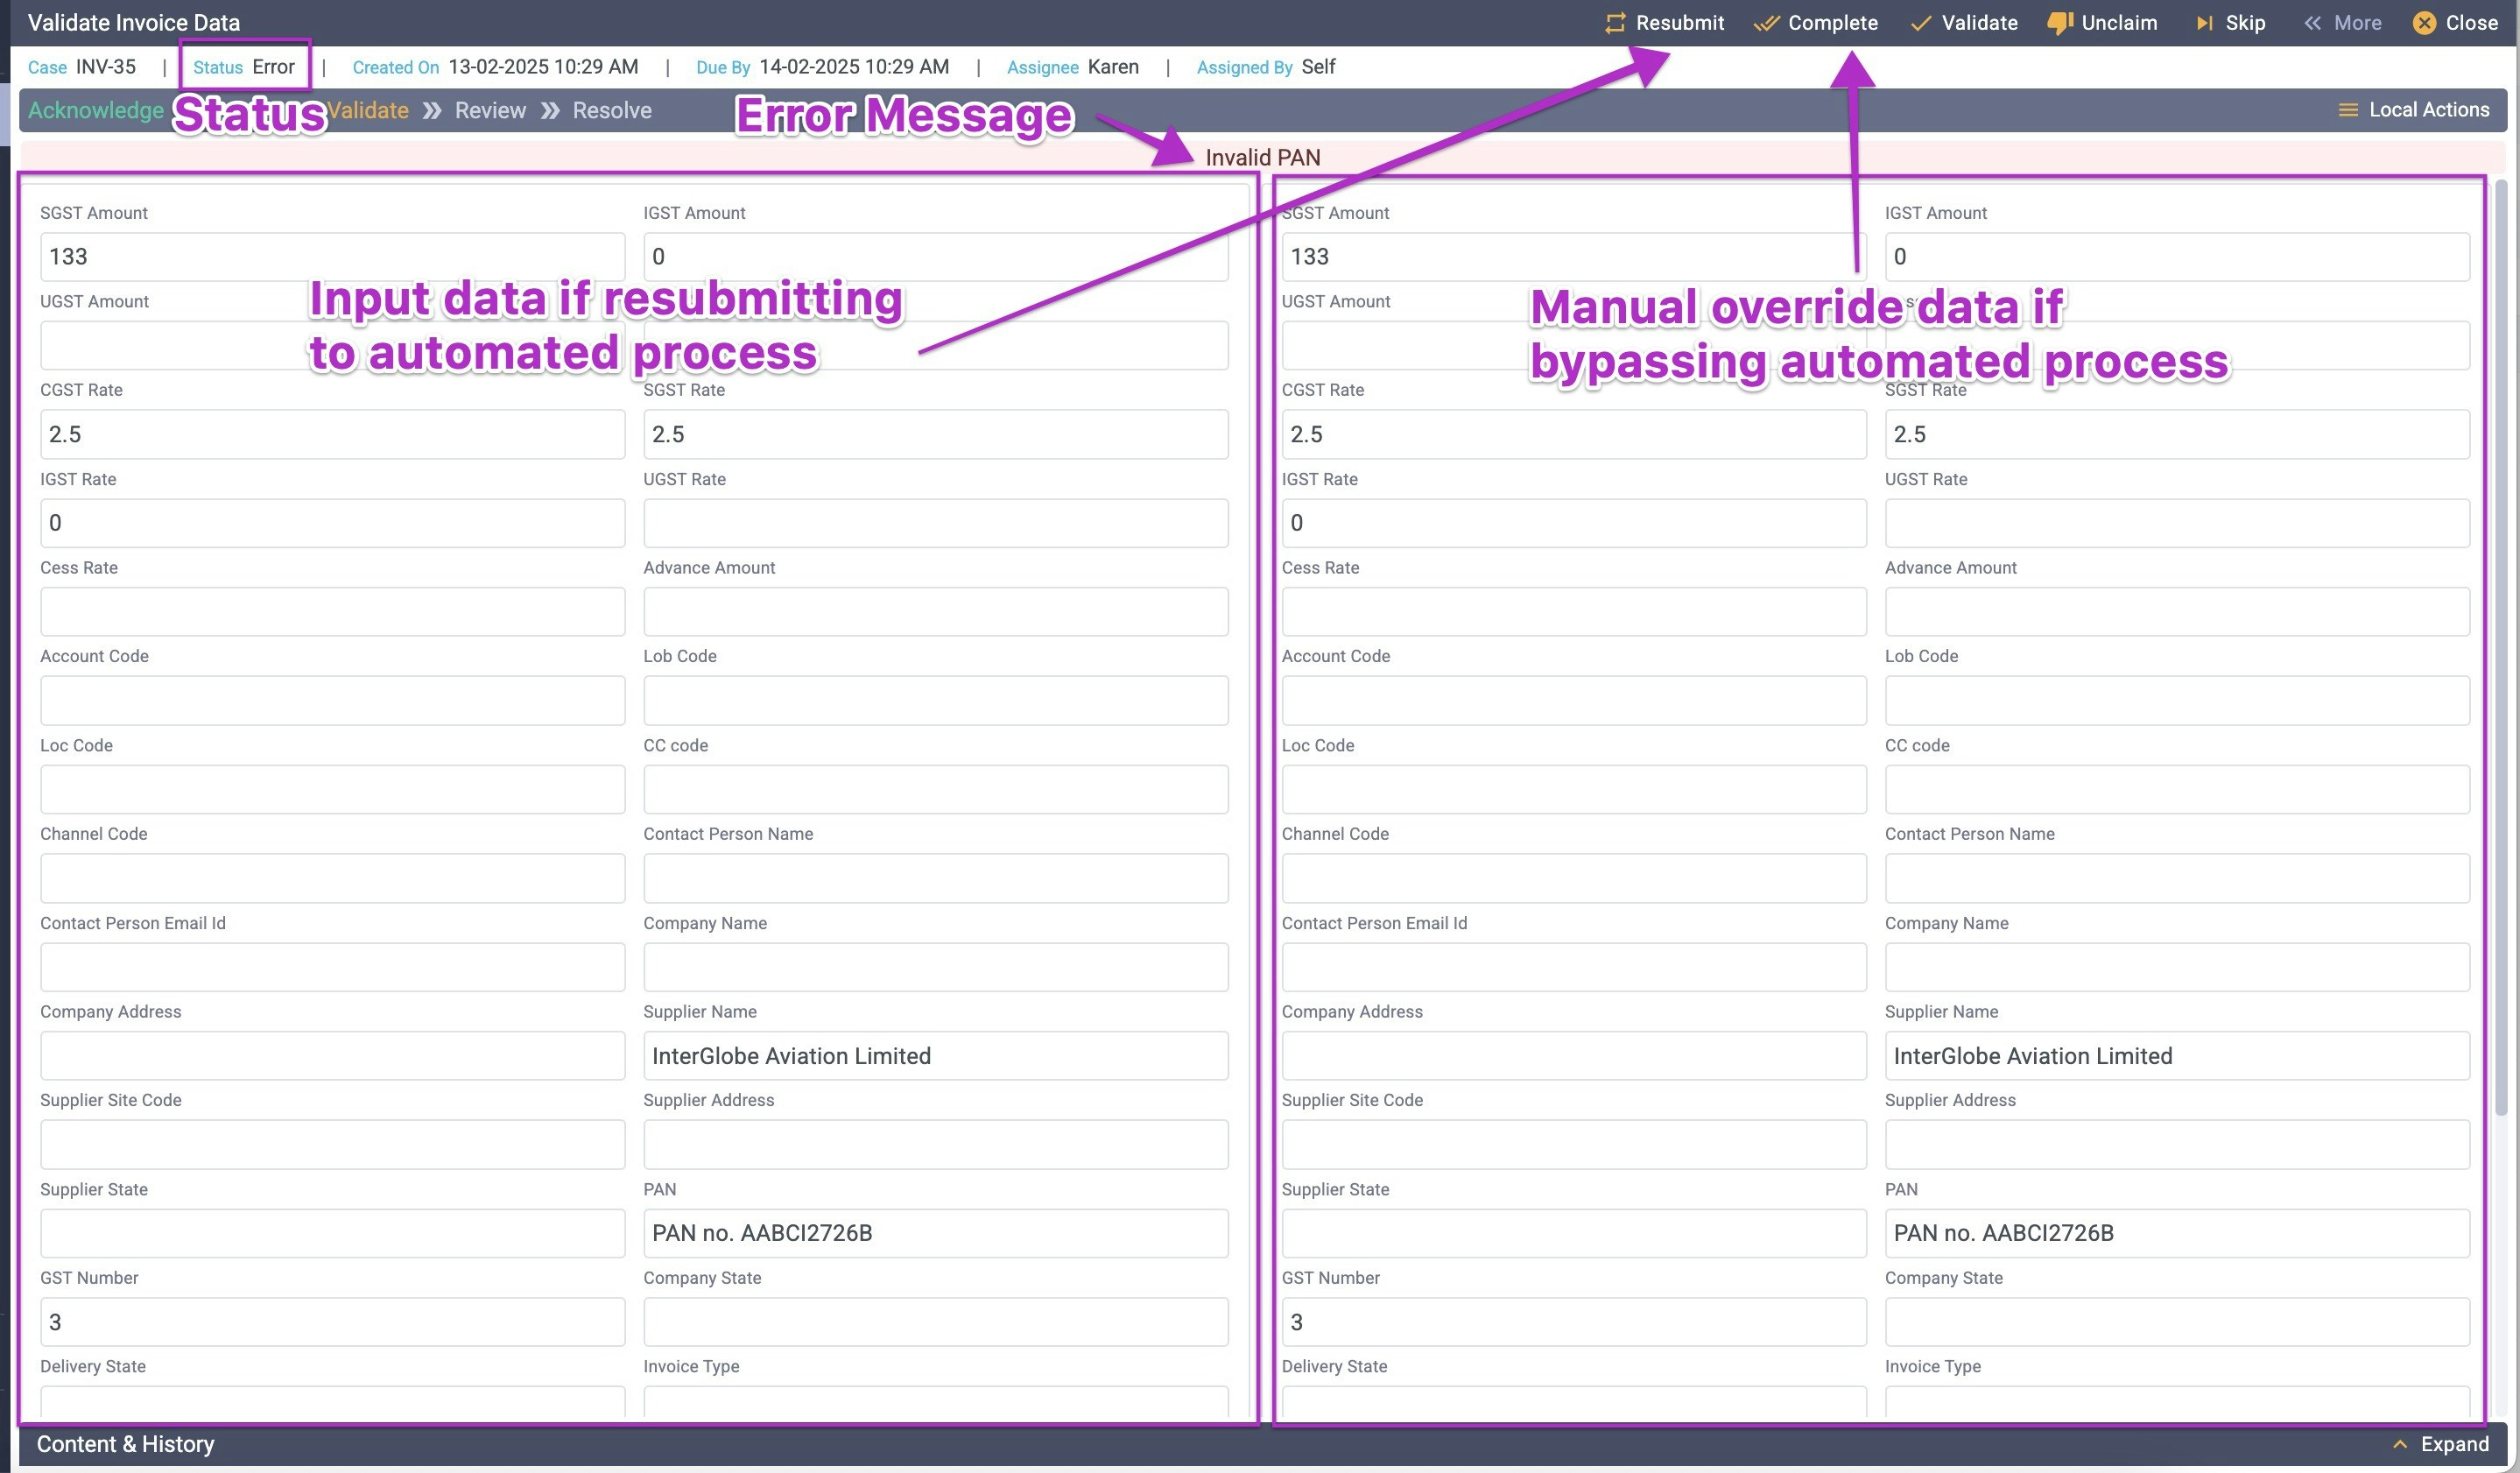 The two sides of the screen start with identical copies of the record’s data. They show the data as it entered the process and up to the point where the error was encountered.
The error to be corrected is at the top (in this case, “Invalid PAN”).
At any point while editing, click **Save** (found under the **\<\< More** menu) to save the changes you have made without attempting any validation or processing of those changes. This does not update the item's status in any way; it simply preserves the work you’ve done so far.
You have two choices in providing the input to resolve the error.
If this item should be corrected and then run back through automated processing, you’ll be using the **RESUBMIT** action. In this case, changes must be made on the **LEFT** side of the screen. This is a typical choice if the process is complex.
Click **Validate** at the top of the screen to check the changes made on the left side of the screen. This ensures that the issue is resolved and that no additional issue is identified before sending this record back through automated processing. Make any additional changes you need to after validating.
1. When you click Validate, if an error is still generated, it will appear in red at the bottom center of the screen.
2. If the task runs successfully with the new data you will see the message “Validations passed successfully” in green at the bottom center of the screen.
Click **Resubmit** to run this corrected data (on the left side of the screen only) back through the same automated task.
If this is a simple change or addition of data within a straightforward process, you may input the data on the **RIGHT** side of the screen and use the **COMPLETE** action. This bypasses further automation in this step and moves the record on to the next step in its flow.
If you are *certain* that the only change needed is the data correction on the right of the screen, click **Complete** to signal that this step is finished and has passed all of the criteria to move to the next task (no further automated validation will be performed in this step).
### ***Direct Editing View***
User and QC tasks do not present their data in a side-by-side view. In this case, the data is organized into groupings and can be directly edited wherever it is found on the screen. Not all fields may be editable, depending on the type of data you’re viewing and how the form’s creator defined its fields. For example, an email’s sender, received date, and message body would typically not be editable.
At any point while you are working on the item, click **Save** (found under the **\<\< More** menu) to save the changes you have made without attempting any validation or processing of those changes. This does not update the item's status in any way; it simply preserves the work you’ve done so far.
The two sides of the screen start with identical copies of the record’s data. They show the data as it entered the process and up to the point where the error was encountered.
The error to be corrected is at the top (in this case, “Invalid PAN”).
At any point while editing, click **Save** (found under the **\<\< More** menu) to save the changes you have made without attempting any validation or processing of those changes. This does not update the item's status in any way; it simply preserves the work you’ve done so far.
You have two choices in providing the input to resolve the error.
If this item should be corrected and then run back through automated processing, you’ll be using the **RESUBMIT** action. In this case, changes must be made on the **LEFT** side of the screen. This is a typical choice if the process is complex.
Click **Validate** at the top of the screen to check the changes made on the left side of the screen. This ensures that the issue is resolved and that no additional issue is identified before sending this record back through automated processing. Make any additional changes you need to after validating.
1. When you click Validate, if an error is still generated, it will appear in red at the bottom center of the screen.
2. If the task runs successfully with the new data you will see the message “Validations passed successfully” in green at the bottom center of the screen.
Click **Resubmit** to run this corrected data (on the left side of the screen only) back through the same automated task.
If this is a simple change or addition of data within a straightforward process, you may input the data on the **RIGHT** side of the screen and use the **COMPLETE** action. This bypasses further automation in this step and moves the record on to the next step in its flow.
If you are *certain* that the only change needed is the data correction on the right of the screen, click **Complete** to signal that this step is finished and has passed all of the criteria to move to the next task (no further automated validation will be performed in this step).
### ***Direct Editing View***
User and QC tasks do not present their data in a side-by-side view. In this case, the data is organized into groupings and can be directly edited wherever it is found on the screen. Not all fields may be editable, depending on the type of data you’re viewing and how the form’s creator defined its fields. For example, an email’s sender, received date, and message body would typically not be editable.
At any point while you are working on the item, click **Save** (found under the **\<\< More** menu) to save the changes you have made without attempting any validation or processing of those changes. This does not update the item's status in any way; it simply preserves the work you’ve done so far.
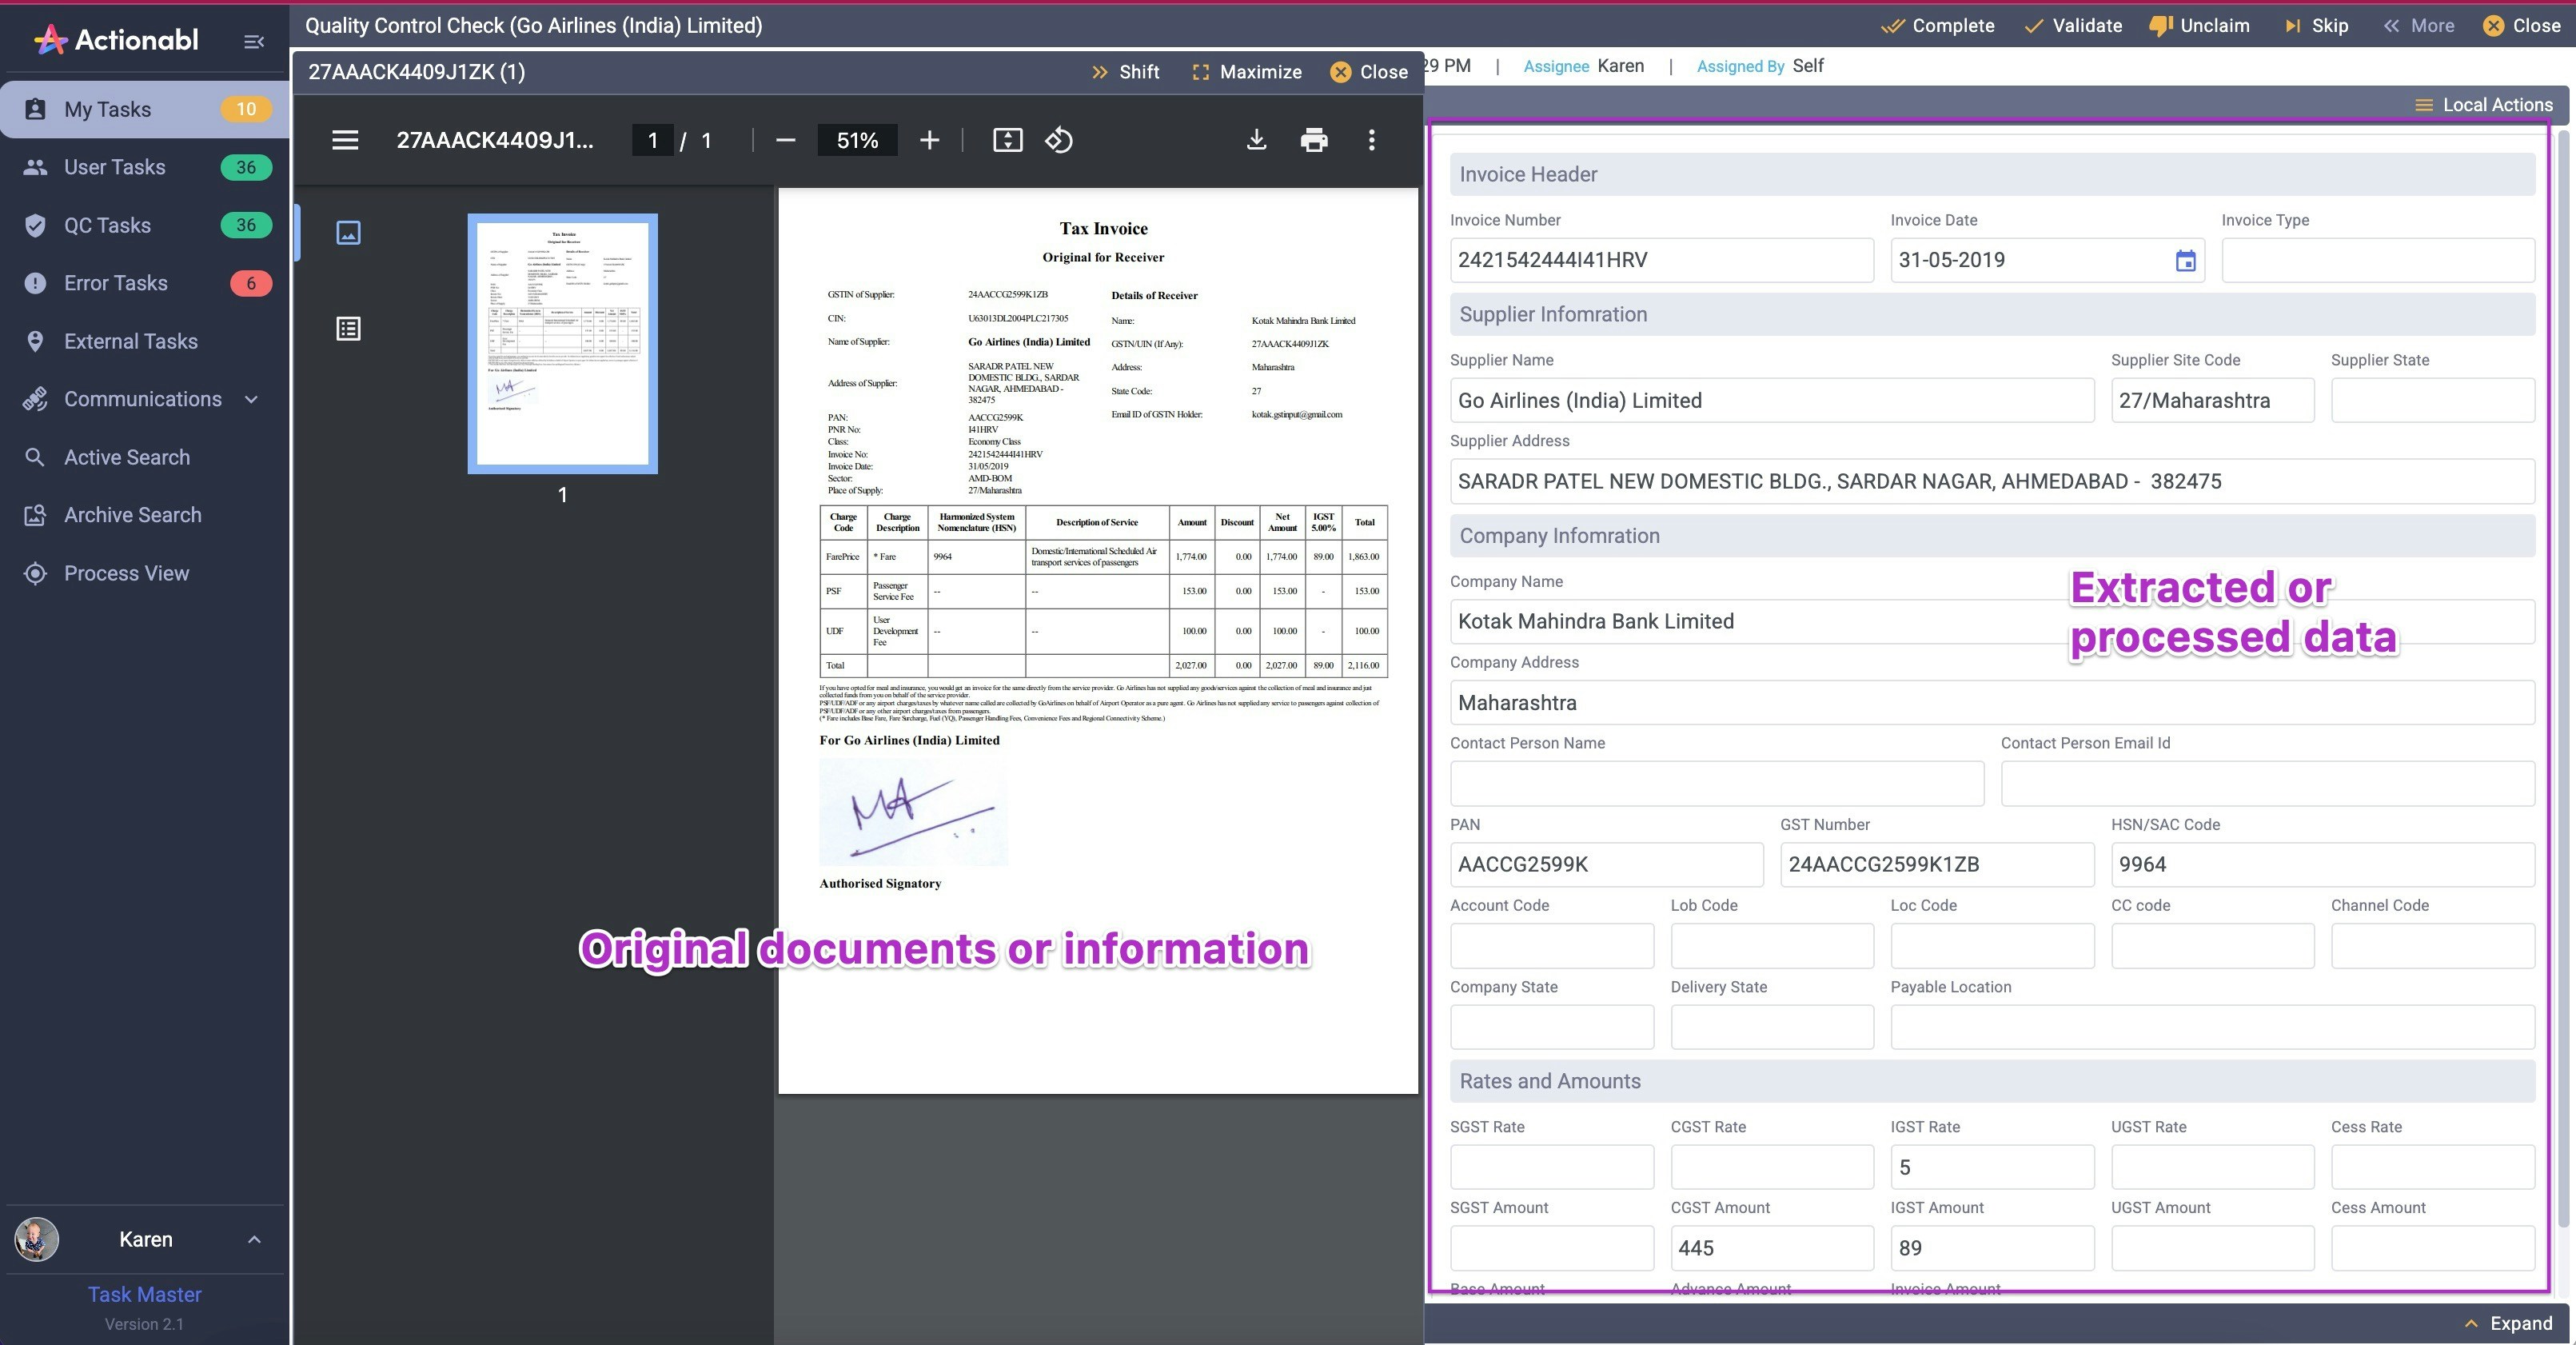 Click **Validate** at the top of the screen to check your changes. This ensures that no additional issue is identified before sending this record to the next step.
1. When you click Validate, if an error is generated, it will appear in red at the bottom center of the screen.
2. If the task runs successfully with the new data you will see the message “Validations successful” in green at the bottom center of the screen.
Your company's form validation rules for this process determine how fields are validated, saved, and errors displayed.
After validating the work, click **Complete** to save the task and move it along to its next processing step.
## **Summary**
The Summary gives you an at-a-glance view of the data involved in the task. This can be useful when investigating or resolving an issue and may also be the primary screen involved in some QC tasks.
From the task detail, click **\<\< MORE** in the top menu bar, then click **Summary**.
Click **Validate** at the top of the screen to check your changes. This ensures that no additional issue is identified before sending this record to the next step.
1. When you click Validate, if an error is generated, it will appear in red at the bottom center of the screen.
2. If the task runs successfully with the new data you will see the message “Validations successful” in green at the bottom center of the screen.
Your company's form validation rules for this process determine how fields are validated, saved, and errors displayed.
After validating the work, click **Complete** to save the task and move it along to its next processing step.
## **Summary**
The Summary gives you an at-a-glance view of the data involved in the task. This can be useful when investigating or resolving an issue and may also be the primary screen involved in some QC tasks.
From the task detail, click **\<\< MORE** in the top menu bar, then click **Summary**.
 The Summary screen shows all data fields for this task and their contents. Once you have reviewed the data, click **Close** to return to the task detail view.
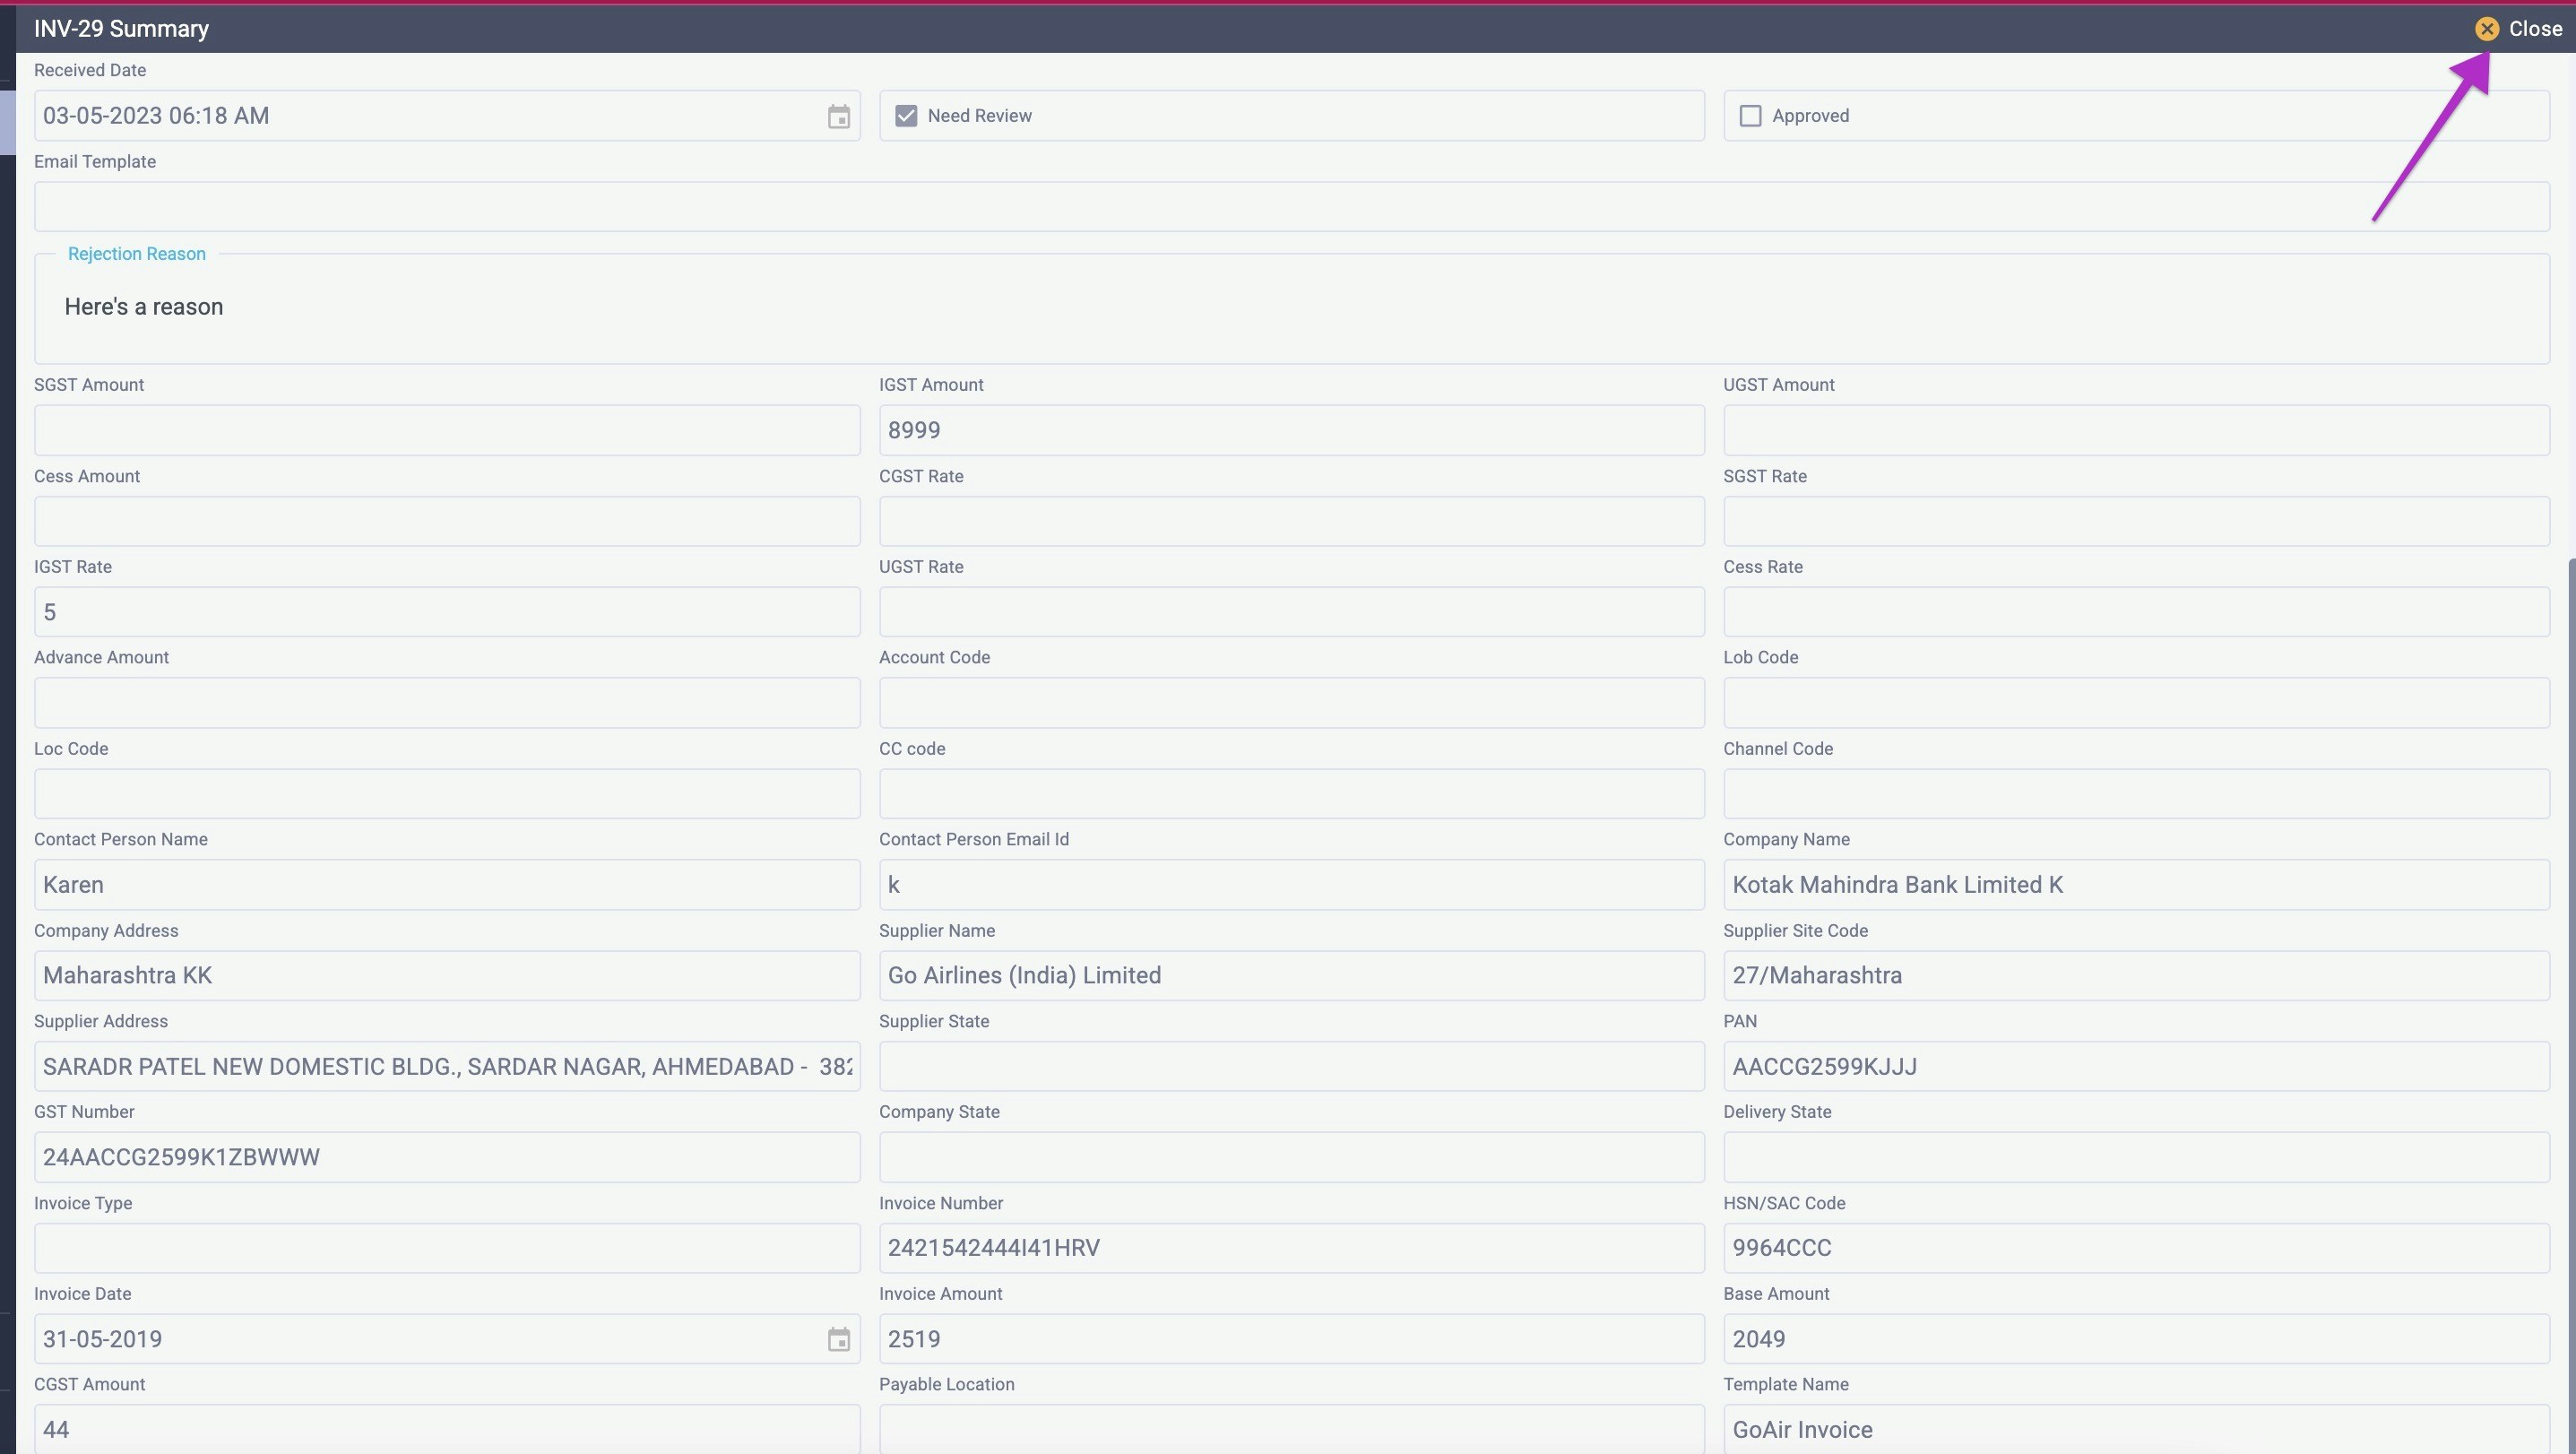 ## **Locate**
The Locate view orients you to where this item currently resides in the overall flow. It brings you to a Progress Map to see the item’s progress.
In the top menu bar, click **\<\< MORE,** then click **Locate**.
## **Locate**
The Locate view orients you to where this item currently resides in the overall flow. It brings you to a Progress Map to see the item’s progress.
In the top menu bar, click **\<\< MORE,** then click **Locate**.
 The progress map highlights the current task for this item in gold for QC and User tasks or red for Error tasks. Tasks that have been completed successfully are green. Future tasks are in pale yellow.
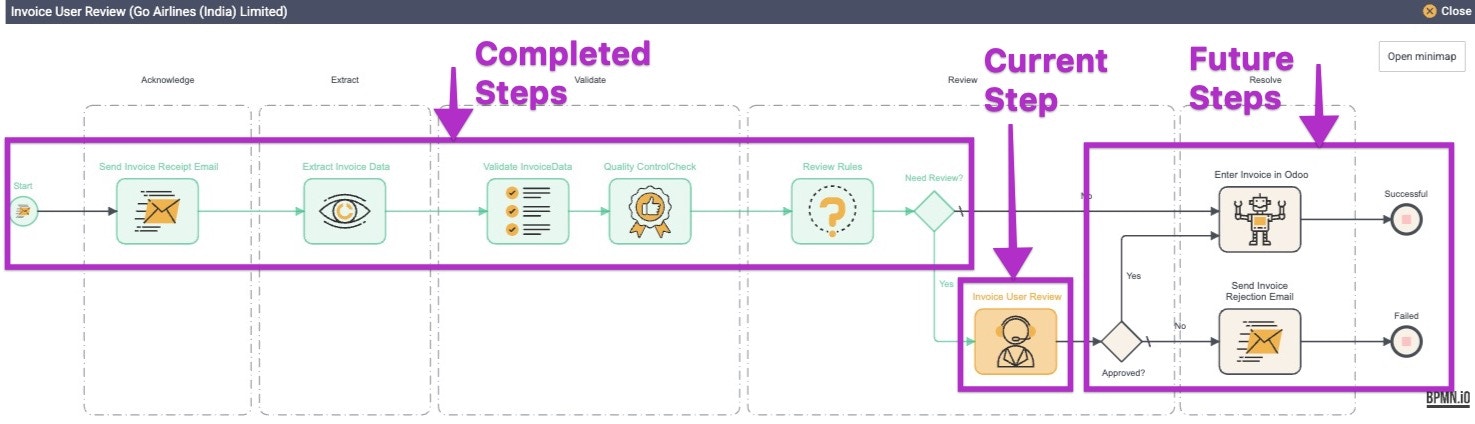 **Handling Tasks**
The exact steps to resolve any QC or User task will depend on your business processes and instructions for that task.
### ***QC Tasks***
QC tasks usually involve some type of inspection of the data, including attachments and notes, or even a physical artifact such as a proof or prototype.
When you click on a QC task that you own:
1. Review the item data you see and make any appropriate updates.
2. After making updates, click **Validate**. This performs field-level validation to ensure that all data is in the correct format and that no required fields are left blank.
3. You can then click **\<\< MORE** and **Save** to save your changes until you are ready to finish your work on this item.
4. Click **\<\< MORE** and **Add Label** to label the item. Labels can then be used in searches and filters.
5. Click on **Content & History** at the bottom of the screen to review any **Notes,** **Attachments**, and **Emails** related to the item.
6. Complete any offline processes your business requires you to do as part of this task.
7. When you are finished:
* Resolve the item and move it to the next process task by clicking **Complete**.
* If appropriate, you can **Discard** the item, which removes it from the process. The item is still found by Active Search with a status of “discarded.” (Click **\<\< MORE** and then **Discard**)
### Business Exception (User) Tasks
In most cases, User tasks are business exceptions that require a person to manually resolve an issue. For example, if an OCR task can’t fully read the data from a scanned document due to poor scanning quality, a User Task may be generated to re-scan the item.
User tasks can also be manual steps like reviewing results and issuing a payment or shipping out a sample.
When you click on a User Task that you own:
1. Review the item data you see and any information at the top of the screen.
2. Click on **Content & History** at the bottom of the screen to review any **Notes**, **Attachments**, and **Emails** related to the item.
3. Make whatever updates are required to resolve the item. Click **Validate** after making updates to ensure the data is correct. Also, **Save** your work (under **\<\< MORE**) if you have other steps to do or are otherwise not quite ready to finish this task.
4. Add any labels to the task under **\<\not see Error Tasks related to system processes or technical problems.
When you click on an Error Task that you own:
1. Review the error message at the top of the screen, then the item data you see.
2. Click on **Content & History** at the bottom of the screen to review any **Notes,** **Attachments**, and **Emails** related to the item.
3. Make the updates required to resolve the problem. **Save** your work if you have other steps to do or are otherwise not quite ready to finish this task.
4. Add any needed labels by clicking **\<\< MORE** and then **Add Label**. Labels can then be used in searches and filters.
5. Click **Validate** after making updates to ensure the data is correct if you plan to resubmit the item to run back through this process.
6. Complete any offline processes your business requires you to do as part of this task.
7. Resolve the item when you are finished:
* **Resubmit** it to send it back through this automated step with the corrections you’ve made. This will revalidate and reprocess the step completely.
* Bypass automated re-processing and move it to the next process task by clicking **Complete**. This indicates that you have verified that all of the processes within this step have been successfully completed, manually or otherwise.
If more appropriate, you can **Discard** the item, which removes it from any further processing steps. (Click **\<\< MORE** and then **Discard**)
## **Making Notes on Tasks**
Annotations on tasks may be key to resolving issues or answering future questions. They are an important tool to use whenever something unusual occurs in handling an item.
***About Notes:***
* Notes can be rich-text documents and contain text, images, links, tables, and a broad array of formatting.
* Each note should be specific to a topic and audience, as multiple notes can be attached to an item as it moves through the workflow. For example, you could have one for the accounting team and another for logistics.
* You set an “access level” on a per-note basis, so you can have notes that are **private**, **group**, or **public** access.
### ***Creating a Note***
1. Open the task detail view for a task that you own.
2. At the bottom of the screen, click **Content & History** to expand the section, then click the **Notes** tab.\\
**NOTE**: For some tasks, the window opens with a document window in the front. You’ll need to close that window to see the Notes tab:\\
**Handling Tasks**
The exact steps to resolve any QC or User task will depend on your business processes and instructions for that task.
### ***QC Tasks***
QC tasks usually involve some type of inspection of the data, including attachments and notes, or even a physical artifact such as a proof or prototype.
When you click on a QC task that you own:
1. Review the item data you see and make any appropriate updates.
2. After making updates, click **Validate**. This performs field-level validation to ensure that all data is in the correct format and that no required fields are left blank.
3. You can then click **\<\< MORE** and **Save** to save your changes until you are ready to finish your work on this item.
4. Click **\<\< MORE** and **Add Label** to label the item. Labels can then be used in searches and filters.
5. Click on **Content & History** at the bottom of the screen to review any **Notes,** **Attachments**, and **Emails** related to the item.
6. Complete any offline processes your business requires you to do as part of this task.
7. When you are finished:
* Resolve the item and move it to the next process task by clicking **Complete**.
* If appropriate, you can **Discard** the item, which removes it from the process. The item is still found by Active Search with a status of “discarded.” (Click **\<\< MORE** and then **Discard**)
### Business Exception (User) Tasks
In most cases, User tasks are business exceptions that require a person to manually resolve an issue. For example, if an OCR task can’t fully read the data from a scanned document due to poor scanning quality, a User Task may be generated to re-scan the item.
User tasks can also be manual steps like reviewing results and issuing a payment or shipping out a sample.
When you click on a User Task that you own:
1. Review the item data you see and any information at the top of the screen.
2. Click on **Content & History** at the bottom of the screen to review any **Notes**, **Attachments**, and **Emails** related to the item.
3. Make whatever updates are required to resolve the item. Click **Validate** after making updates to ensure the data is correct. Also, **Save** your work (under **\<\< MORE**) if you have other steps to do or are otherwise not quite ready to finish this task.
4. Add any labels to the task under **\<\not see Error Tasks related to system processes or technical problems.
When you click on an Error Task that you own:
1. Review the error message at the top of the screen, then the item data you see.
2. Click on **Content & History** at the bottom of the screen to review any **Notes,** **Attachments**, and **Emails** related to the item.
3. Make the updates required to resolve the problem. **Save** your work if you have other steps to do or are otherwise not quite ready to finish this task.
4. Add any needed labels by clicking **\<\< MORE** and then **Add Label**. Labels can then be used in searches and filters.
5. Click **Validate** after making updates to ensure the data is correct if you plan to resubmit the item to run back through this process.
6. Complete any offline processes your business requires you to do as part of this task.
7. Resolve the item when you are finished:
* **Resubmit** it to send it back through this automated step with the corrections you’ve made. This will revalidate and reprocess the step completely.
* Bypass automated re-processing and move it to the next process task by clicking **Complete**. This indicates that you have verified that all of the processes within this step have been successfully completed, manually or otherwise.
If more appropriate, you can **Discard** the item, which removes it from any further processing steps. (Click **\<\< MORE** and then **Discard**)
## **Making Notes on Tasks**
Annotations on tasks may be key to resolving issues or answering future questions. They are an important tool to use whenever something unusual occurs in handling an item.
***About Notes:***
* Notes can be rich-text documents and contain text, images, links, tables, and a broad array of formatting.
* Each note should be specific to a topic and audience, as multiple notes can be attached to an item as it moves through the workflow. For example, you could have one for the accounting team and another for logistics.
* You set an “access level” on a per-note basis, so you can have notes that are **private**, **group**, or **public** access.
### ***Creating a Note***
1. Open the task detail view for a task that you own.
2. At the bottom of the screen, click **Content & History** to expand the section, then click the **Notes** tab.\\
**NOTE**: For some tasks, the window opens with a document window in the front. You’ll need to close that window to see the Notes tab:\\
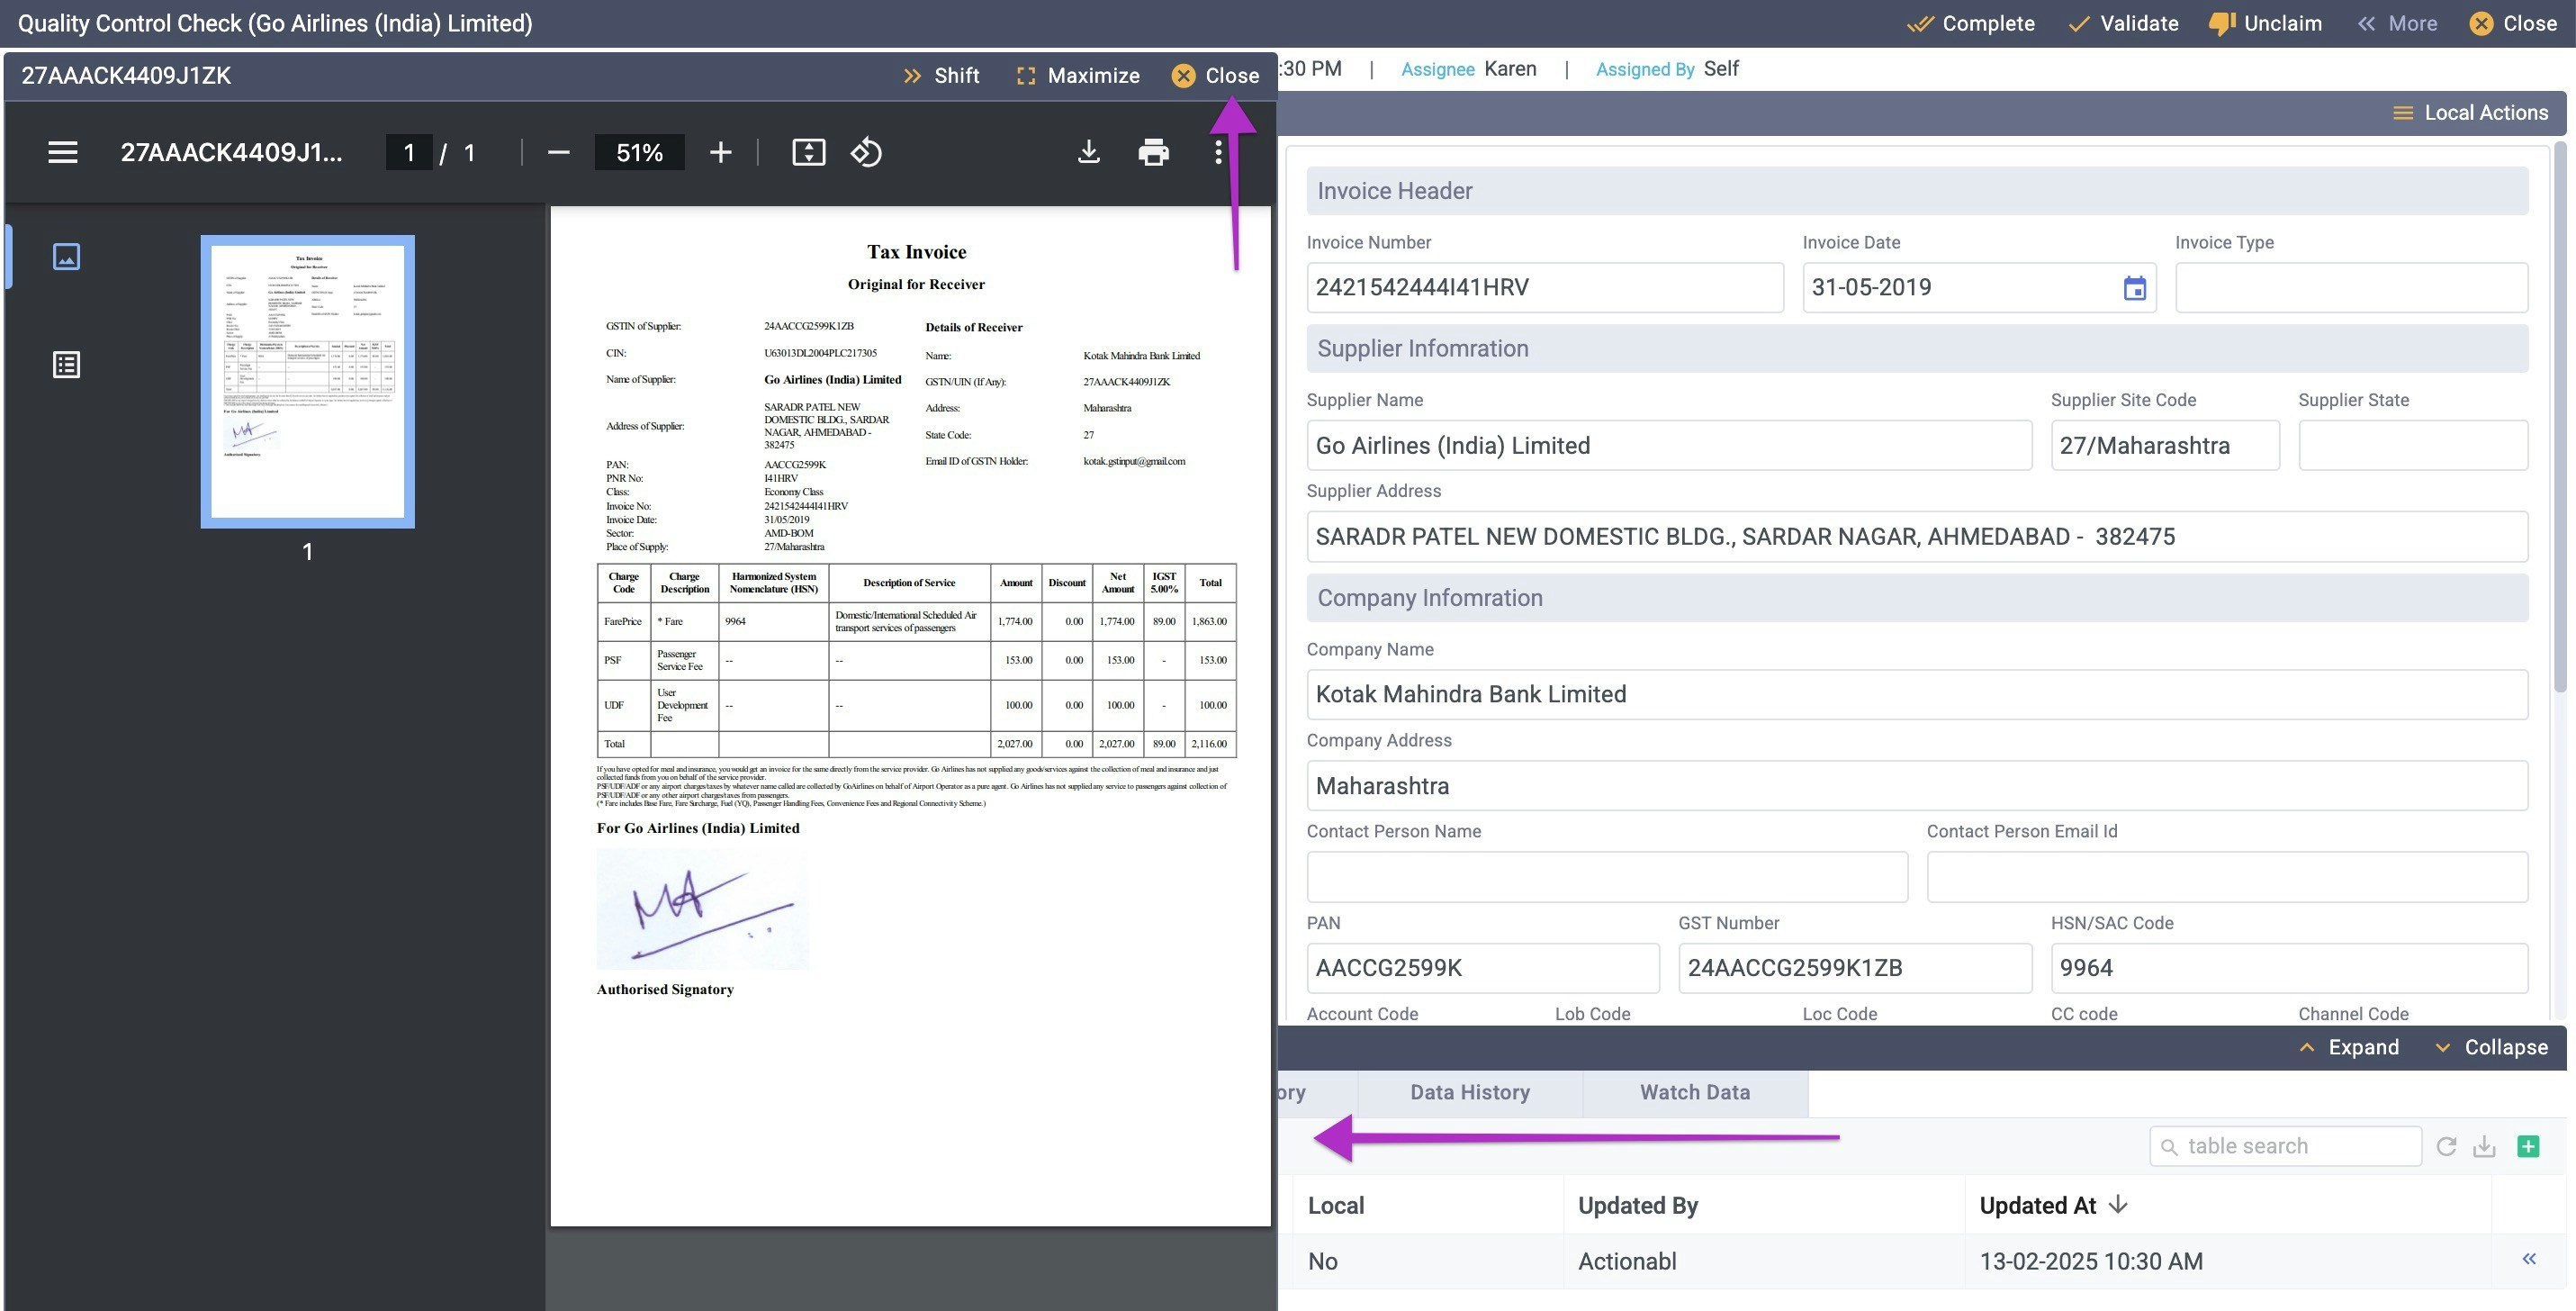 3. To add a note, click the **green plus icon** on the right of the screen. The note editor will appear as a pop-up.\\
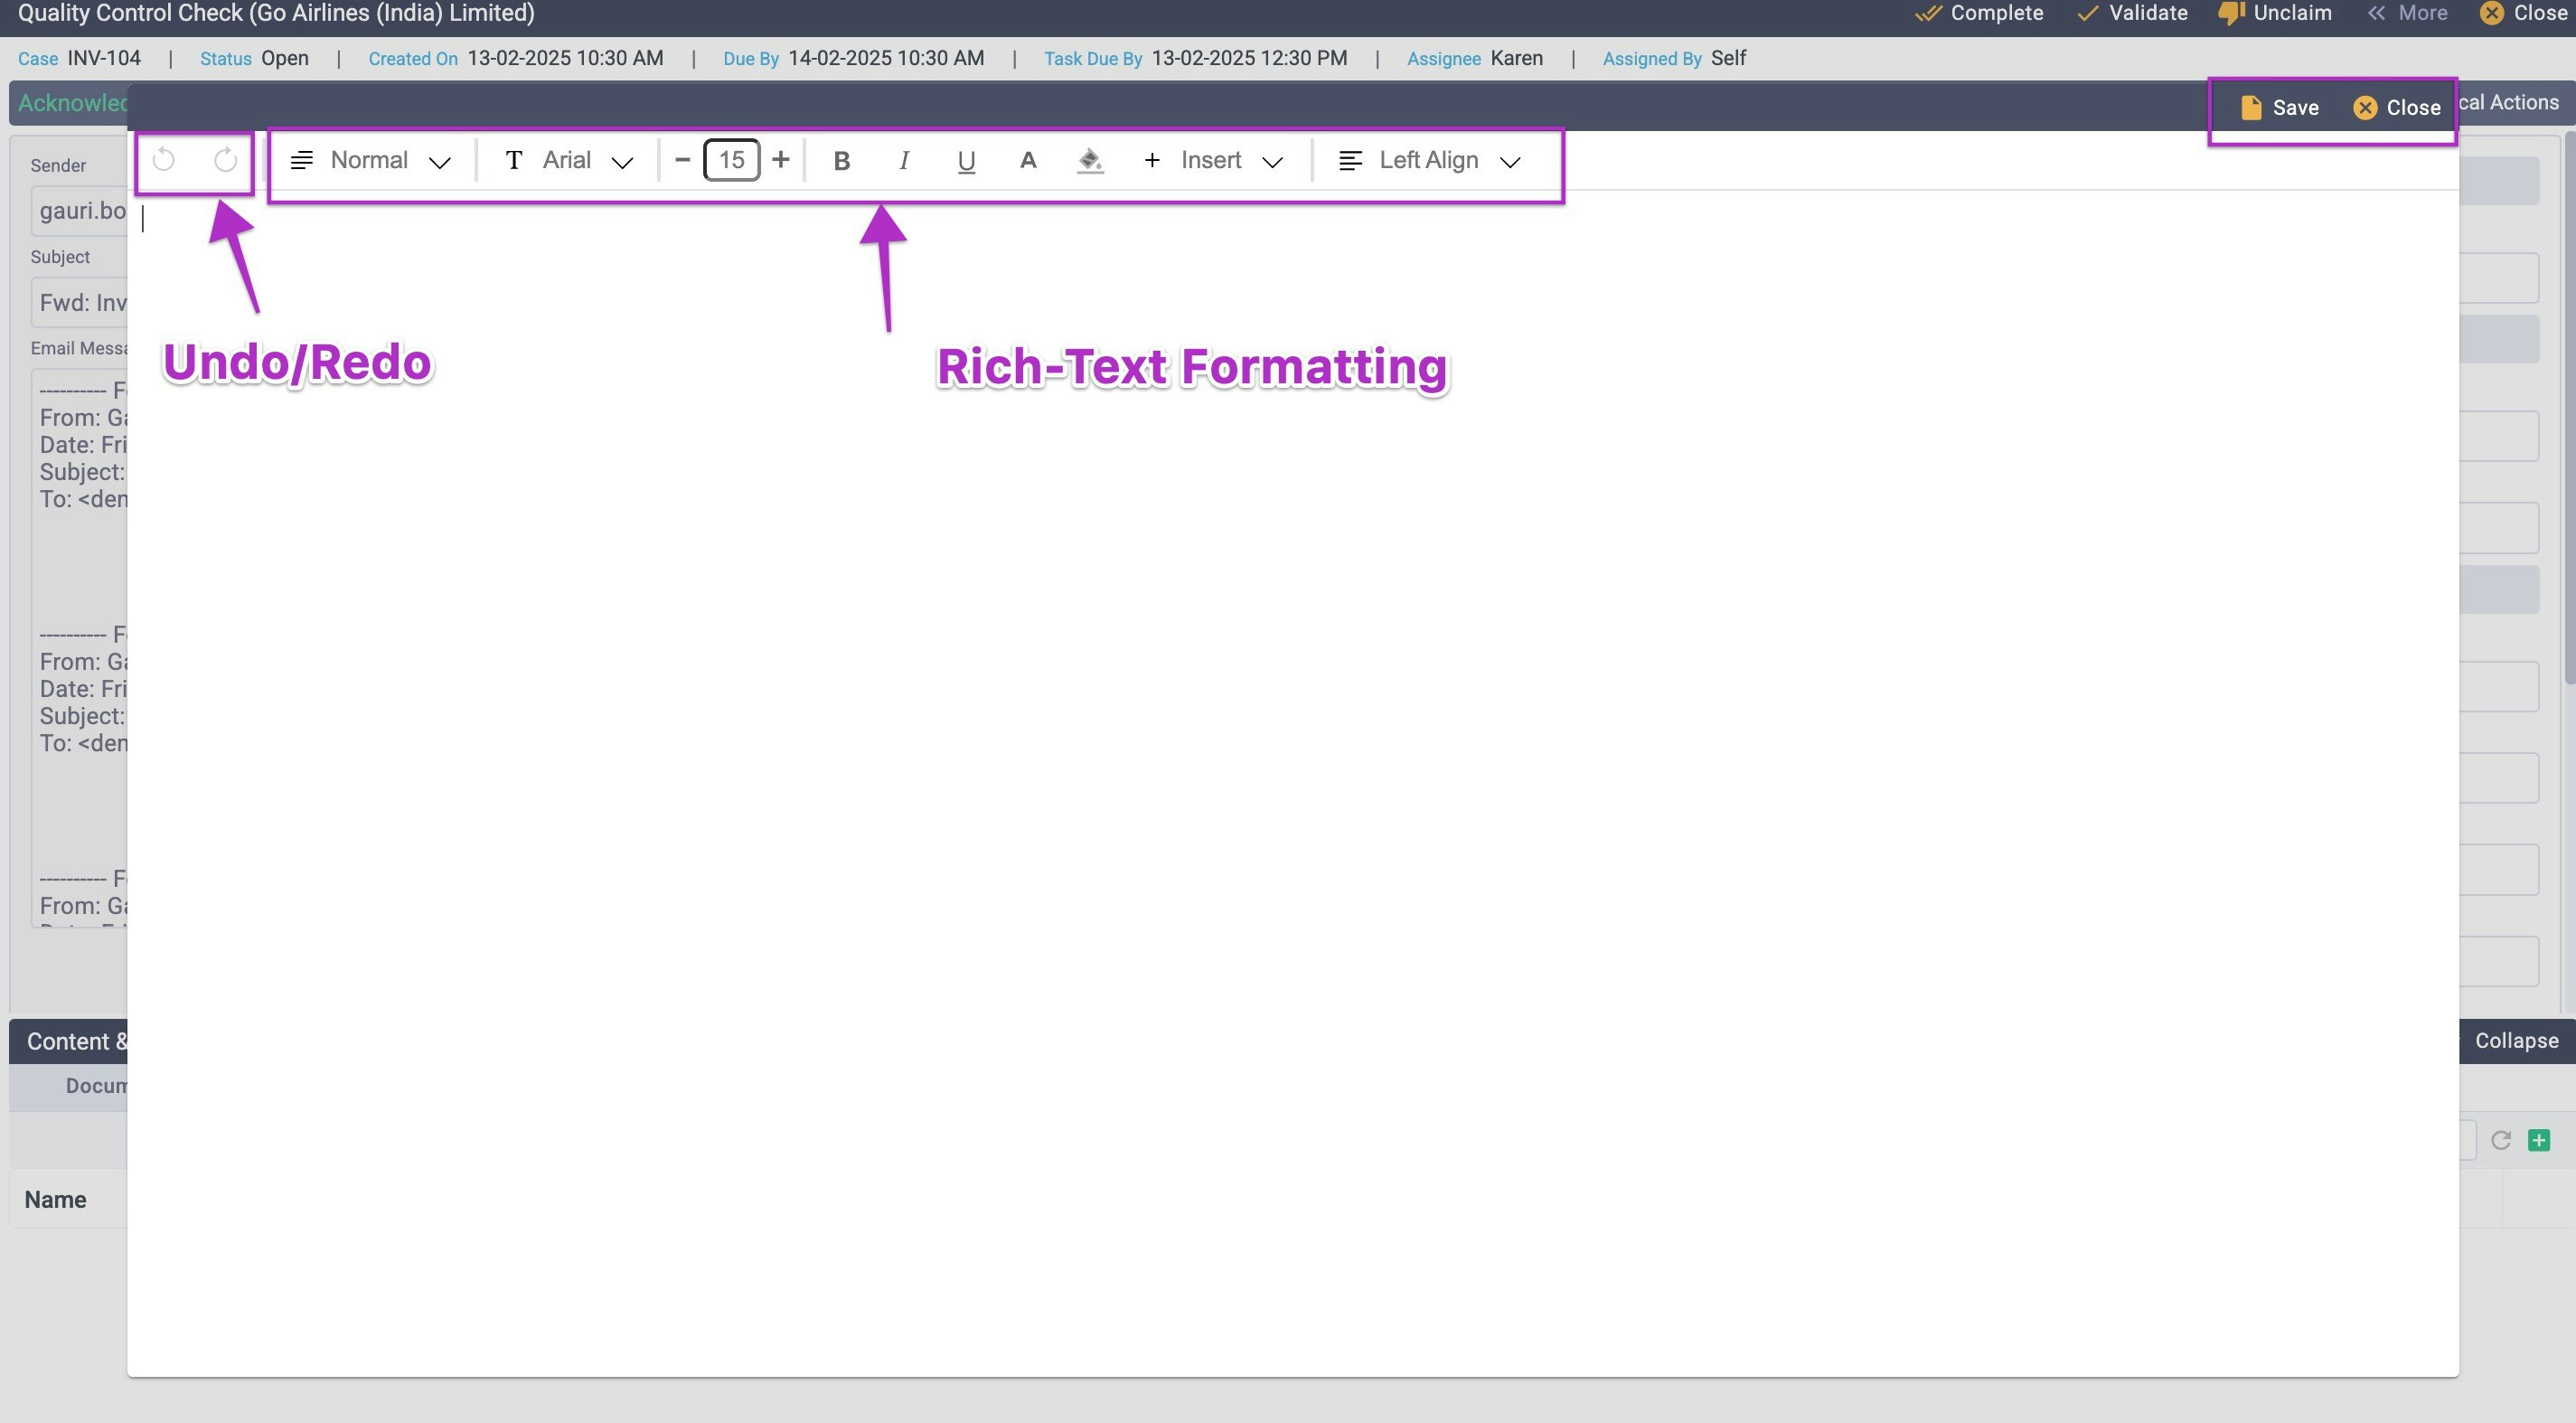 4. Use the note editor like any text editor, such as Word or Docs.
* Shortcuts like Copy (Ctrl/Cmd C) and Paste (Ctrl/Cmd V) work here.
* The Insert menu lets you easily add images, links, horizontal lines, and tables.
* The formatting options across the top of the screen include bold, italic, font color, background color, alignment, and list/indent styles.
* The Edit menu provides Undo / Redo and Select All options, in addition to the usual cut, copy, and paste.
5. After composing your document, click **Save** to save and close the pop-up. You can also click **Close** without saving to discard your work.
6. The note you created is saved as an unnamed Public note on this item.\\
4. Use the note editor like any text editor, such as Word or Docs.
* Shortcuts like Copy (Ctrl/Cmd C) and Paste (Ctrl/Cmd V) work here.
* The Insert menu lets you easily add images, links, horizontal lines, and tables.
* The formatting options across the top of the screen include bold, italic, font color, background color, alignment, and list/indent styles.
* The Edit menu provides Undo / Redo and Select All options, in addition to the usual cut, copy, and paste.
5. After composing your document, click **Save** to save and close the pop-up. You can also click **Close** without saving to discard your work.
6. The note you created is saved as an unnamed Public note on this item.\\
 7. Now, adjust the note’s name and access level and make any other changes by clicking the **expand icon** on the far right of the item.\\
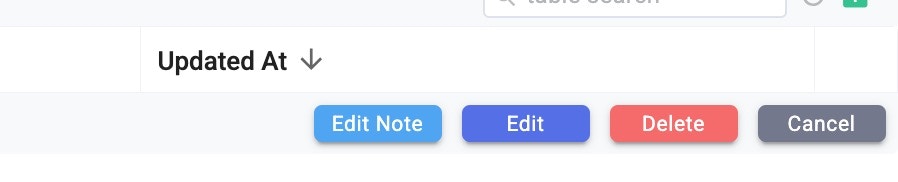 1. If you need to make changes to the content you just saved, click **Edit Note**.
2. To update the note’s name, access level, and task note status, click **Edit**.\\
1. If you need to make changes to the content you just saved, click **Edit Note**.
2. To update the note’s name, access level, and task note status, click **Edit**.\\
 3. Type a descriptive name for the note.
4. Click the down arrow under Access Level and select the appropriate security level.
* **User** restricts the note and its content to be visible to only you.
* **Group** allows anyone in the same user group as you to see the note and its content.
* **Public** lets anyone who can see this item see the note and its content.
5. Click the checkbox to indicate if this is a **Local** note. Local notes are only seen on this item during this processing step; when the task is resolved, the note disappears. If you leave this unclicked, the note will remain on the item throughout its life, regardless of its step or status.
Click **Save** to retain the changes you’ve just made or **Cancel** to exit editing without saving your changes.
## **Discard an Item**
Occasionally, an item flowing through the process may no longer be needed. Examples could include duplicate items or offline tasks that don’t apply to the specific circumstance. When this is the case, **Discard** the item.
1. **Claim** the item and access its task details page.
2. Click **\<\< MORE** and then **Discard**.
3. You'll be asked to confirm the deletion of the item and warned that the process will end. This indicates that the item will not flow through any subsequent process steps.\\
3. Type a descriptive name for the note.
4. Click the down arrow under Access Level and select the appropriate security level.
* **User** restricts the note and its content to be visible to only you.
* **Group** allows anyone in the same user group as you to see the note and its content.
* **Public** lets anyone who can see this item see the note and its content.
5. Click the checkbox to indicate if this is a **Local** note. Local notes are only seen on this item during this processing step; when the task is resolved, the note disappears. If you leave this unclicked, the note will remain on the item throughout its life, regardless of its step or status.
Click **Save** to retain the changes you’ve just made or **Cancel** to exit editing without saving your changes.
## **Discard an Item**
Occasionally, an item flowing through the process may no longer be needed. Examples could include duplicate items or offline tasks that don’t apply to the specific circumstance. When this is the case, **Discard** the item.
1. **Claim** the item and access its task details page.
2. Click **\<\< MORE** and then **Discard**.
3. You'll be asked to confirm the deletion of the item and warned that the process will end. This indicates that the item will not flow through any subsequent process steps.\\
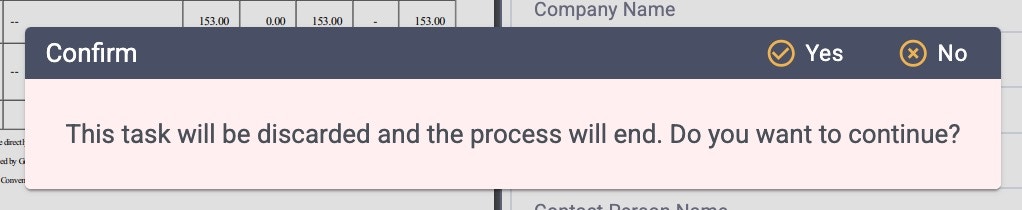 4. Click **OK** to discard it or **Cancel** to return to the task details page.
**NOTE**: After an item is discarded, it can still be found via Active search, with a status of “Discarded.”
## **Bulk actions**
You can perform several actions simultaneously on a group of selected items. This is called a **Bulk Action**.
Examples:
* Claim / Unclaim
* Assign / Reassign
* Download attachments
* Complete or Discard
You can only act on tasks that are all in the same process.
1. On any task list, toggle **Bulk Actions** in the top center of the page.
2. Click the **checkbox** to the left of each item that you want to take this action on.\\
4. Click **OK** to discard it or **Cancel** to return to the task details page.
**NOTE**: After an item is discarded, it can still be found via Active search, with a status of “Discarded.”
## **Bulk actions**
You can perform several actions simultaneously on a group of selected items. This is called a **Bulk Action**.
Examples:
* Claim / Unclaim
* Assign / Reassign
* Download attachments
* Complete or Discard
You can only act on tasks that are all in the same process.
1. On any task list, toggle **Bulk Actions** in the top center of the page.
2. Click the **checkbox** to the left of each item that you want to take this action on.\\
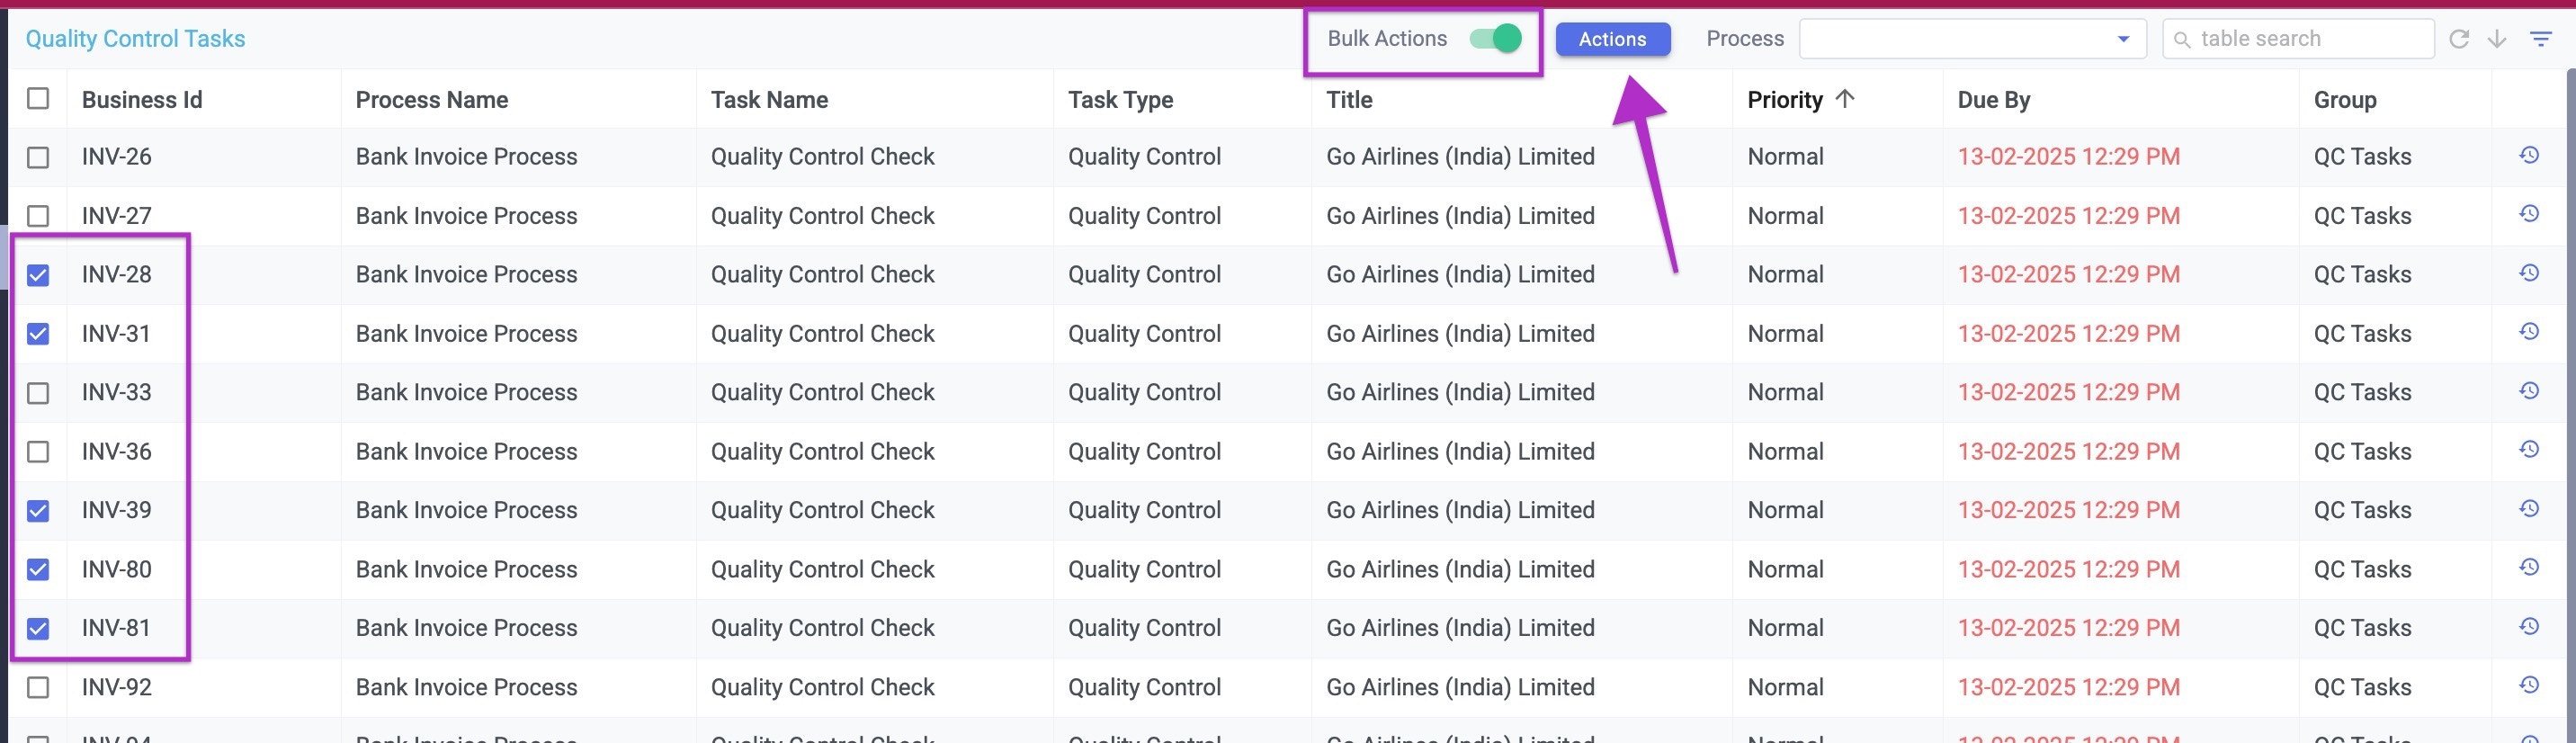 3. Click the blue **Actions** button to open the bulk actions pop-up. The pop-up contains only the items you selected.\\
 4. The actions available on this group of items are at the top right of the popup. Your options for bulk action are determined by the types of items you’ve selected and the status of those items.
**HINT**: Just under the Close link is a download icon that allows you to download the displayed list of items.\\
4. The actions available on this group of items are at the top right of the popup. Your options for bulk action are determined by the types of items you’ve selected and the status of those items.
**HINT**: Just under the Close link is a download icon that allows you to download the displayed list of items.\\
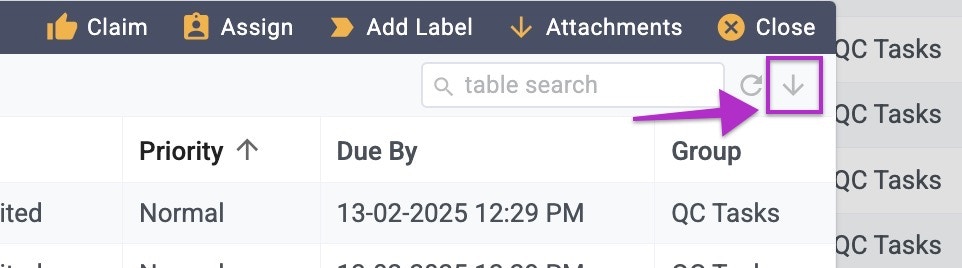 **Click the action** you would like to take or click **Close** to cancel and return to the list of all items.