OVERVIEW
Actionabl.ai is a platform that automates your business processes and alerts users whenever human intervention is needed.
This guide covers aspects of managing the automations , processes, tasks, connectors, andrules within the system.
If you are a new technical or supervisory user of Actionabl, you should first review Getting Started with Actionabl to familiarize yourself with key concepts and terms used throughout this document. Related Documents
- Controller Guide covers all aspects of the Controller dashboard, which includes:
- Scheduling and management functions for automations, AI spaces, tasks, and cron jobs
- Process analytics
- Process view management
- Error Task management
- Task Management Guide is written primarily for your company’s business users, but you may find it helpful in understanding the larger task-related concepts and processes that they are working with you to resolve.
- User Management Guide includes all aspects of managing users, groups, and departments. It is intended primarily for supervisory and administrative users.
- Process Administration Guide is used to learn how to create, edit, and manage processes and all of their components. This includes the creation of tasks, connectors, data fields, data sources, and more.
MANAGING AUTOMATIONS, TASKS, RULES, AND APPS
If you are a Supervisory or Administrative user, you likely have access to manage certain things about the tasks that are flowing through a process and the rules, apps, connectors, and automations within that process. Some non-admin users may also have been granted the right to edit some of these items.
Most of the tasks in this guide are accessed through the Process View (which is available on most dashboards).
Management Functions
- The Automation tasks screen displays and manages the status of the tasks that keep items flowing through the process.
- Task Management lets you:
- Set a task to Active or Inactive.
- Configure the Service Level Agreement (SLA) for this task. Violations of the SLA generate alerts to certain users so problems can be fixed.
- Specify automated assignments of tasks to a workgroup or user.
- Configure all types of notifications that can be triggered by this task, including the contents and templates for each notification.
- Rules Management configures the rules that guide how data is validated as it flows through the task, including the error messages generated by them.
- The Decision Model is where the business logic for rules can be adjusted.
- App Connector shows and lets you adjust how a connector is used within the process.
Accessing Process Management Functions
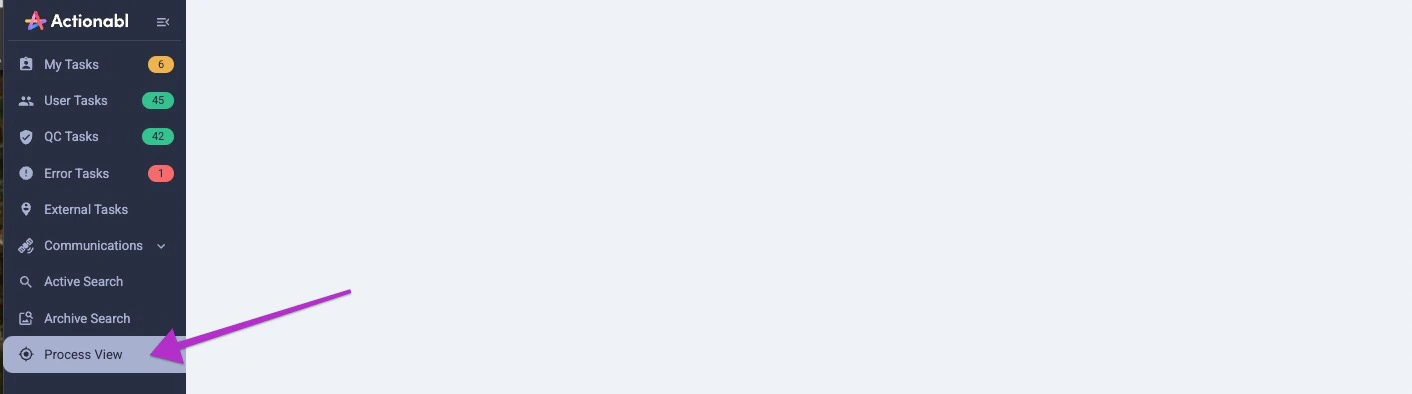
Process management functions are all accessed through the Process View.
Each process is managed separately, and your user group grants you permission to perform these tasks on a process-specific basis.
To access management functions:
-
Click Process View in the dashboard to access the module.\
-
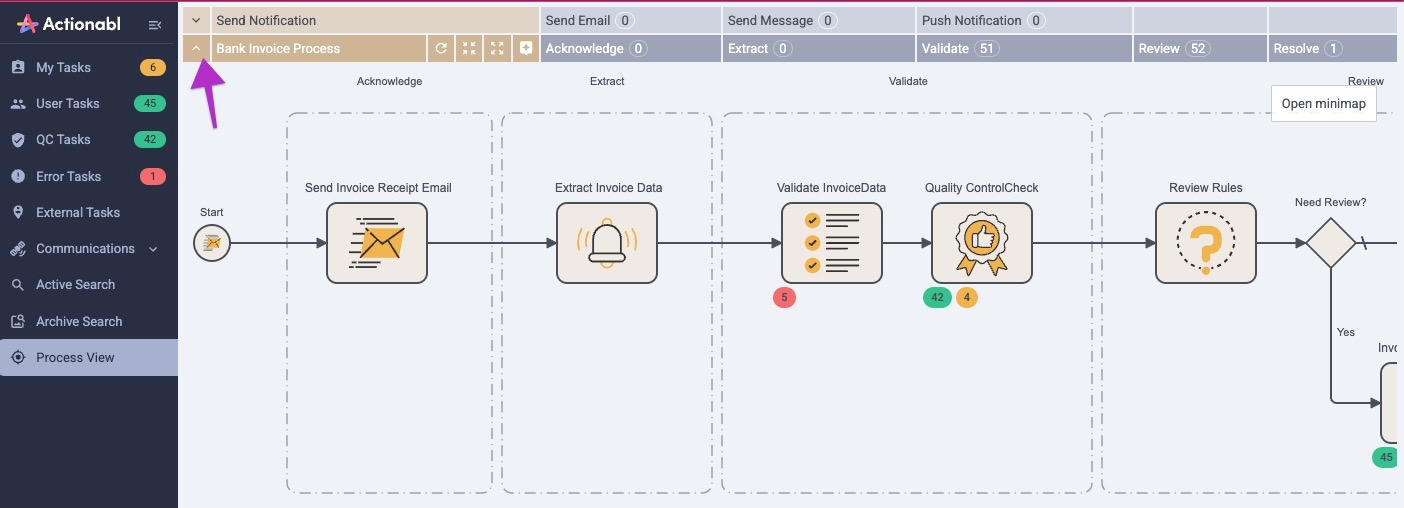
Click the desired arrow to expand the process you wish to manage.\
-
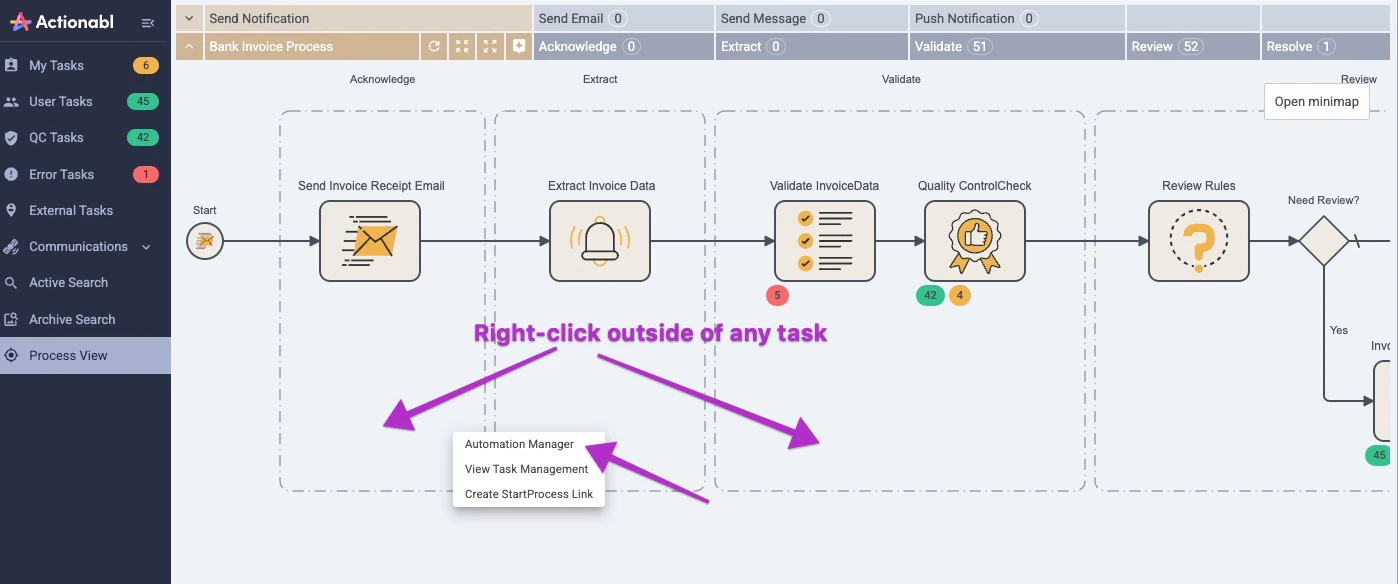
To access Automation Management, place your cursor outside of any task and RIGHT-click. Select Automation Manager from the menu. (You can also access task management from this menu.)
-
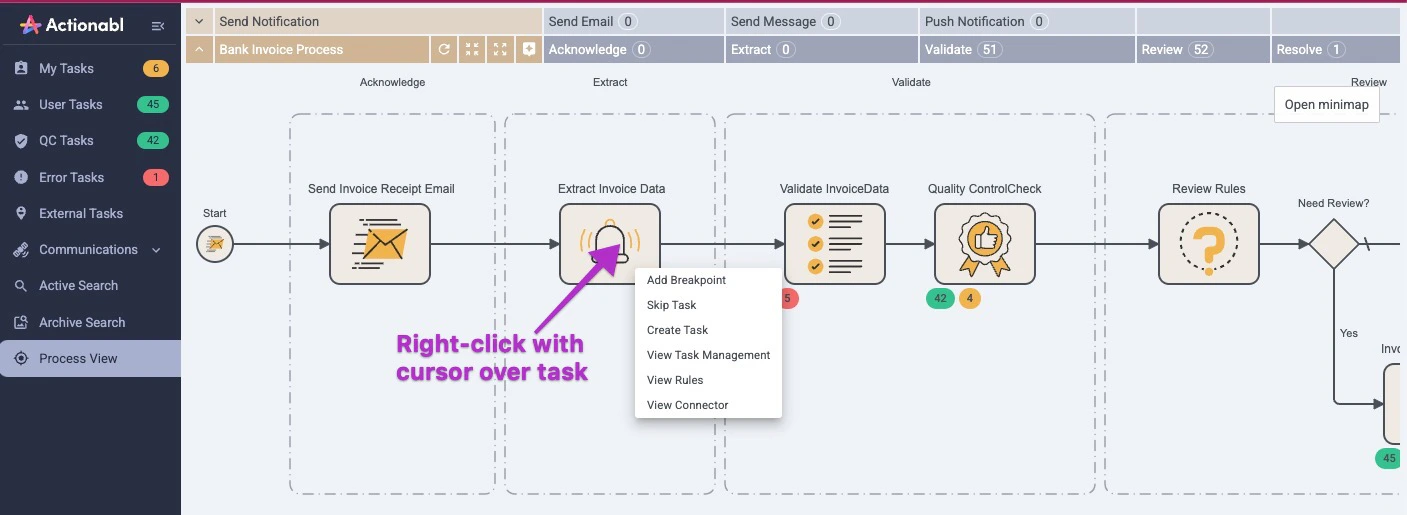
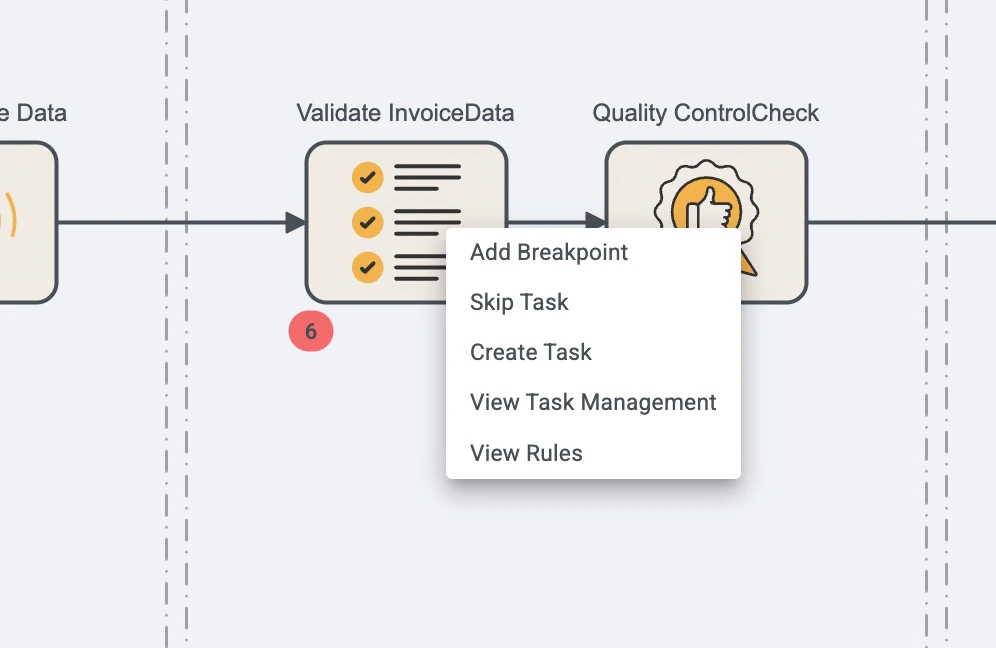
To access Task Management or the Task-Specific Rules, hover over any of the process steps and RIGHT-click. On that menu, select either View Task Management or View Rules.\
-
To view the Decision Model business logic rules, hover over a Review Rules step and RIGHT-click. On that menu, select View Decision Model.\
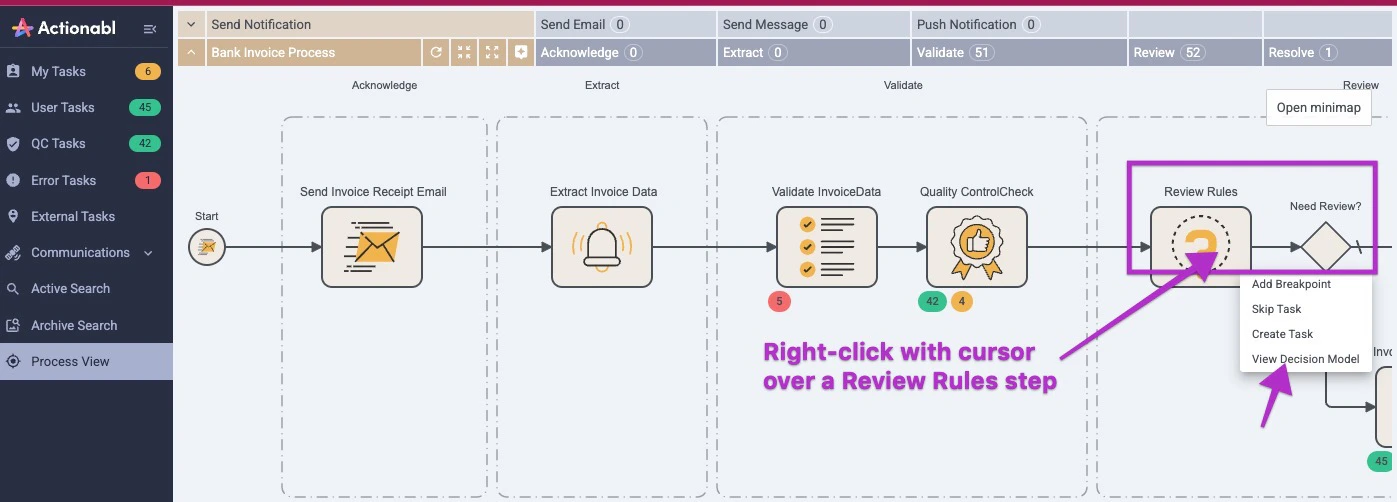
-
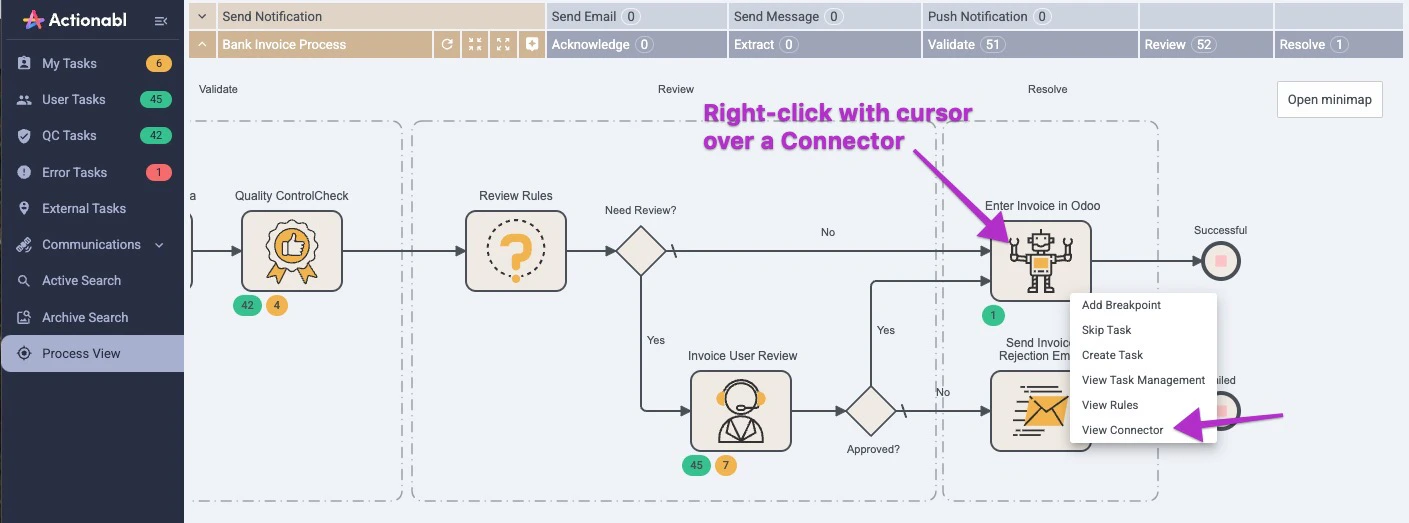
To view a connector’s settings, hover over any step that uses an app, RIGHT-click, and select View Connector from the menu.\
Automation Management
Automations are the heart of a process; they are the elements that move items through the tasks without human intervention.
However, there are times when something needs adjustment or goes wrong. The Automation Manager is where you manage and resolve those cases by starting, stopping, or restarting processes.
Open the Automation Manager. You’ll see a pop-up listing all automations in the current process. An asterisk (*) in the Process Name or Task Name field indicates that the automation spans all processes or all tasks in this process, respectively.
- Sort by clicking any column’s header.
- Search the list using the search field in the top right.
- Close the list by clicking Close at the top right.
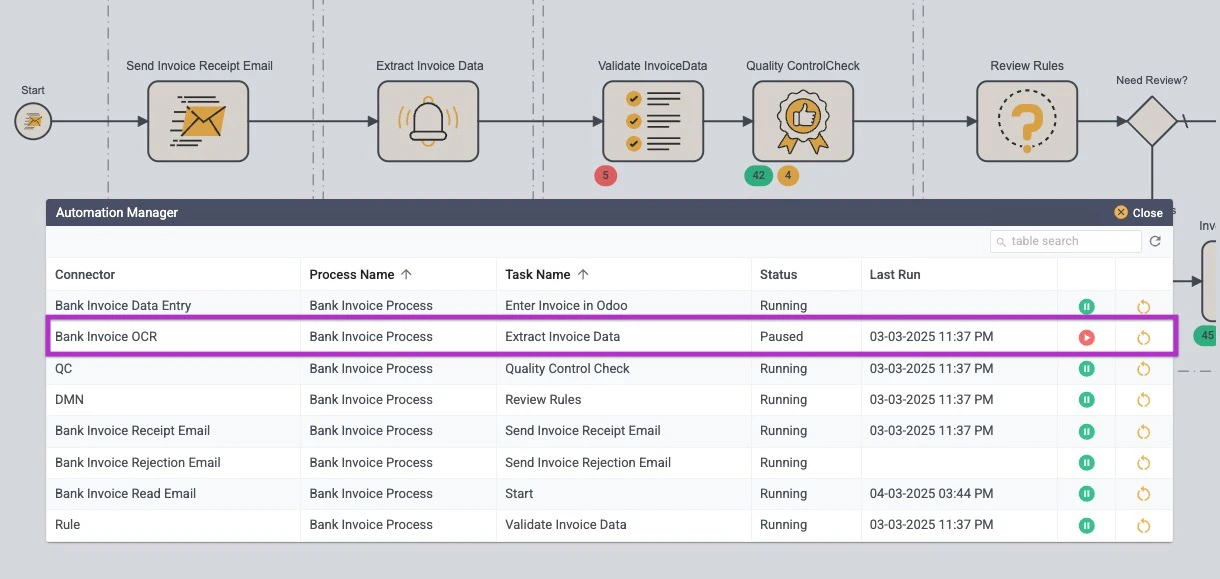 You can see each automation’s Status in the Status field and start or stop it. Last Run is the date and time on which the automation was last started.
- Running: the automation is currently running correctly.
- Paused: a user has clicked the pause button, and the automation is not currently active. When changing ANY process rule or task configuration, you should first Pause the process and then restart it once your changes are complete. This activates your changes for all future (and queued) items.
A status of Paused does not indicate an error state.
Click the red button to continue running the process where it left off.
- Failed: This should be exceptionally rare but indicates that something has gone wrong in the system or automation, causing it to fail.
Contact your system administrator or Actionabl support for help if you see this.
- Pausing / Resuming: These are temporary statuses that you’ll see for a few seconds while the automation is pausing or restarting.
- Restart This stops and then restarts the process to ensure any updates are made. If you click this, you’ll receive a popup to confirm your action:

Task Management
The Task Management pop-up is where you can view the task details in the process and edit some of the task’s components.
As each type of task (user, QC, error, global) in a process differs in its design and the scope of data that it handles, the actual fields shown will be different.
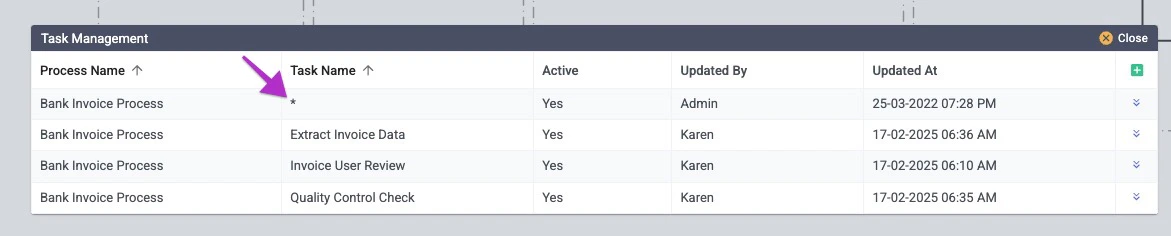
HINT: When you click on “View Task Management” while hovering over a specific task, the pop-up appears with that task already expanded. The other tasks in the process are collapsed. If you access Task Management by clicking outside of a task, the first task in the process is expanded by default.Screencast Global Task Settings
Settings that apply across the process as a whole are “global” task management settings, indicated by an asterisk (*) in the Task Name field.
 Click on the expand icon on the far right to open the task if it isn’t already open.
- To change the information, click the blue Edit button at the bottom right. When you are in Edit Mode, that button changes to a green Save button.
- To collapse the task and return to the list without saving any changes, click Cancel.

Process Information
The top section is Process Information, showing the process’ display name, task name, Active status and SLA (Service Level Agreement).

- This pop-up shows the Process and Task Names but does not allow them to be edited. Only administrators can change a process or task name.
- Active turns a task on or off for execution. If you turn this off for a Global task, it will attempt to default to the next-higher level of process configuration (system -> process -> task -> sub-task).
- The Process SLA is the service-level agreement that sets the expectation for how long the process takes to complete. In the case of a global setting, this is the completion window expected for the entire process. Exceeding this window causes the task status to display as OVERDUE, and the due date will show in red.
This is entered as: dd:HH:mm (days:hours:minutes). For example:
1.5 hours: 00:01:30
1 day and 8 hours: 01:08:00
5 days: 05:00:00
- The Notification Workgroup and Thread Workgroup settings specify the groups that are notified when the SLA is violated.
Error Handling
The Error Handling section specifies how any error condition that occurs during the entire process is assigned and alerted.

- Workgroup sets the User Group(s) who can see and access the error task. Typically, your administrator will have created an error-handling group that is a subset of the users for this process.
- Reassign to Last User is a checkbox to automatically assign an error task to the last user who claimed or was assigned this same type of error task.
- User lets you select a specific user to always be assigned this error task.
- Auto Assign assigns the task to the user with the fewest current assignments, who is available, and who also belongs to the group assigned to the task.
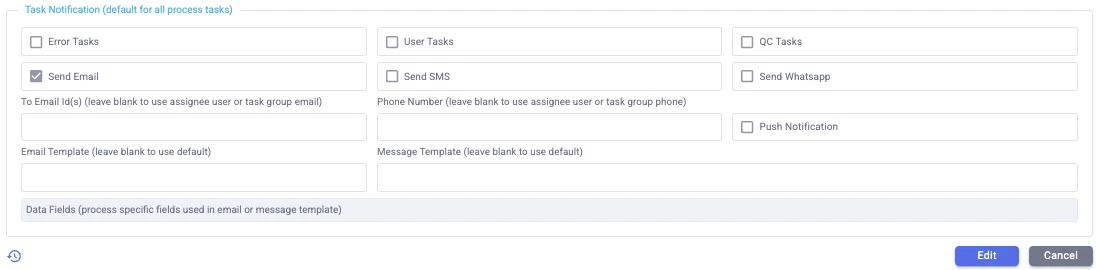
Task Notification
The Tasks Notification section is where you configure all non-error alerts and notifications, as well as the content and templates used for them.
HINT: Global notifications are sent routinely across ALL tasks in this workflow, so they are sent out every time an item moves between task steps. If you prefer to have users notified only when items move into certain steps (like user tasks or QC tasks), do not use global notifications; use User Tasks for that instead.
-
The first line selects which types of tasks should receive notifications: Error, User, and/or QC.
-
Next, indicate the type(s) of notifications the system should send: Email, SMS, and/or WhatsApp messages.
-
The Recipient Email and Phone Number on the next line is only used if you want to override the email and phone associated with the automatically assigned group and/or user in the previous step. If this is left blank, the notifications will use the contact information available on the profile settings for the user(s) that match the workgroup and/or assignment settings.
-
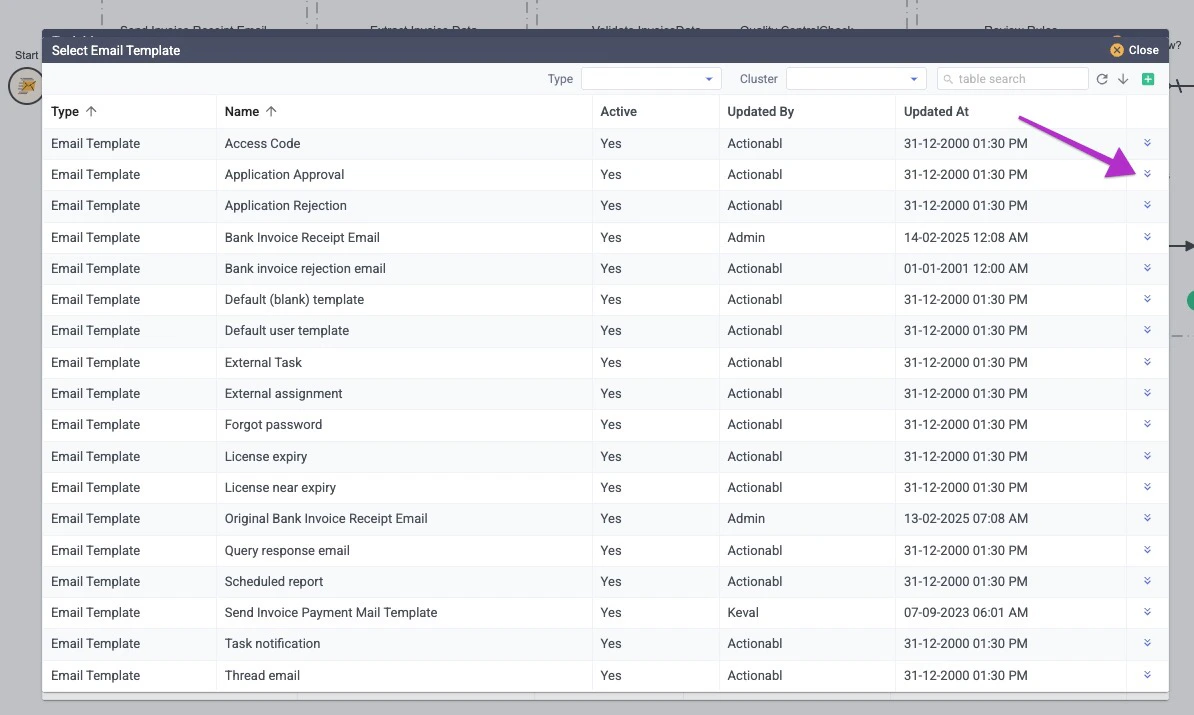
Email Template lets you override the default email template in the system and send a customized message for notifications from this process.
Click the expand icon to select from available templates. Click the name of the template you wish to use. To see the details of any template’s contents click the expand icon to its right.
 When you scroll to the bottom of the message template’s setup, you will see several action buttons:

NOTE: If you make changes to a template listed here, those changes will apply in ALL processes or tasks where this email template is used. It is strongly recommended that you start by DUPLICATING the email template if you are changing or testing new content. This will avoid making an unwanted global change across all processes where a common email is used.
- Edit unlocks the fields in the setup to allow you to make changes to them.
- Test validates the changes that you’ve made to a template to ensure that it doesn’t generate any errors when used to send an email.
- Duplicate creates a copy of this email template that you can then use as the basis for new content. This is the preferred process to use when you don’t want to make a global change across all processes where a common email is used or you are testing significant changes to content.
- Delete removes the template from the system and from all processes using it.
- Cancel returns to the previous screen without saving any changes.
- The blue clock icon on the left shows the full editing history of this template.
- You can also create a new email template by clicking the plus icon at the top right of the window.
Message Template works just like Email Template, but is used for SMS and WhatsApp messaging.
The Communications Management Guide (COMING SOON) provides more details on creating and managing email and messaging templates.
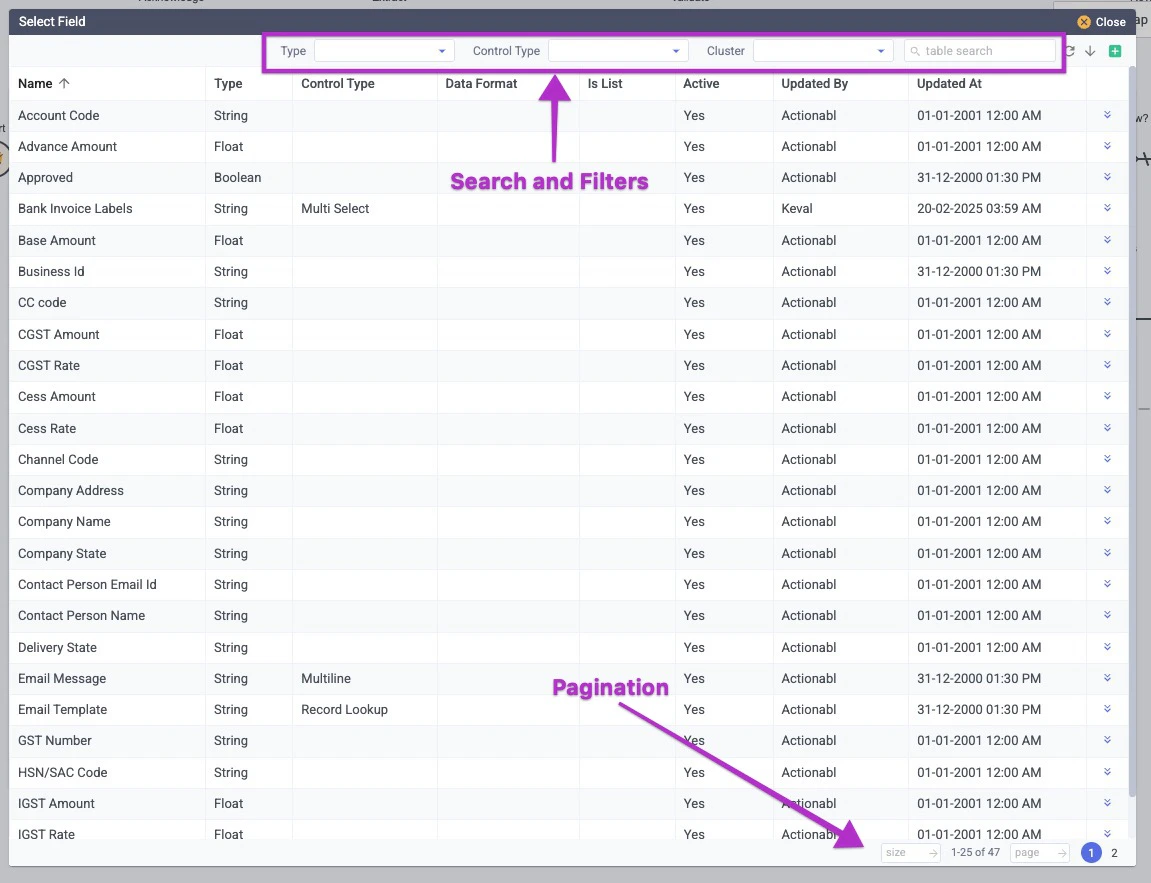
- The final section is Data Fields. This is where you specify fields that may be referenced explicitly and included in the Email and Messaging templates (default or otherwise). All fields used within the email or messaging template must be specified here, or the data will not be available when the process runs. If you do not specify a field here and it is called within the template that field will be left blank in the messaging.
- In Edit mode, click the green plus sign to the right of Data Fields to begin selecting fields.\

- Click the select icon to select from the available data fields. Click the field’s name to make it available.
- Field lists can be long. Use the Search at the top right to find the field you want.
- Note that the list may contain multiple pages. Use the navigation at the bottom right to adjust the number of entries you see per page and to move between pages.\
- Click the green plus to add more data fields.
- After adding fields, you can change the order in which they are listed by using the move icon to drag them into the desired order. This does not affect processing in any way; it’s simply for your convenience in referencing them.
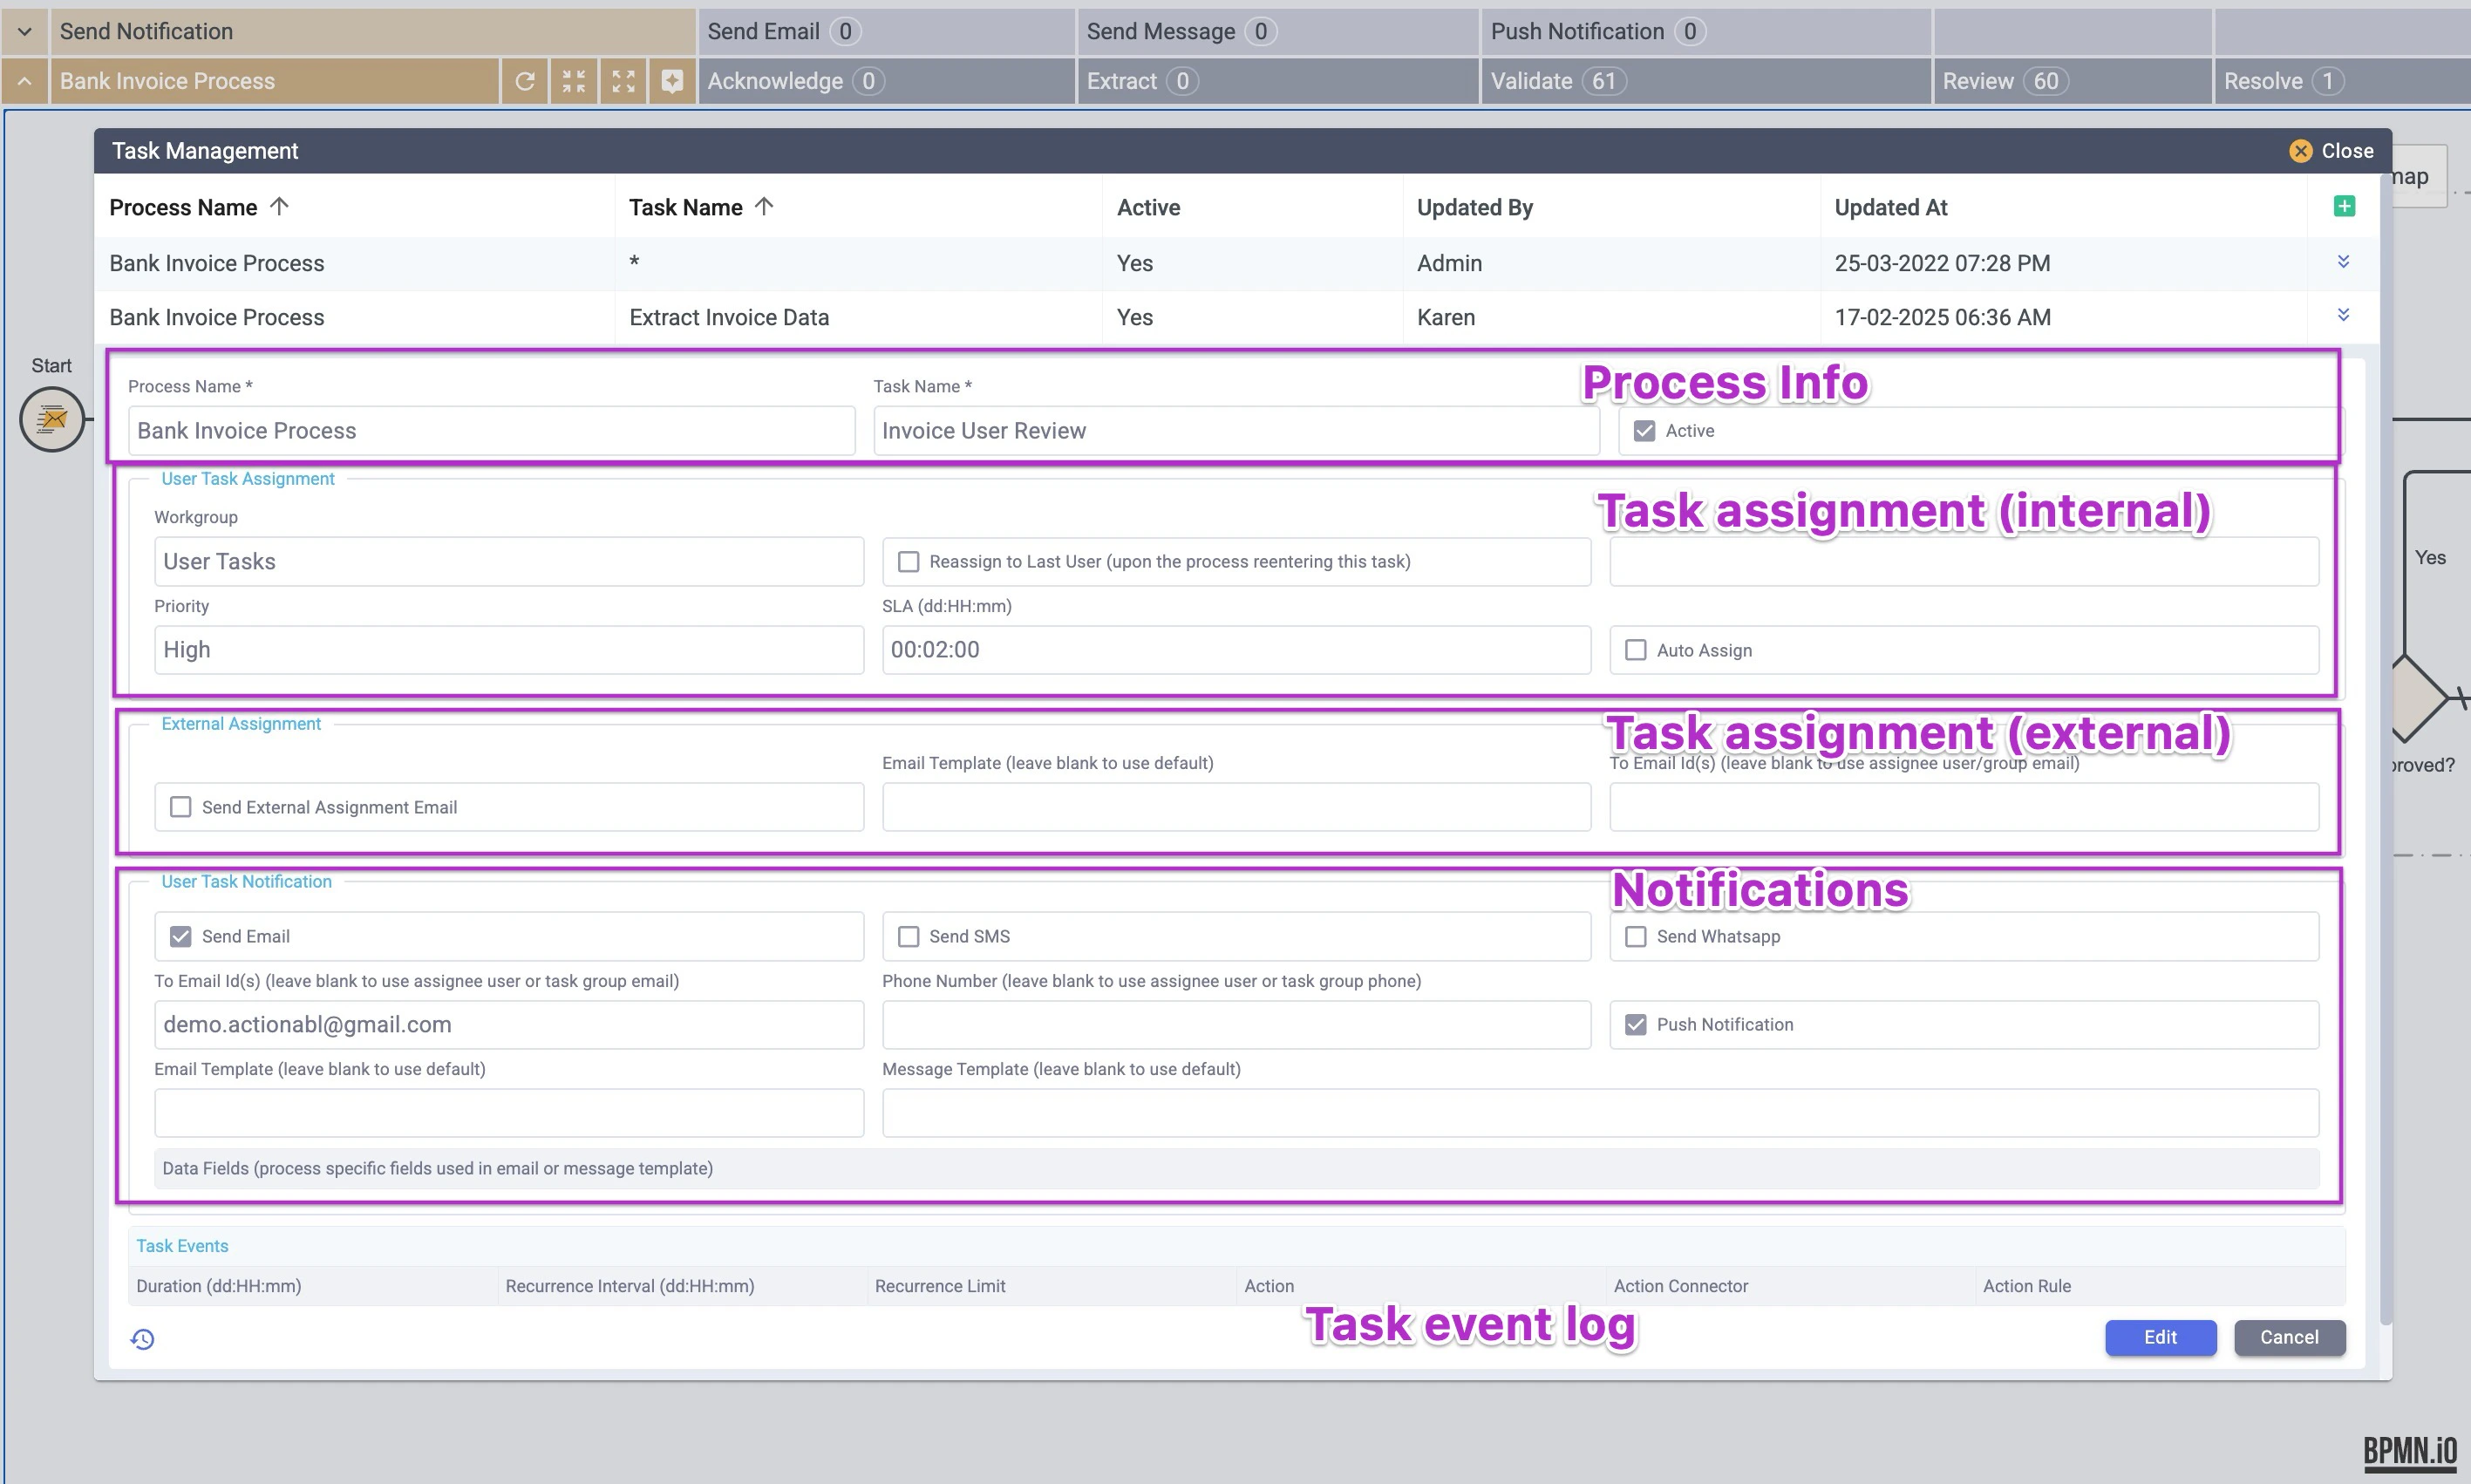
User Task Settings
User task settings differ from the global task settings in a few key ways:
- They apply only to items within the specified task and process.
- They do not allow for any settings relating to error handling.
In the list of tasks, click a user task to expand its management view.
 As with global tasks, click Edit to switch the item’s data into an editable state and click Save or Cancel when done.
The Process Information is organized like a global task, but there is no process-wide SLA specified.
As with global tasks, click Edit to switch the item’s data into an editable state and click Save or Cancel when done.
The Process Information is organized like a global task, but there is no process-wide SLA specified.
- When in Edit mode, you can toggle the task’s Active status. If you make a task inactive, it is skipped when processing items through the workflow.
The User Task Assignment section specifies how a task should be auto-assigned internally to the organization. As with global tasks, you can specify this at the workgroup or user level and can also default to reassigning it to the last user who was assigned an item in this task.
- Use the Priority dropdown to set the task’s priority flag. This flag is used to sort items on the task listing. Critical items are listed at the top, followed by High, Medium, and finally Normal items.
- Optionally, you can set an SLA for this specific task. This SLA cannot be longer than the one set globally for the process. The format is the same as elsewhere: days:hours:minutes (dd:HH:mm).
External Assignment is unique to User Tasks. It allows you to assign someone outside of the Actionabl workflow to complete a task within the workflow. For example, this could be a client’s signoff on a proof or a supplier who needs to respond with a due date on an order.
- Click the Send external assignment email box to activate this option.
- Specify the email template to be used to notify about the action only if you want to override the default setup in the workflow.
- Specify the destination email to receive the notification of the action they need to take only if you want to override the default external destination email set up for this process.
The last section is where you specify the types of Notifications to be sent regarding this task. This works exactly like the notifications for global tasks, but in this case, they are sent only in response to items in this task. Unlike global notifications, these are specific to an item entering a particular step, so they are well-suited to things like:
- Alerting a manager that an item has completed a critical automated task and has changed to a new stage in the process.
- Updating a team on new available items in an action queue.
If using task notifications, you can manage which data fields are available for inclusion in those notifications by adding or deleting them from the list.
QC Task Settings
QC tasks have the simplest settings of all task types. Like User tasks, they do not allow for error-handling specifications.
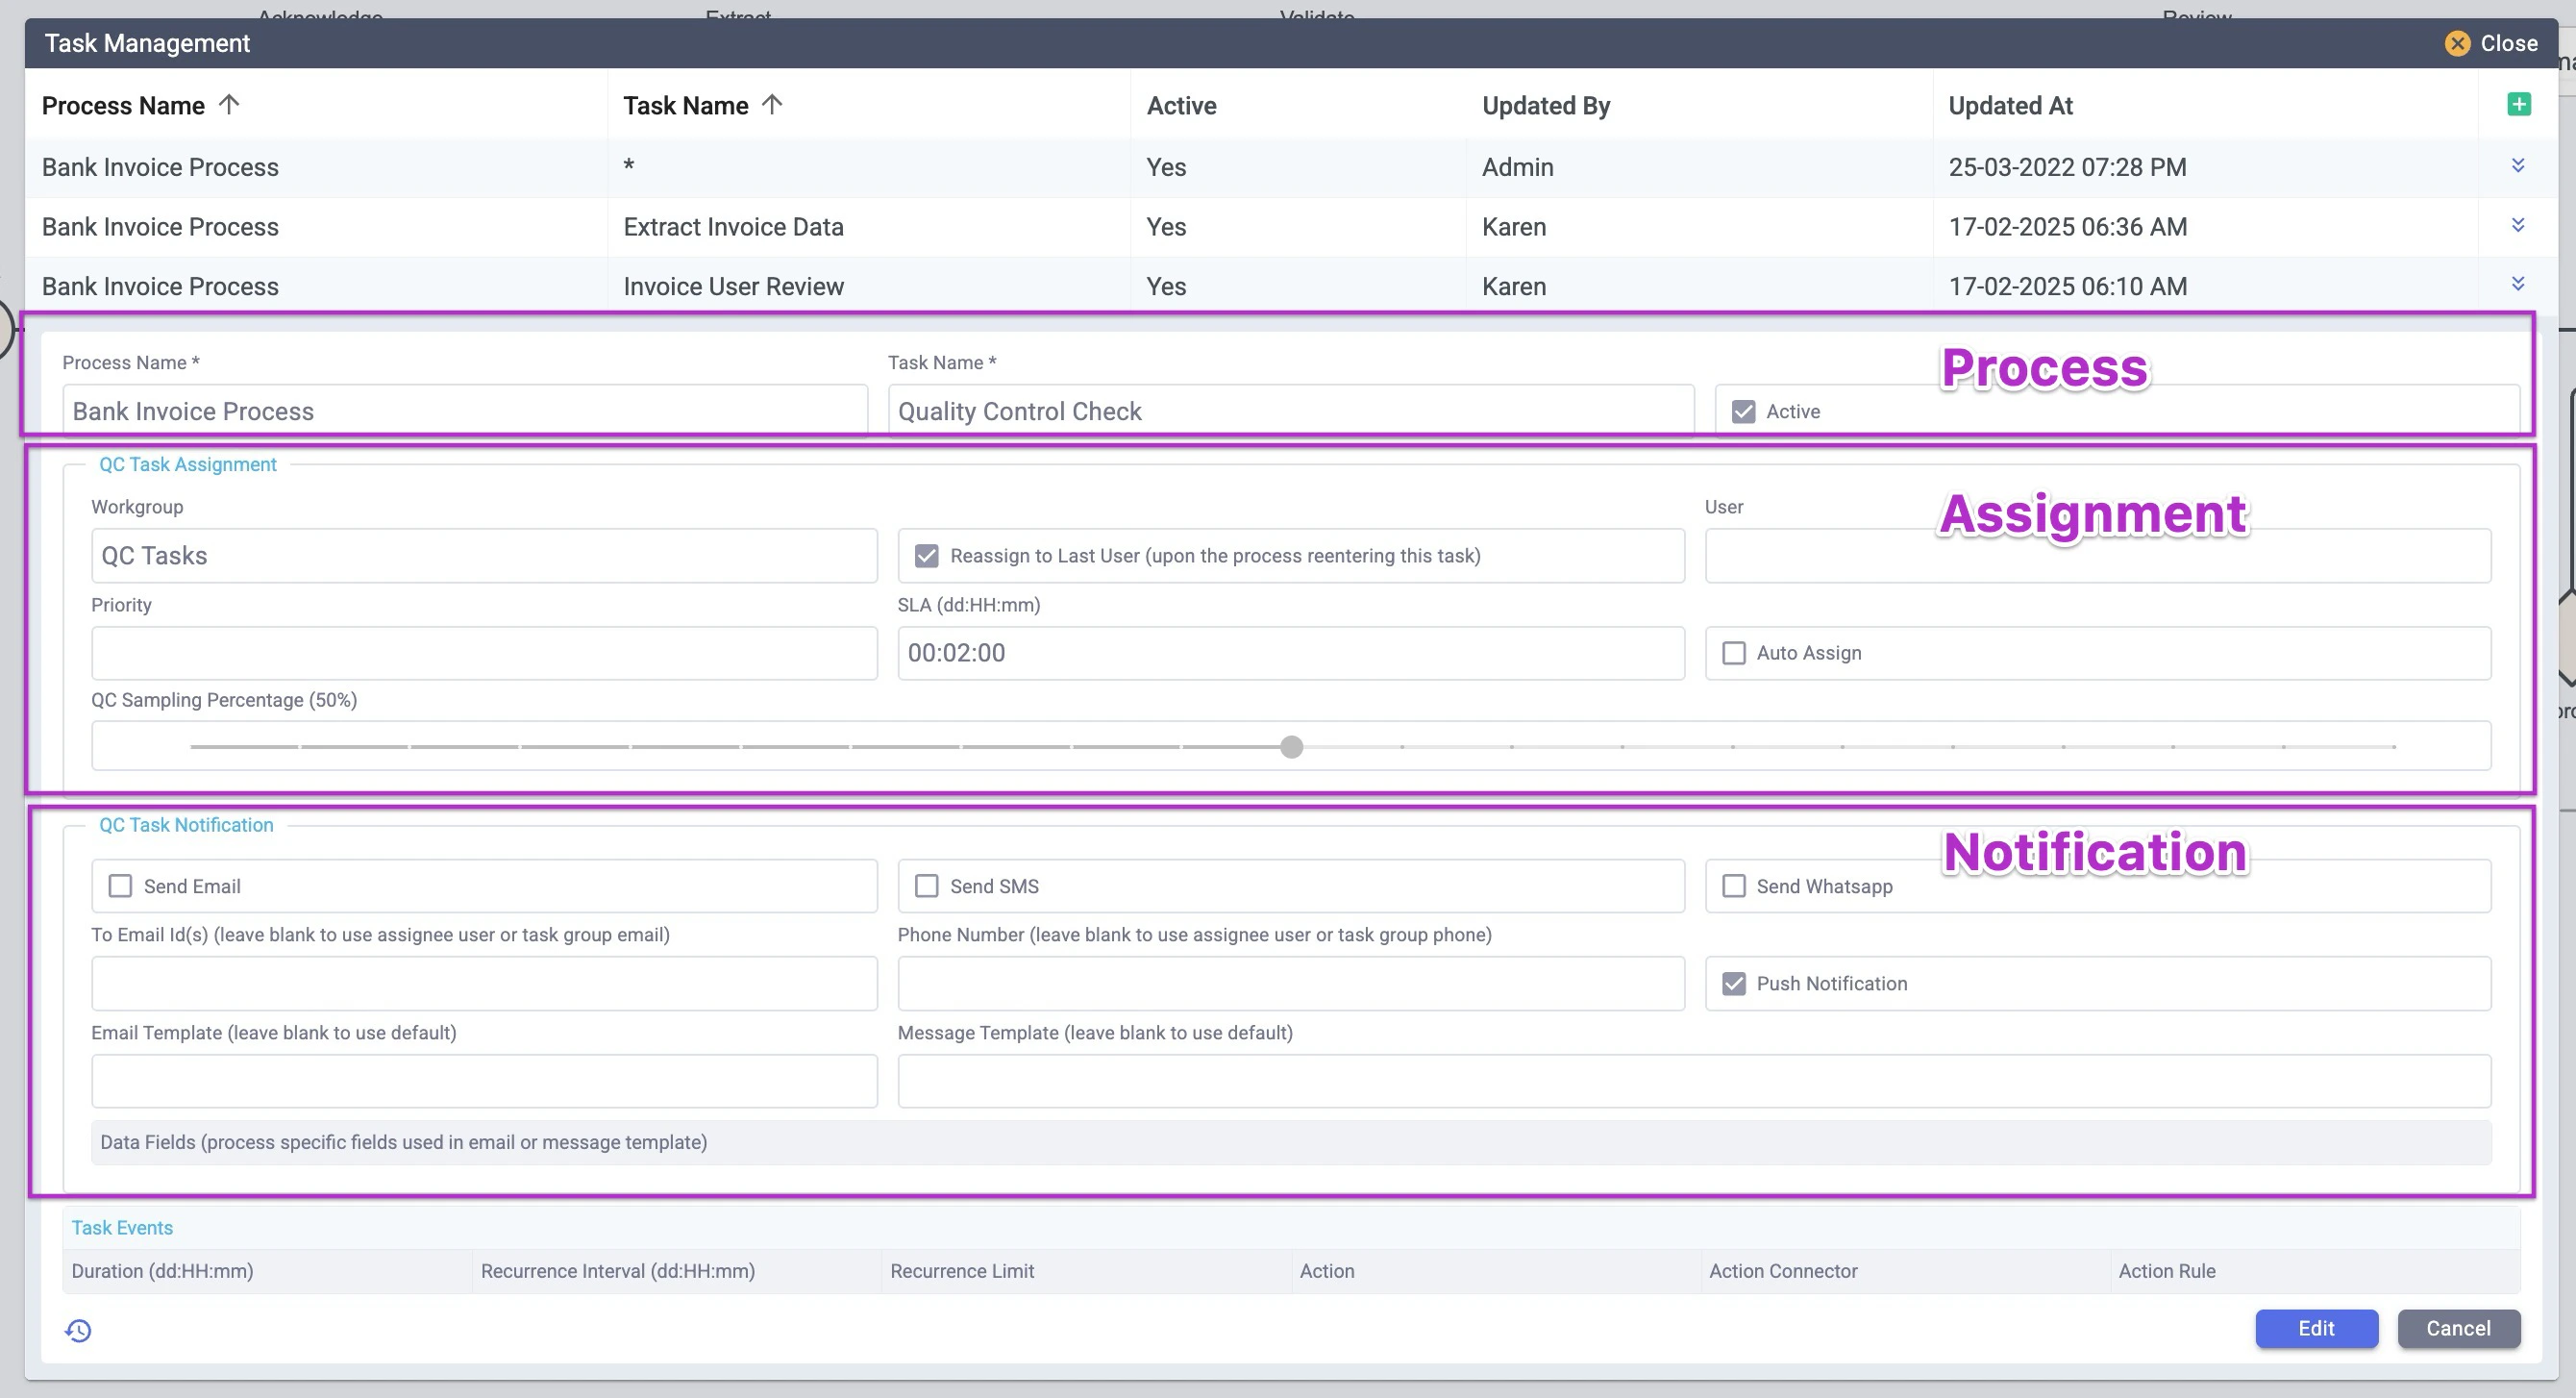 As elsewhere, click the Edit button to make the task’s data editable, then click either Save or Cancel when you’re finished.
- When in Edit mode, you can toggle the Active status of this task in the Process area.
In the Assignment area, you have the same control over auto-assignments as on other task types and can use a Workgroup or User assignment. You can also reassign the task to the last user who completed this type of task.
- Use the Priority dropdown to set the task’s priority flag. This flag is used to sort items on the task listing. Critical items are listed at the top, followed by High, Medium, and finally Normal items.
- Optionally, you can set an SLA for this specific QA task. This SLA cannot be longer than the one set globally for the process. The format is the same as elsewhere: days:hours:minutes (dd:HH:mm).
- The slider for QC Sampling Percentage determines the percentage of tasks (by volume) that are randomly sampled to go through the QC process. To ensure that every item goes through manual QC, set it to 100; to bypass QC altogether, set it to 0.
The last section is where you specify the types of Notifications to be sent regarding this QC task. This works exactly like the notifications for other task types, but these are specific to QC items. They are well-suited to:
- Notifying a user that there is a new QC task auto-assigned to them.
- Alerting a manager that an item has completed a critical automated task and is ready for a QC or inspection stage.
If using task notifications, you can manage which data fields are available for inclusion in those notifications by adding or deleting them from the list.
Connectors
Connectors are a special category of automated tasks that execute a separate function on an item.
You can view connectors by hovering over any connector type of task, right-clicking, and selecting View Connector from the menu.
For all connector types, there is a Task History button in the bottom left to see the editing history of the item.
| Type | Definition | Icon |
|---|
| Start Event | The action that kicks off a process flow, such as receipt of an email or webhook. |  |
| App | Action taken by an application |  |
| OCR | Optical character recognition to extract data from a digital document |  |
| RPA | Robotic process automation to allow the software to mimic a human action |  |
| Machine Learning (ML) | Specialized apps like face or voice recognition |  |
| Bot | Automated, repetitive tasks like scheduling data backups |  |
Start Event
This connector is the action that initiates the entire process. It can be any of the following.
| Action | Description |
|---|
| Cron | Schedule a task to run at specific intervals, such as “Daily at 3:14 PM” or “every 15 minutes.” |
| Read Email | Read an email received at a non-Gmail account. |
| Read Gmail | Read an email received at a Gmail account. |
| Read Folder | Read data from a folder (like a hotfolder) whenever a change is made or a new file is created. |
| Read File | Monitor a folder and check for a new or updated file. Read that file when it is identified. |
| FTP | Read content from a folder (like a hotfolder) that is available on the FTP server. |
| WebHooks | Transfer or exchange data over the Web using a standardized format. |
| Custom Start | Javascript, Python script, or a Rule can trigger the process to start if the script’s logic defines it (e.g., if the script runs on the 1st of each month). |
App
App connectors link to a third-party application to complete a task, such as sending an email or updating a third-party system via webhook.
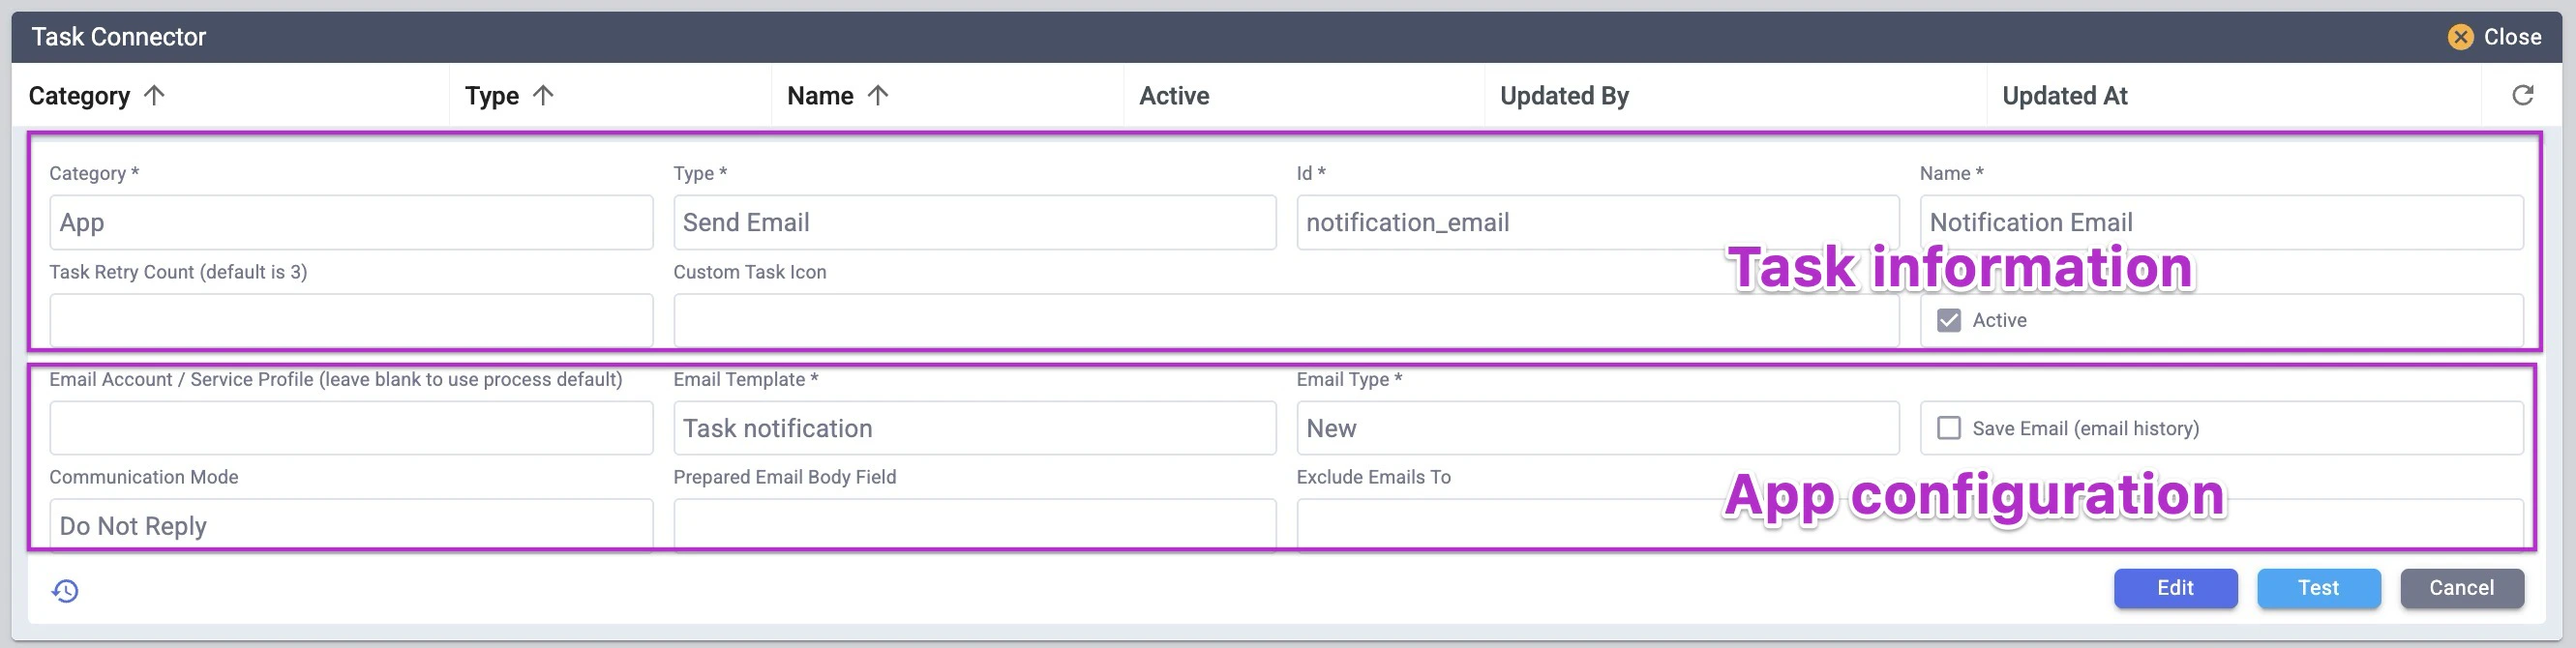 The Task Information section at the top shows the basics about this particular task:
Type is the app type for this connector. For App connectors it can be one of the following:
The Task Information section at the top shows the basics about this particular task:
Type is the app type for this connector. For App connectors it can be one of the following:
| Action | Description |
|---|
| Send Email | Send an email from a non-Gmail account. |
| Send Gmail | Send an email from a Gmail account. |
| Send Message | Send an SMS or WhatsApp message. |
| Read Folder | Read data from a folder (like a hotfolder). |
| Read File | Read data from a file. |
| Generate Document | Create a document. Document types that can be created are: PDF, Excel, CSV, HTML, and Word |
| FTP | Read content from a folder (like a hotfolder) that is available on the FTP server. |
| WebHooks | Transfer or exchange data over the Web using a standardized format. |
| Code | Run custom Javascript. |
- ID is the unique ID for this connector in the system and cannot be changed.
- Name is the display name for this connector. It can be changed without impacting the workflow, but the change will be visible to all system users and in all processes where this particular connector is used.
- Task Retry Count is the number of times that this task will automatically be attempted if it fails. This is set to 3 by default, and an entry is only needed here if you wish to override that.
- Custom Task Icon is the icon shown for this step in the process view.
- Icon Type is set to either Solo or Superimpose. Solo is a simple icon, such as a stop sign. Superimpose is a layering of multiple icons, such as a stop sign displayed over an OCR icon to show that the process is intended to prevent an OCR process from running.
- Active is the toggle for turning this task on or off. Tasks need to be turned off when duplicating them to create a new task and whenever making changes to a task. An inactive task is in “draft” mode and will not be attempted when the process runs.
Below that is the App Configuration section. The fields in this section change depending on the type of App selected (from the list above).
OCR
OCR stands for optical character recognition, which is used to translate scanned images into meaningful and editable text data. It’s most helpful for cases like receiving a document like a scan of a paper invoice or parts list and then bringing that data into a database.
 Type is the OCR engine being used for this connector. Actionabl OCR is built in but other engines may be integrated into your instance as well.
ID is the unique ID for this connector in the system and cannot be changed.
Name is the display name for this connector. It can be changed without impacting the workflow, but the change will be visible to all system users and in all processes where this particular connector is used.
Task Retry Count is the number of times that this task will automatically be attempted if it fails. This is set to 3 by default, and an entry is only needed here if you wish to override that.
Custom Task Icon is the icon shown for this step in the process view.
Icon Type is set to either Solo or Superimpose. Solo is a simple icon, such as a stop sign. Superimpose is a layering of multiple icons, such as a stop sign displayed over an OCR icon to show that the process is intended to prevent an OCR process from running.
Active is the toggle for turning this task on or off. Tasks need to be turned off when duplicating them to create a new task and whenever making changes to a task. An inactive task is in “draft” mode and will not be attempted when the process runs.
Extraction Type indicates whether you want to extract fields (named key-value pairs) or plain text (such as the body of an email).
OCR Cluster determines the technical settings for character recognition and processing to be used on this task. The clusters are built and optimized for the type of document typically processed in this step, so adjustment here should not be necessary.
Type is the OCR engine being used for this connector. Actionabl OCR is built in but other engines may be integrated into your instance as well.
ID is the unique ID for this connector in the system and cannot be changed.
Name is the display name for this connector. It can be changed without impacting the workflow, but the change will be visible to all system users and in all processes where this particular connector is used.
Task Retry Count is the number of times that this task will automatically be attempted if it fails. This is set to 3 by default, and an entry is only needed here if you wish to override that.
Custom Task Icon is the icon shown for this step in the process view.
Icon Type is set to either Solo or Superimpose. Solo is a simple icon, such as a stop sign. Superimpose is a layering of multiple icons, such as a stop sign displayed over an OCR icon to show that the process is intended to prevent an OCR process from running.
Active is the toggle for turning this task on or off. Tasks need to be turned off when duplicating them to create a new task and whenever making changes to a task. An inactive task is in “draft” mode and will not be attempted when the process runs.
Extraction Type indicates whether you want to extract fields (named key-value pairs) or plain text (such as the body of an email).
OCR Cluster determines the technical settings for character recognition and processing to be used on this task. The clusters are built and optimized for the type of document typically processed in this step, so adjustment here should not be necessary.
RPA
Robotic Process Automation (RPA) is a powerful tool that allows an automated process to mimic a human’s interaction with an external piece of software, such as an application running locally on a Windows desktop or in a web browser. The Robot is configured to click buttons, fill in fields, and interact with applications in ways that mimic a human.
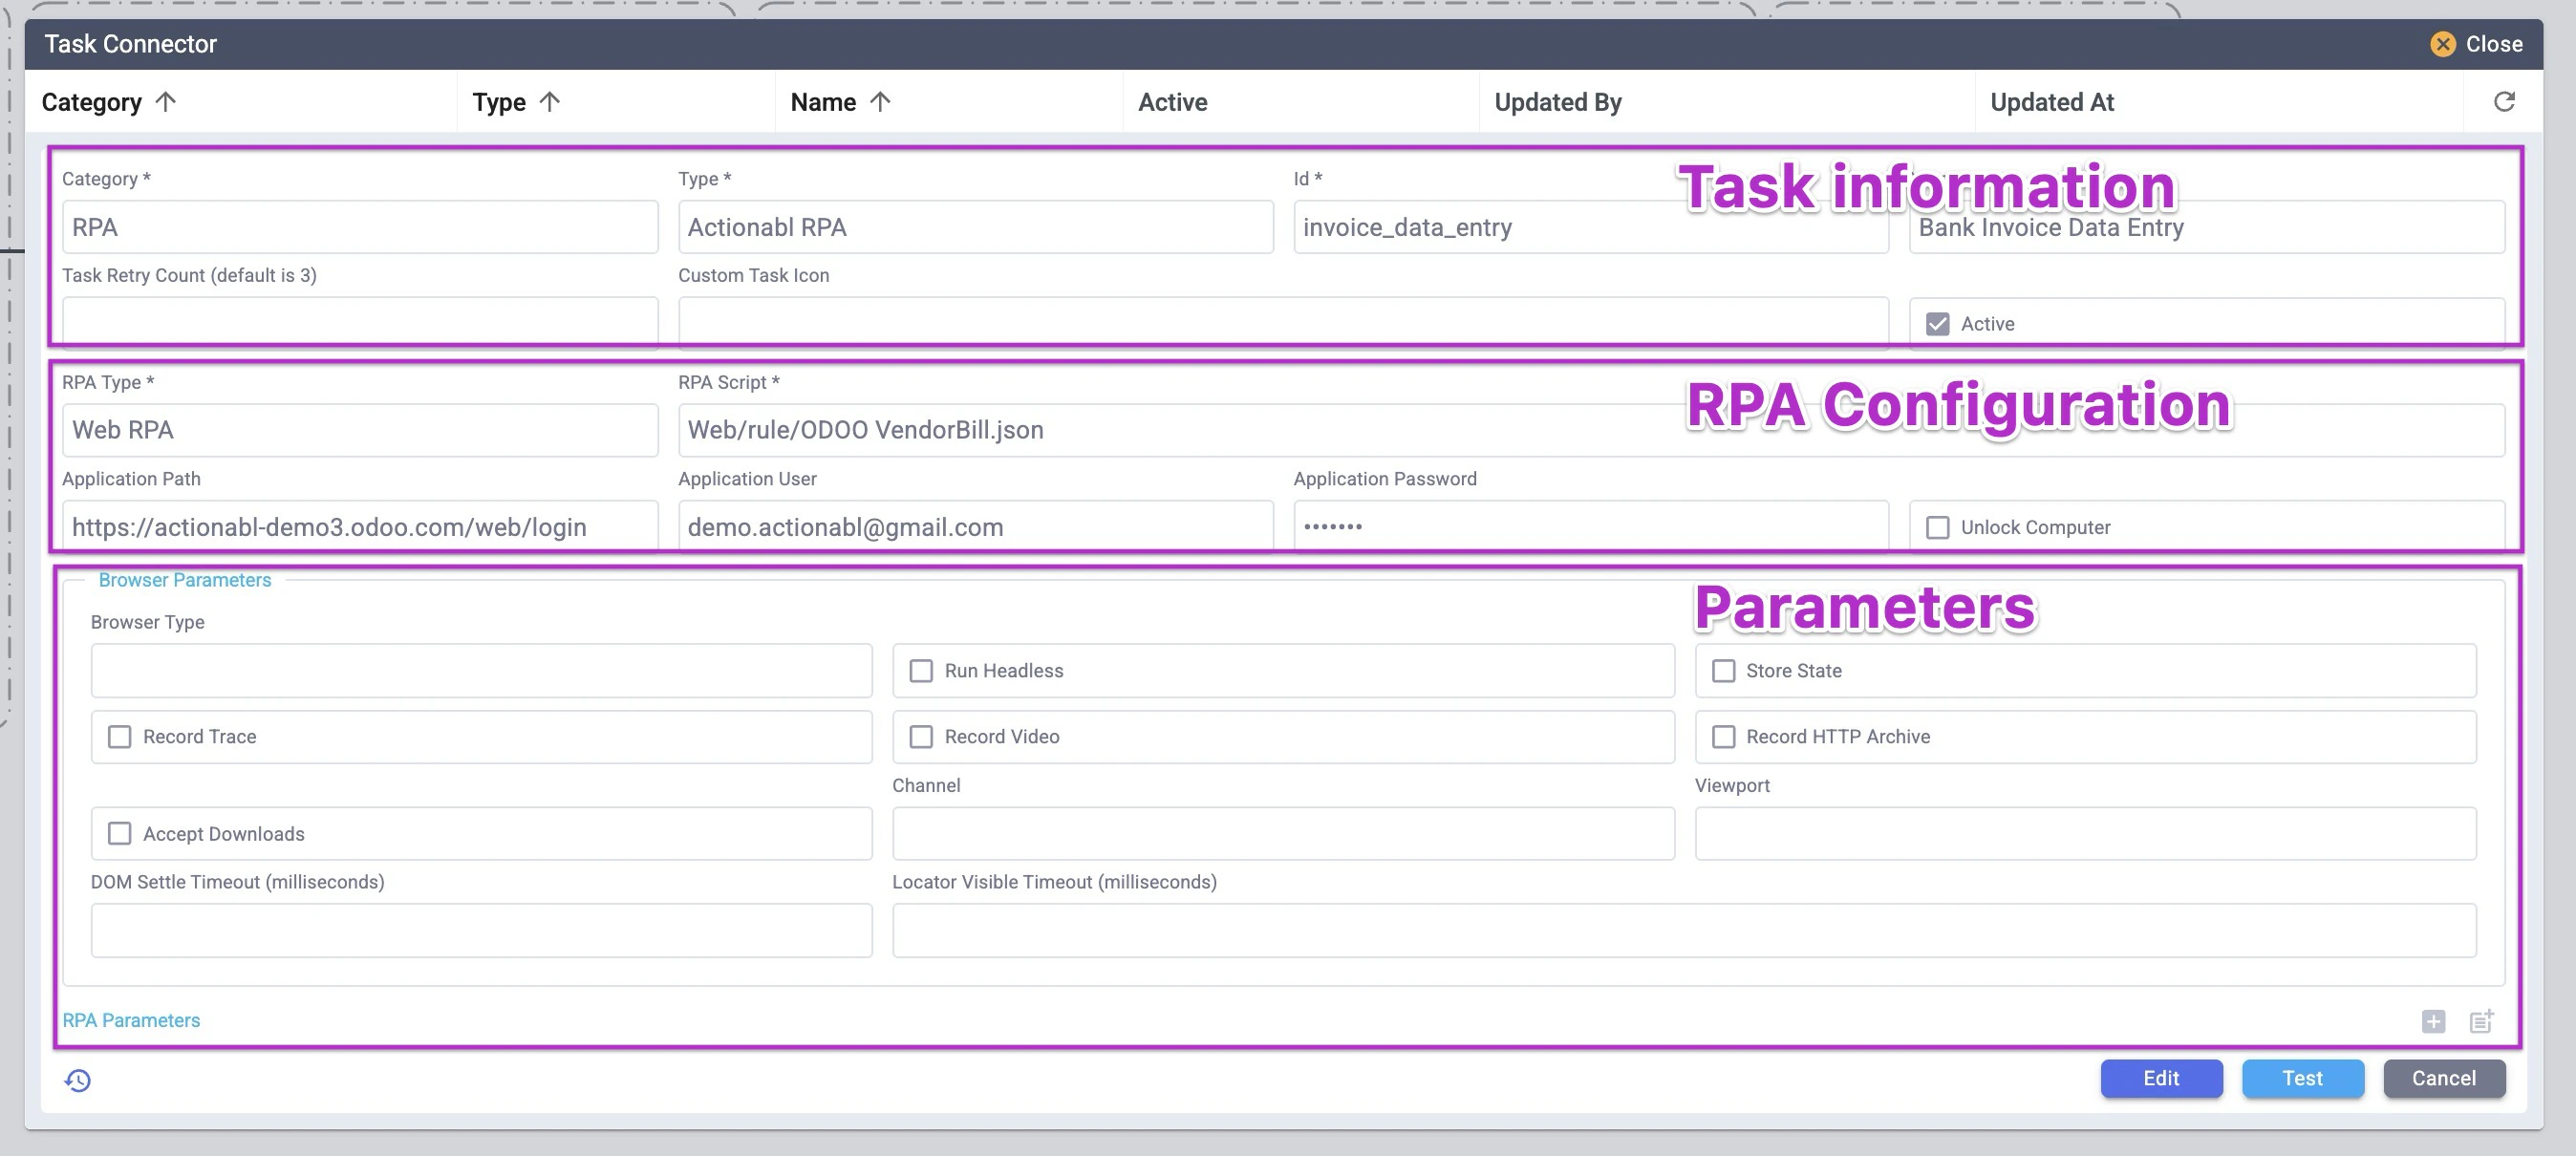 The top section has the same task configuration as in other connectors. It includes the ID, display name, number of retries, the icon to use, and the Active flag.
Below that is the configuration of the RPA itself.
The top section has the same task configuration as in other connectors. It includes the ID, display name, number of retries, the icon to use, and the Active flag.
Below that is the configuration of the RPA itself.
- RPA Type indicates where the RPA should execute: Windows, Web, Java, SAP, Android, or Custom.
- RPA Script is the Javascript file to be run via RPA on the remote destination. This script contains all of the instructions needed to execute the task. The developer or an administrator previously uploaded it to the server using a script written for this purpose.
- Application Path, User, and Password are the credentials used to run the application on the remote device.
- The Unlock Computer toggle specifies whether the robot first needs to unlock the remote device before executing the task.
The remainder of the pop-up contains the parameters to be configured for the process being run. The options displayed depend on the RPA Type selected in the previous section.
- Parameters are entered as key-value pairs.
- Browser Parameters (as shown above) are only shown for the Web RPA type.
As elsewhere, there is a Task History button in the bottom left to see the editing history of this item.
Bot
Bots are specialized connectors that perform repetitive tasks, such as scheduling jobs to run daily or performing backups. They require little configuration.
Unlike an RPA task, where the robot clicks on fields and buttons and can be “visualized” as an operation within an app, a Bot is an invisible actor. Bot tasks, for example, update data in a database.
Machine Learning (ML)
Execution by specialized apps like face or voice recognition is considered a Machine Learning (ML) task. These events are focused on teaching a computer to learn from this data and improve accuracy and understanding each time it runs.
The Type is currently restricted to Actionabl ML, which uses the built-in machine learning function for execution. Otherwise, the top section has the same task configuration as in other connectors. It includes the ID, display name, number of retries, icon to use, and Active flag.
AI Space identifies the AI processing module or server. In Edit mode, clicking the expand icon shows the connection strings and allows you to select which AI space should be used in this task.
RULES
Rules are the elements of business logic that are used for processing data, making decisions, and determining whether an error has occurred. They are defined by the business in most cases. Some examples of rules are:
- An invoice must be dated on or after the date that an order shipped to the customer.
- Orders over $1,000 should be routed to vendor A, while orders equal to or under $1,000 should go to vendor B.
- If an order exceeds $25,000, its invoice must go through a QC step with the Accounting team.
There are two types of rules: Task-Specific and Process.
Task-Specific Rules
Task-specific rules may exist in any task step. When hovering over the task, select View Rules in the dropdown menu.
 Task-specific rules can be ones such as:
- Data validation
- Transforming data
Process Rules
Process rules are managed under View Decision Model on Review Rules task steps:
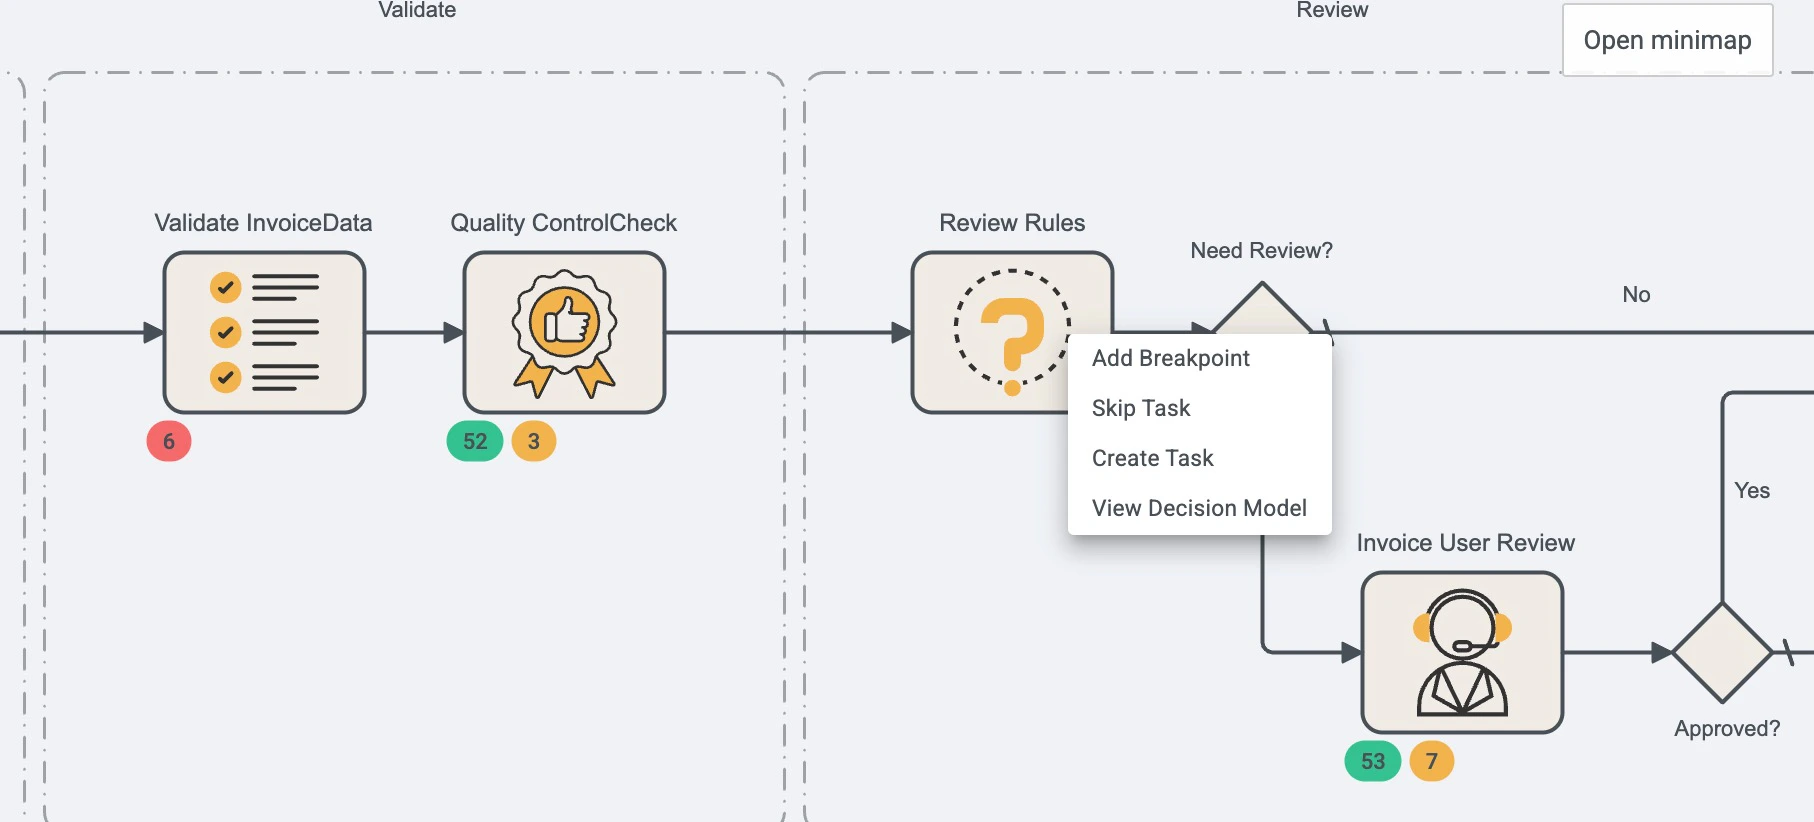 Process rules determine which branch of logic the item should flow into next.
The Rule Decision Model
When you open the Review Rules decision model, you see all elements of the set of rules that are being evaluated at that point in the process.
 The top section is the rule information.
- ID cannot be changed once the rule is created
- Name is the display name of the rule. This can be changed, but be aware that doing so will change its name for all users of the system and all places where this rule is used.
- Type is the definition of the rule that determines the fields it uses and how it processes them. For example, with the above decision model, the type is set to “Bank Invoice Review Definition” and has 3 fields:
- Two inputs: Supplier Name and Invoice Amount
- One output: a boolean value for Needs Review?
- Active is the flag that turns the rule on or off. If a “Review Rules” step exists in the process but its rule is made inactive, the system will ignore the rule and continue processing. If a rule exists at a higher level (system -> process -> task -> sub-task), that rule will take precedence here.
The next section contains the values against which the item’s data is compared to determine the outcome of the step.
As shown above, there are two input fields: Supplier Name and Invoice Amount. For each of these values, a setting is specified for the output field (“Needs review?”).
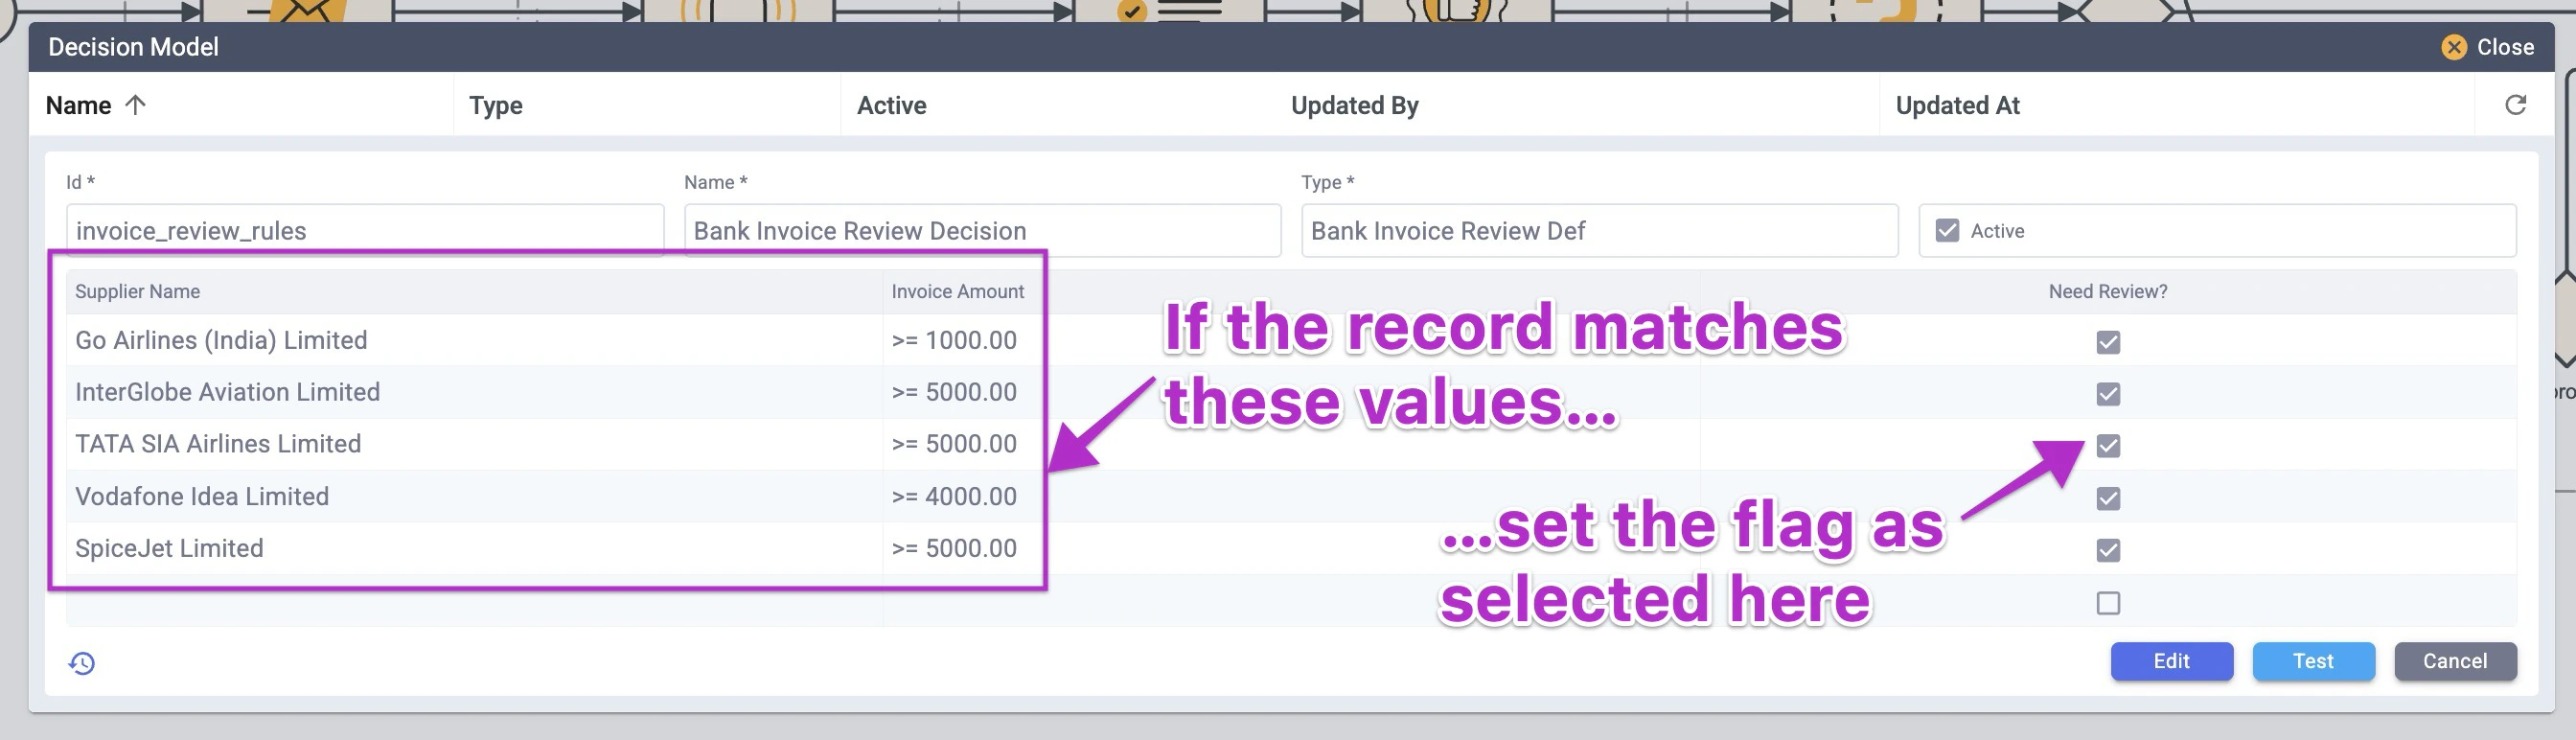
So for example, an invoice from SpiceJet Limited for $4,328 would not need review, while one of that same amount from Vodafone Idea Limited would require it.
The display order is the order in which criteria are calculated. This can be important in some cases where you want a criterion to only be evaluated if another criterion has been met.
For example, using the above data, you might see rules like this:
| Supplier Name | Invoice Amount | Needs Review |
|---|
| * (matches any supplier) | >= 25000.00 | Y |
| Vodafone Idea Limited | >= 4000.00 | Y |
| Go Airlines (India) Limited | >= 0 | Y |
In this case:
- Invoices greater than or equal to $25,000 from ANY supplier will need review. If this condition is met, no further rule processing is needed.
- Only invoices greater than or equal to $4,000 from Vodafone require review.
- ALL invoices from Go Airlines (India) Limited require review.
- If other suppliers submit invoices under $25,000, they do not require any review.
You can move a criterion up or down in the order by dragging the move icon on its right to the desired position in the list.
The bottom line of the list is where you can add new criteria for the rule when you are in Edit mode. Type the data to match for each of the fields, then select the appropriate setting for the output field. Be sure to click Save when you are done, or Cancel to leave the screen without saving.
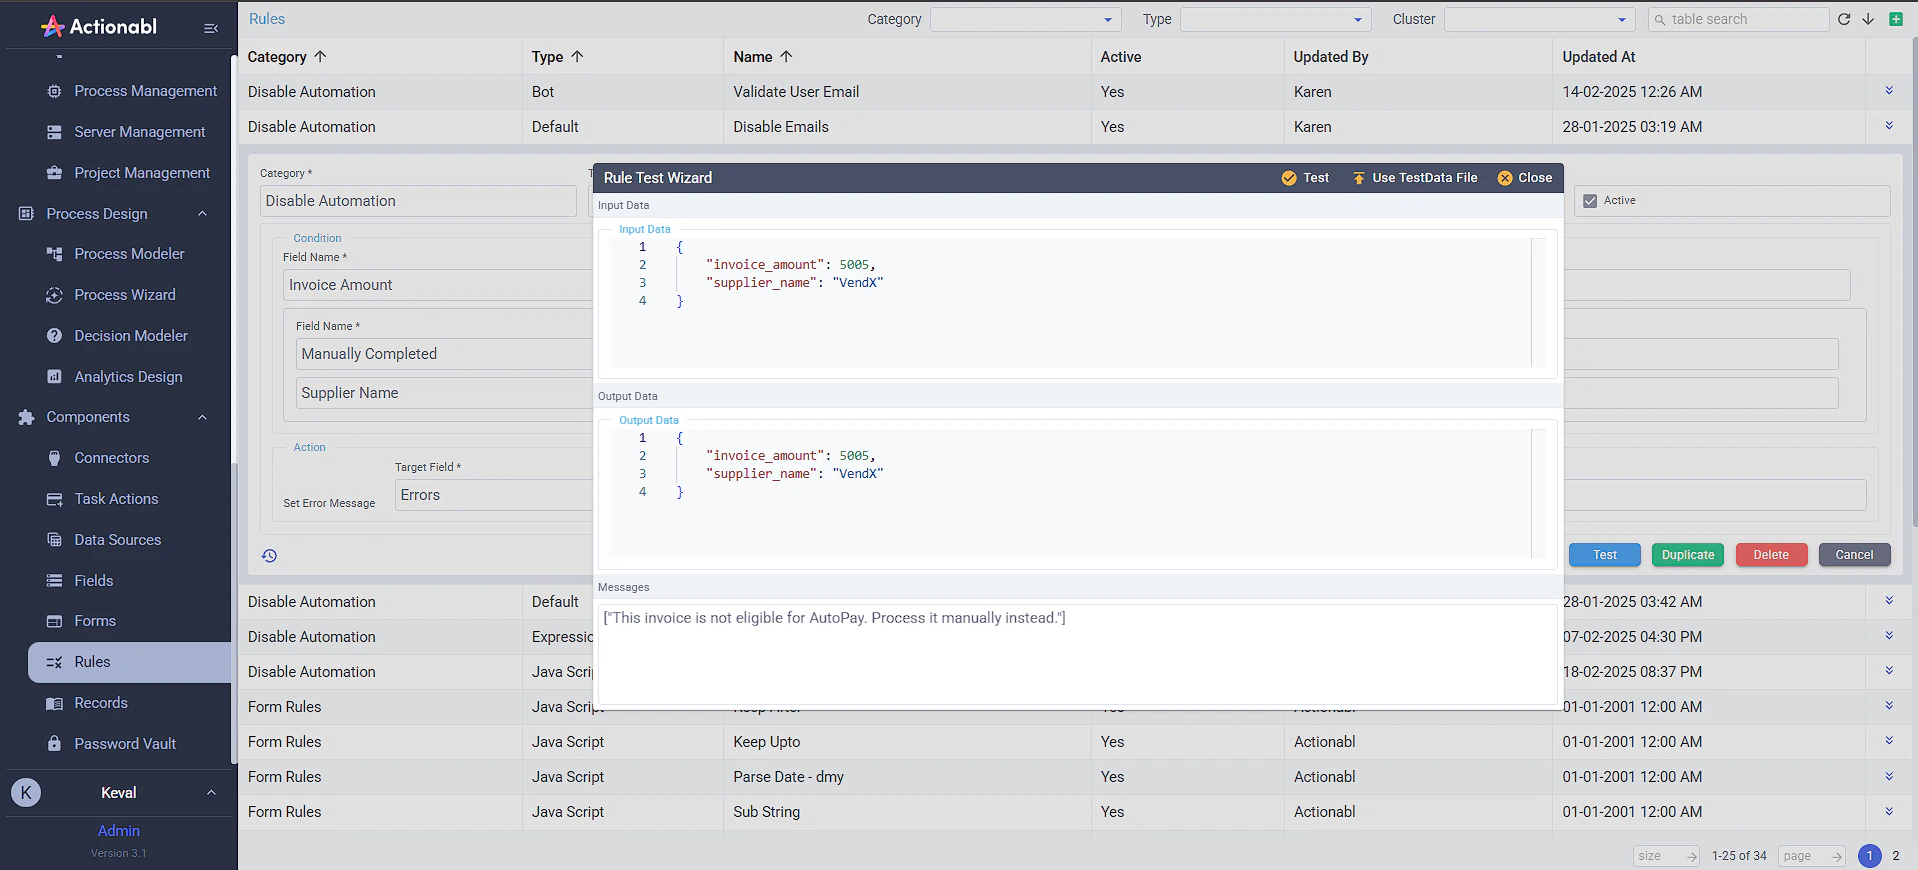
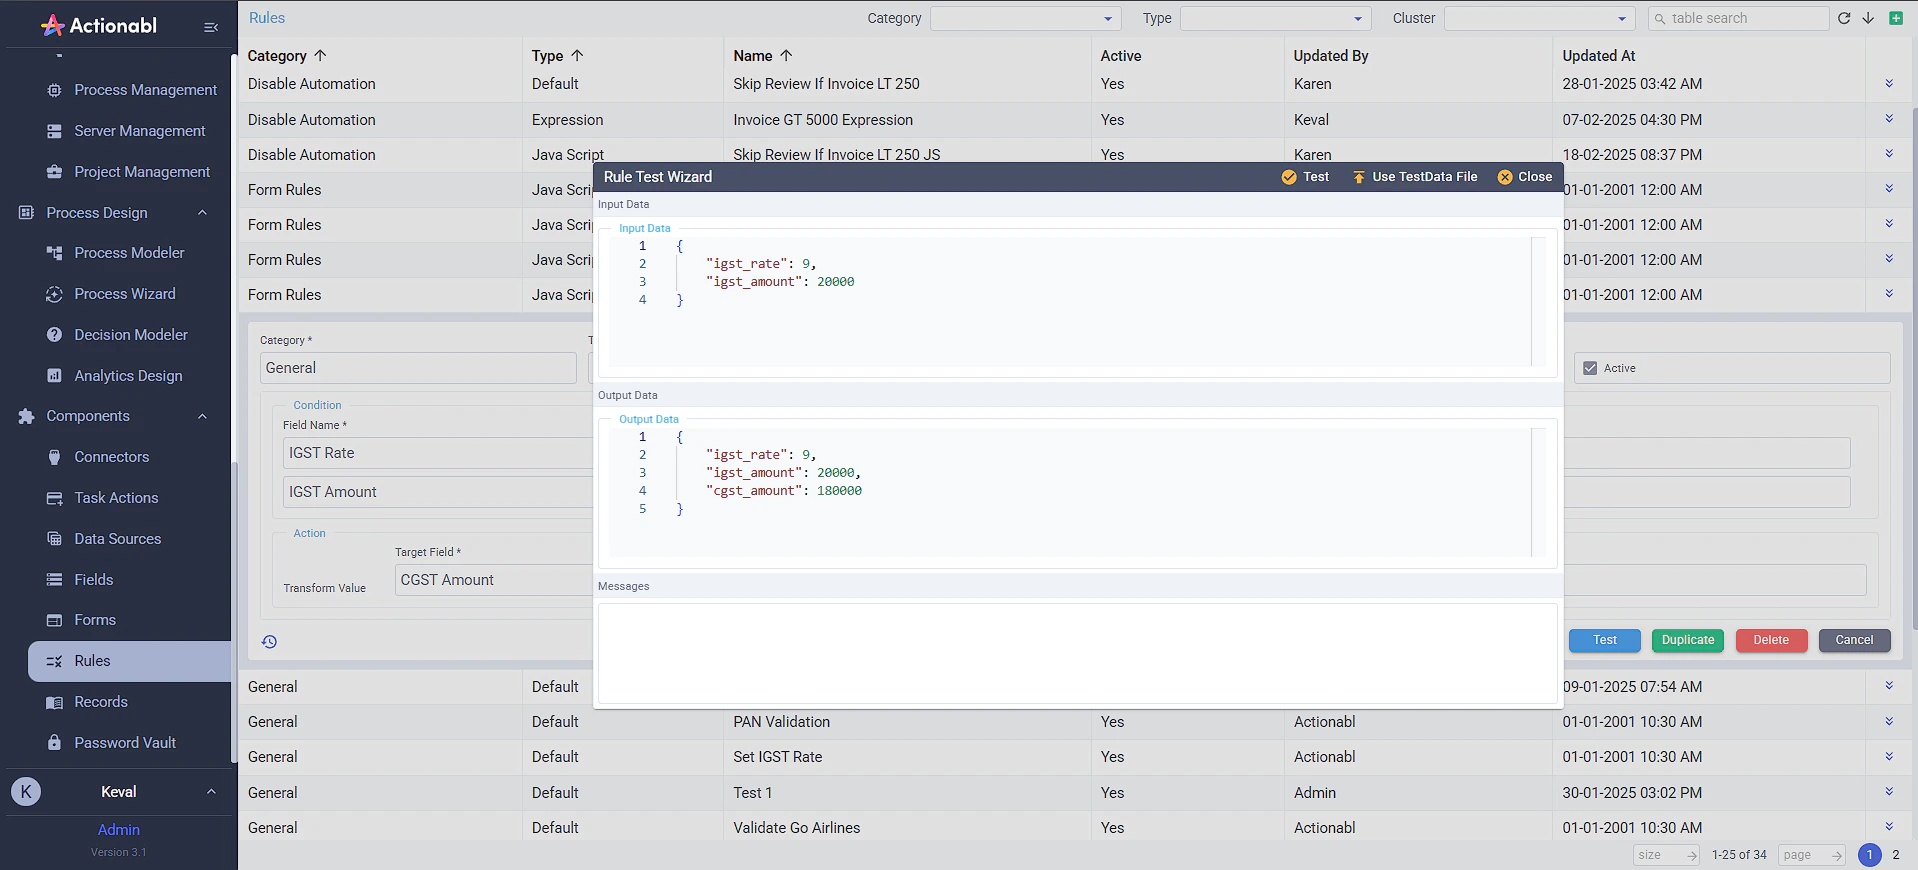
If you make changes to a rule, you are strongly encouraged to test those changes to ensure they work as expected. After saving your change, click the Test button and enter the appropriate test data. Review the output and compare it to what you would expect to see.
Input data is entered in JSON format in the Input field. When you click Test, the output data and/or any Messages are shown in the bottom section of the form.
To use an uploaded JSON file with test data, click the Use TestData File option; this file must be uploaded to the file system by an administrator, just as with other uploaded files.
Examples of test data are shown here:
 Click the trashcan icon to delete a criterion from the list.