OVERVIEW
Actionabl.ai is a platform that automates your business processes and alerts users whenever human intervention is needed. This guide covers the creation and editing of process automations within the system, including connectors, tasks, rules, and forms.Related Documents:
- Controller Guide covers all aspects of the Controller dashboard, which includes:
- Scheduling and management functions for automations, AI spaces, Tasks, and cron jobs
- Process analytics
- Process view management
- Error Task management
- Task Management Guide is written primarily for your company’s business users, but you may find it helpful in understanding the larger concepts of the tasks you’re administering.
- User Management Guide includes all aspects of managing users, groups, and departments. It is intended primarily for supervisory and administrative users.
- Automation, Rule, and Task Management Guide details the management of all of the core “actions” in the system through automations, rules, tasks, and connectors. It also details process management and how connectors function, which informs how you administer them.
Unless otherwise noted, all Actionabl admin menus mentioned in this document are found under the Admin dashboard, accessed from your user profile.
UNDERSTANDING THE COMPONENTS OF PROCESS AUTOMATION
In Actionabl, the Process View defines an automation and how data flows through the system. It has a number of components: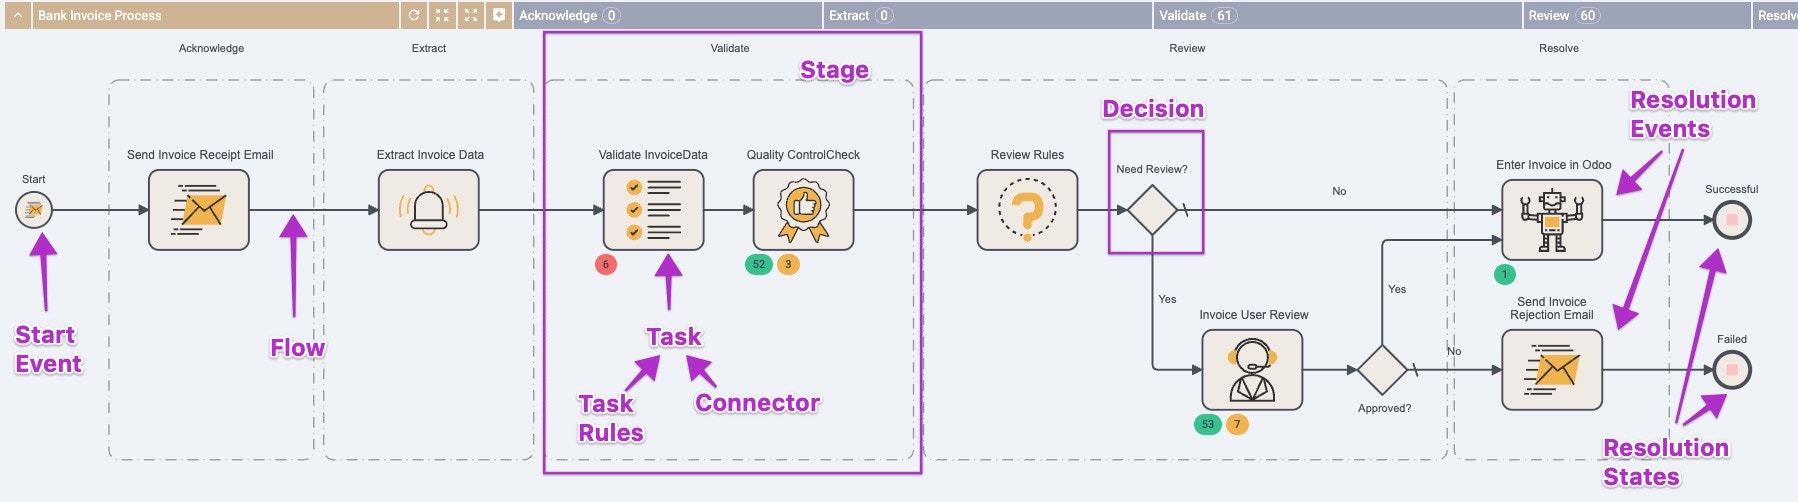
- The Start Event kicks off the execution of the process. This may be, for example:
- A regularly scheduled scan of a folder or file to detect changes
- Receipt of an email or message from an external resource
- An inbound API call or webhook event
- A cron job that runs on a scheduled basis to execute a database query
- The process is made up of a series of Tasks, which may be guided by Task Rules and use Connectors to complete actions.
- Items pass through the process using the Flows to move through the tasks. Flows can change the status (and Stages) of the item as they move it between task steps.
- Decisions represent logical branches in the flow, where an item may be directed into a different pathway based on the rules and evaluations that occur within the Decision task.
- At the end of the process, each pathway has a Resolution Event, representing the automation’s terminal action.
- Data sources, which may be internal or external
- Data fields in the database
- Remote workers to connect to APIs and integration points
- External Access resources, which can retrieve or send data outside the Actionabl system.
- Records, which define messaging templates and connections to things like FTP sites, email accounts, or other outside accounts.
DESIGNING A PROCESS AUTOMATION
When designing a process automation, it’s tempting to just start building the flow in the system. However, this is the least efficient approach and can cause frustration. We recommend the following process. Steps 1 through 7 are done outside of Actionabl using your preferred flowcharting method and tools. Step 8 is done in Actionabl.Build the process flow
Start by sketching the process flow. This flow should include all inputs and outputs, decision points, tasks, and status transitions for items flowing through the process.
Identify your data sources
Identify all of the data sources that this process uses in each of its tasks. This includes all APIs, communications, human inputs, databases, and forms.
Define the data
For each task in the process, clearly define the data it will use, including inputs, outputs, and any translations or calculations.Each data point should have an identified source and a storage point.
Define Tasks, Rules, and Connectors
In your process flow, fill in the details of each task and all of the connectors and rules that govern it.
For example, if you have a task that validates an invoice, list the validations to be performed (e.g., date, vendor, quantities matching a PO, looking for a VIP flag, dollar thresholds, etc.). If your task uses an action like OCR or a bot, list the specific actions to be performed and the inputs and outputs of those actions.As you build your tasks, connectors, and rules, group them into the appropriate Stages.
Define Decision Points
For each potential branch in the flow, clearly define what the decision is evaluating - the field(s), groupings, logic, and conditions.
Define How Items Flow Between Tasks
Each task must have an input and an output flow. The flow is what moves the item between this task and its next one and may involve logical rules to determine which task comes next. Define each flow and each possible branch an item can follow.
For example: if a task is a decision model determining whether an item must be manually reviewed, it will have two outbound flows: one for “yes” and one for “no.” The “yes” flow directs the item into a manual review step, while the “no” flow goes to an automated payment task.
Define The Resolution Task(s)
Ensure that every pathway has a well-defined resolution task as its endpoint.
Build the Process Components in Actionabl
Now that you have all of the process components defined, you can start building them in the system. If you start at the most granular level and build up from there, the elements you need for more complex items like tasks will already be in place when you’re ready to use them.In Actionabl, we recommend that you build items in this order:
- Data fields
- Data sources
- Records
- Connectors
- The Process Model
- Tasks and Stages - The Process Model
- Task Rules
- Decisions
- Remote workers
- External accesses
MANAGING DATA FIELDS
A Data Field is a container for a defined, discrete, element of data stored in JSON format within Actionabl. A field has the following characteristics:- Type (required) defines the format of the data stored in the field. Supported types are: String, Integer, Float, Boolean, Date, Date Time, Time, Field Set, JSON, Attachment, or Alias.
- Unique ID (required), which cannot contain spaces or special characters other than underscores. Example: member_email_address
- Name (required) is the human-friendly name of the field displayed on internal lists, forms, and reports. If no Display Label is set, this is what shows in the UI for this field. This is usually set to a version of the ID. Example: Member Email
- Active is a flag indicating whether the field is currently in use and should be shown in reporting and the UI. This defaults to checked.
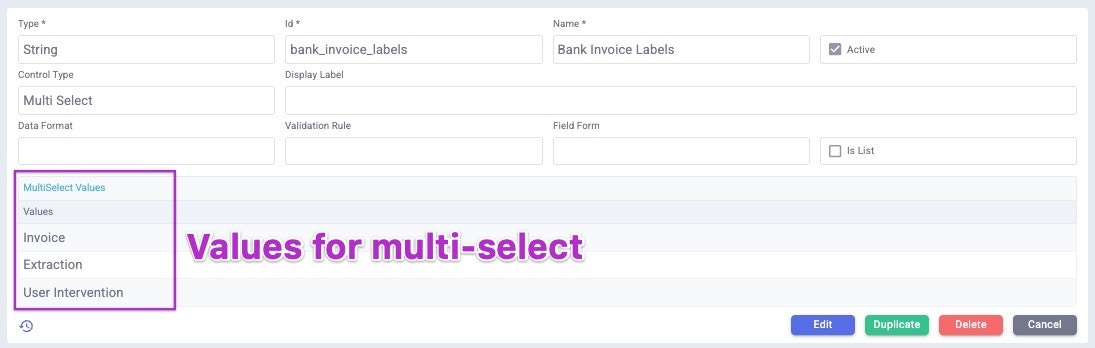
- Control Type governs how inputs to the field are structured. Supported types are: Multiline, Lookup, Dropdown, Checklist, File Select, Link, Currency, Date Format, Text Editor, Multi Select, Record Lookup, User, and Display In Place. Your selection here may cause other input fields to appear, such as the items to select or the number of input lines to display.
- Display Label overrides the Name when the field is displayed in a form or in the UI. Example: Email.
- Data Format controls how the data in the field is displayed in the interface. The selected data format must be compatible with the Type and the Control Type. Valid options are: ID, Folder ID, User ID, Name, Number, Alphanumeric, Percentage, Currency, File Path, URL, Phone Number, Email, Time Interval (DDHHMM), IP Address, Host Name, and Port Number.
- The Validation Rule is an optional rule that sets guardrails on what can be entered into this field. For example, if the field is “invoice_date,” the validation rule may say that the date entered cannot be earlier than the company’s founding date and also can’t be a future date. The Validation Rule cannot be violated by any existing entries, not just new entries—it’s not an input validation; it’s a field validation.
- Field Form is the form in which this field is used, if it’s part of a field set.
- If Is List is checked, the field is treated as an array that can contain multiple values.

Creating New Fields
If an existing field is configured similarly to the new field, you can duplicate the existing field and use that as the basis for the new one. Alternatively, click the green plus icon on the top right of the field list to create a new field from scratch.
- In the new field dialog, select a Type from the dropdown.
- Type a unique ID. This cannot contain spaces or special characters other than underscore (_).
- Enter a Name that will be easily understood in the forms, reports, and areas of the interface where the field appears.
- Leave Active checked unless you want the field to be inactive and hidden.
- Optionally:
- Select a Control Type from the dropdown. If you do not select one, the system will default to one it assumes is appropriate to the Type you selected. Your selection of a control type may cause additional options to appear, such as the number of input lines or format specifications.
- Add a Display Label to override the internal Name of this field when it is shown in user forms.
- Specify a Data Format. This is a more detailed internal format for storing data, such as “phone number” for an integer field. It restricts the input to the parameter of the format selected.
- Validation Rules can be used to limit the input in the field. For example, you can specify that a Name cannot contain numbers or that a date cannot be in the future.
- Select a Field Form.
- If the field should contain an array of values (multiple entries), click the “Is List” box.
Editing Existing Fields
You can only Edit fields that you or another user have created; fields created by Actionabl cannot be changed. However, you can Duplicate any field in the system and make changes to its structure and characteristics. In the Components section of the menu, click Fields to open the list of fields.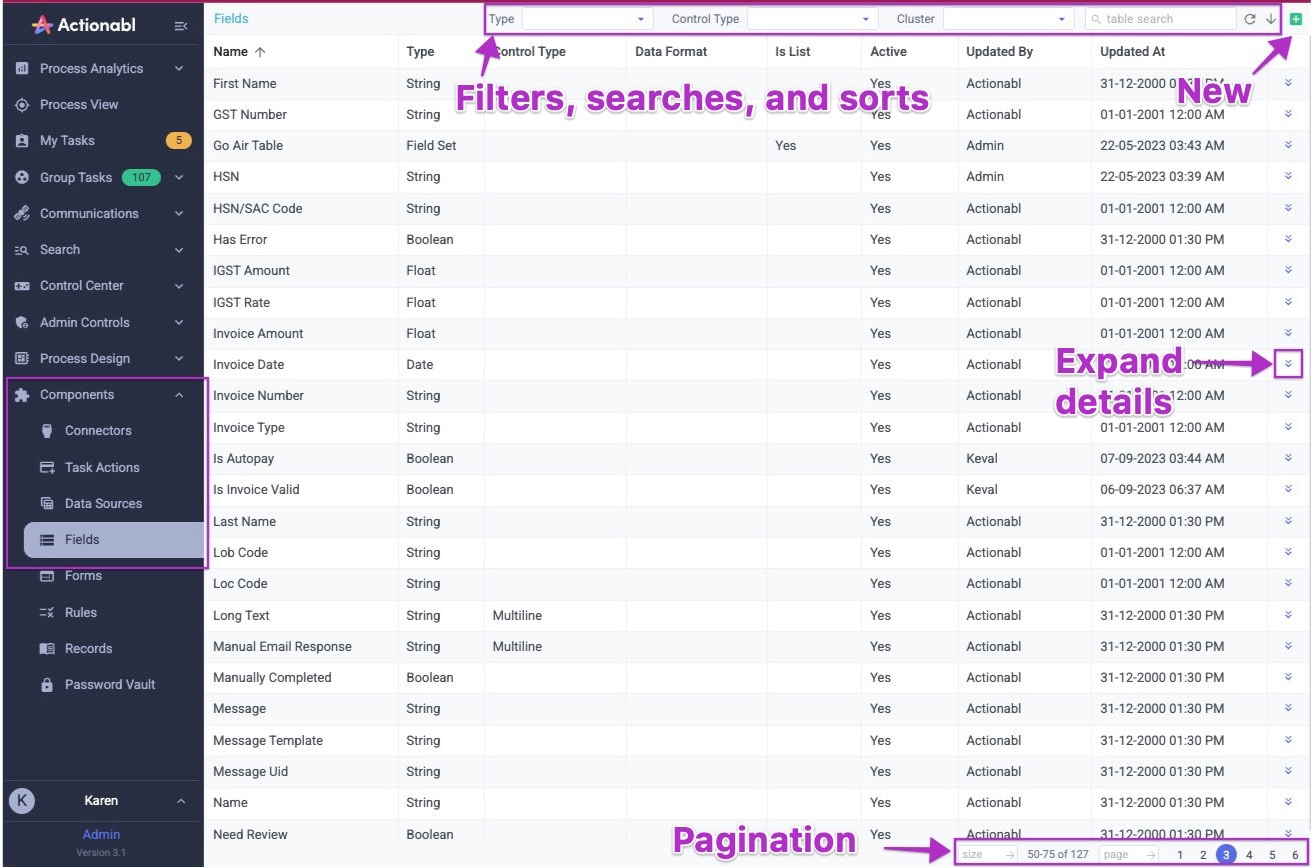
- Type. Select from the dropdown list of field types such as Integer, Boolean, or String.
- Control Type. Select from the dropdown list of control types such as Dropdown or File Select.
- Cluster. Select the process or sub-process in which the field is found. Clusters are used in load balancing; they are defined in project_config.js and usually correspond to process definitions.
-
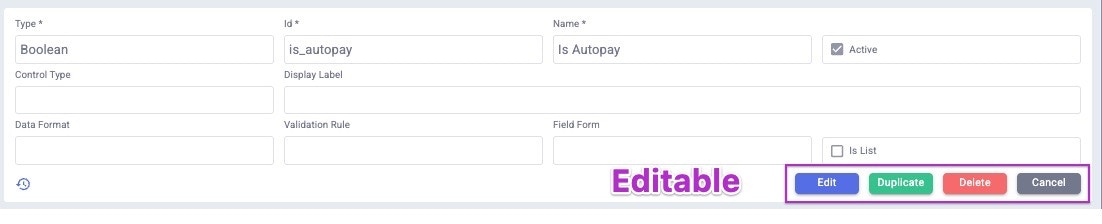
Click the Expand icon to open the field you want to edit or duplicate. If you can edit the field, it will look like this:\

-
Click Edit or Duplicate to continue.
Duplicating a field only copies its definition, not the data contained in it.
- In the window, you can now select or change all of the elements of the field.
- If editing an existing field that is in use, be aware that changing its type, data format, validation, or control type may create errors in existing processes or forms that use the field.
MANAGING DATA SOURCES
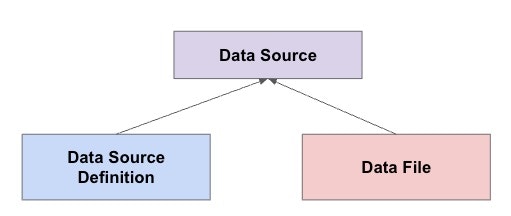
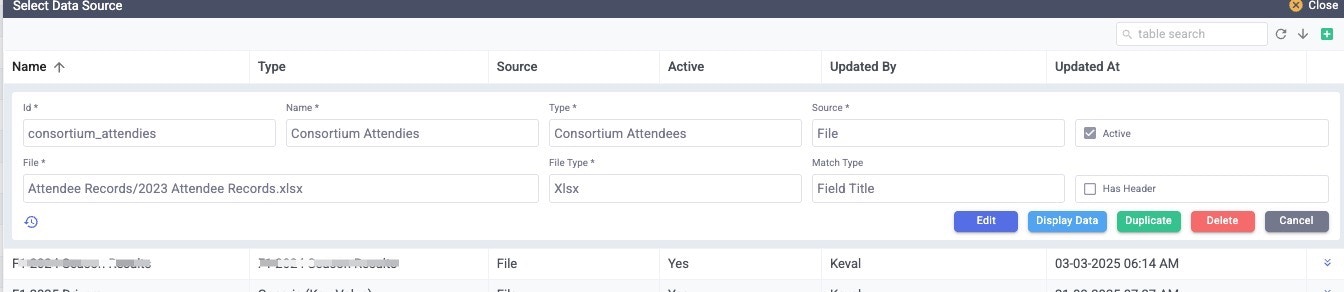
Data sources are static tables of data that can be queried against as a reference, but that cannot be updated by the automated processes.Let’s use an example where we track a list of attendees at a yearly event. Each year’s attendance records are kept in an XLS or CSV file.Data sources have 3 components:
- Data Source Definition. This is the table definition for the data, specifying the following for each column: field name, display name, data type, and whether the field is hidden. A data source definition can be mapped to multiple data sources as long as their structures are identical. For example, the same data source definition can be used for every year of the event’s attendee records, as long as those records have the same data structure.
- Data Source Mapping. This entry maps the data source definition to a specific instance of the data and sets the field on which to match the definition to the data. This is where the data source definition for the event would have multiple entries, one for each of the event years.
-
Data Source File. This is the file that contains the actual data (the attendee information for year 2, for example). This can also be a key:value entry you’ve typed or the results of a Bot’s actions.
Creating A Data Source Definition
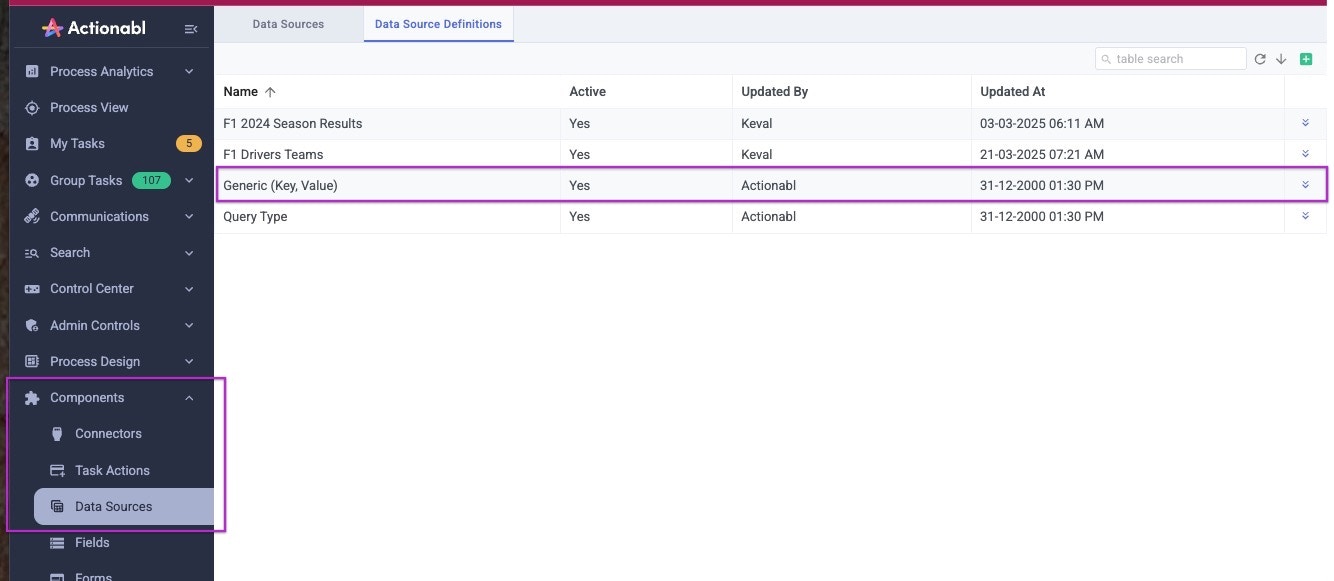
- Go to Components -> Data Sources.
- At the top, start with the Data Source Definitions tab.
- Either click the green plus at the top right to start from scratch, or use an existing definition as the model. To do that, click the Expand icon next to the model, then click Duplicate. For this example, we’re going to duplicate the Generic (Key, Value) definition.\
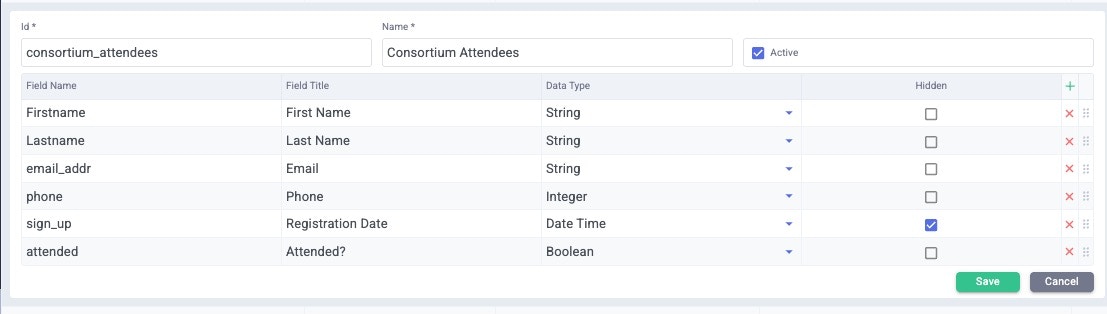
- Enter an ID. This cannot contain spaces or special characters other than underscore (_).
- Replace the Name copied from the original record with the name for the new definition.
- Leave Active checked. It should now look something like this:\

- Next, specify each of the fields in your data file, along with their “friendly” name and type.
- Field Name should exactly match the column header in the data source file.
- Field Title can be anything you’d like. This is how the data will be labeled in the interface, reports, etc., within Actionabl.
- Select a Data Type that represents how the data should be interpreted from the source file.
- Click Hidden if the field should not be displayed in Actionabl. Its data is still available for use in rules and calculations.
- Your input should look something like this:\
- Click Save.
Defining a Data Source Mapping and Source Data
Your data source definition maps to:- A file previously uploaded to the system
- A file that the user will upload whenever the data source is called
- Information you directly enter in key:value format
- The results of a bot’s actions that run when this data source is called

- Type a unique ID for the data source. This cannot have spaces or special characters other than underscores (_). Using our previous example, this will be a specific year’s attendees, so its ID and name should reflect that.
- Enter a Name for the data source. This is how the source will appear in all menus, reports, and anywhere it’s listed in the system.
- For the Type, select the Data Source Definition you just created for it.\

Entry Source Type
This source assumes you have a relatively small set of data and that you’re going to type it in here. Clicking this loads a table showing the data definition you specified.

File Source Type
The File source type assumes that you’ve uploaded a file to the filesystem, which makes it available for selection. To do this, you can place the file in a folder or leave it at the root level for uploaded files on your system. If you aren’t sure how to upload this file, consult with your system administrator or DevOps/IT department. When you select File as the source type, your input screen will look something like this:
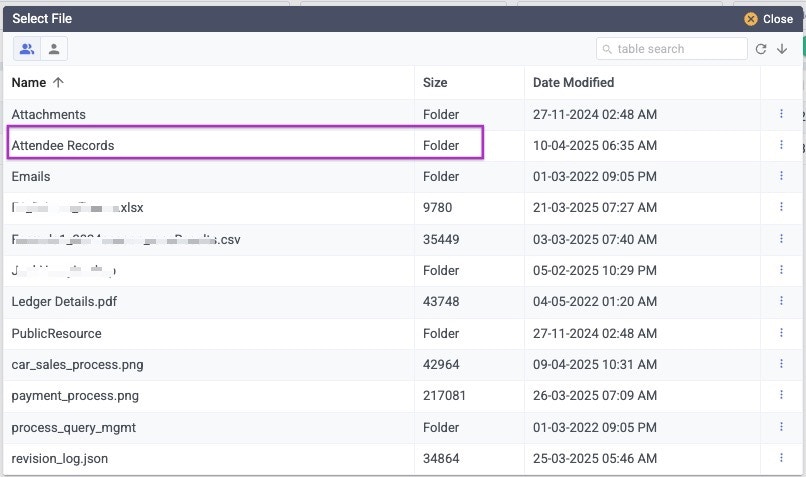
Note that some of the list entries (like Attendee Records) are described as Folders. Clicking one of these opens the folder and shows the files in it. To return to the previous list level, click the double dots at the top left of the list.\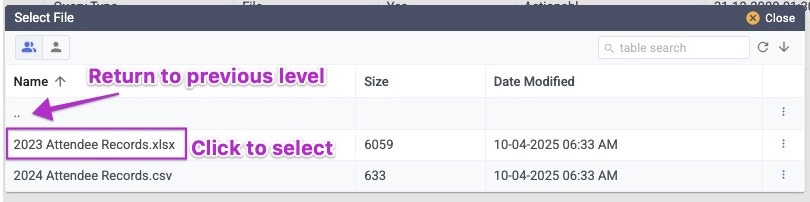
- Click on the File you want to use for this mapping.
- Select the File Type in the dropdown.
- In the Match Type dropdown, select how you want to match the fields to the Data Source Definitions. You can use the field index (the row number in the input file), field name, or field title to match on.
- If your input file contains headers, click “Has Header” to skip the first row of the file.

File Upload Source Type
The File Upload source type differs from the File type in that it prompts the user for an uploaded file when the data source is called. This is especially handy if recent or refreshed data is needed whenever the data source is used.
- Specify the File Type to be uploaded from the dropdown list.
- Specify the Match Type from the dropdown, which defines how the file’s data is matched to the Data Source Definition.
- Indicate whether the input file is assumed to have a header row, which should be ignored.
Bot Source Type
The Bot source connects the data source to a bot script, which runs using the specified parameters whenever the data source is called. This is especially useful when a complex process or data assessment is required to generate a result set for use. For example, you might create a script that calls a REST API to fetch data, which is then manipulated to be used as a data source.
Note that some of the entries on the list are described as Folders. Clicking one of these opens the folder and shows the files in it. To return to the previous list level, click the double dots at the top left of the list.\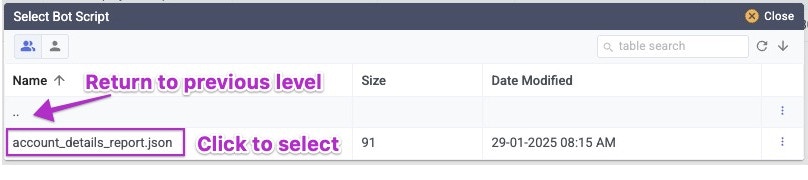


Uploading Data Source Files
Files such as those used in data sources must be uploaded directly to the file system in the Project/Folders/Resources/Published/Files folder. For ease of maintenance, we strongly recommend creating subfolders here and using a consistent naming system to organize your files. File uploads are made by a technical user or administrator who has been granted access, usually using an FTP client. Once a data source is uploaded, it cannot be directly edited. To update the contents, upload a replacement file with the exact same filename.MANAGING TASK ACTIONS
Each task needs an action, so before creating it, we need to ensure that the appropriate actions are defined in the system. Go to Components -> Task Actions to see and edit the actions already defined or to add a new action. Actions can have one of seven types: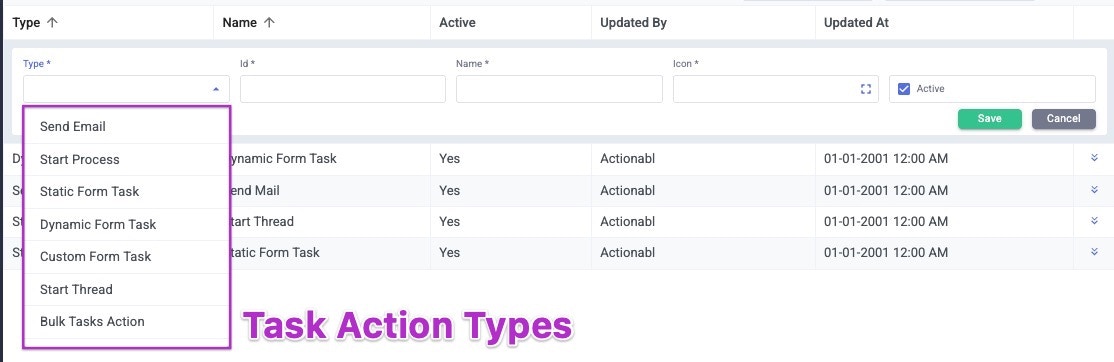
- Send Email actions send an email using one of the system-defined email templates. (See Email Templates for more information about creating and managing templates.)
- A Start Process is a “start task” that initiates a process flow. Examples include receiving an emailed invoice from a vendor or scanning a folder for a newly created file.
- Static Form, Dynamic Form, and Custom Form task actions are used in tandem with the Local Actions in a task to send a form to the user to fill out.
- Static forms are pre-created and standard forms that the process sends, such as a password reset or a standardized request for information.
- Dynamic forms are created on the fly based on the unique information in the task. For example, this could send a request for more information based on certain criteria found in an invoice’s data.
- Custom forms let you select a pre-created form that is defined using a custom script. The form-level actions are customized to this task.
- Start Thread tasks open a new communication thread associated with the task, which can be used for notifications and other communications.
- Bulk Tasks Action combines multiple task actions into a single one by using a rule.
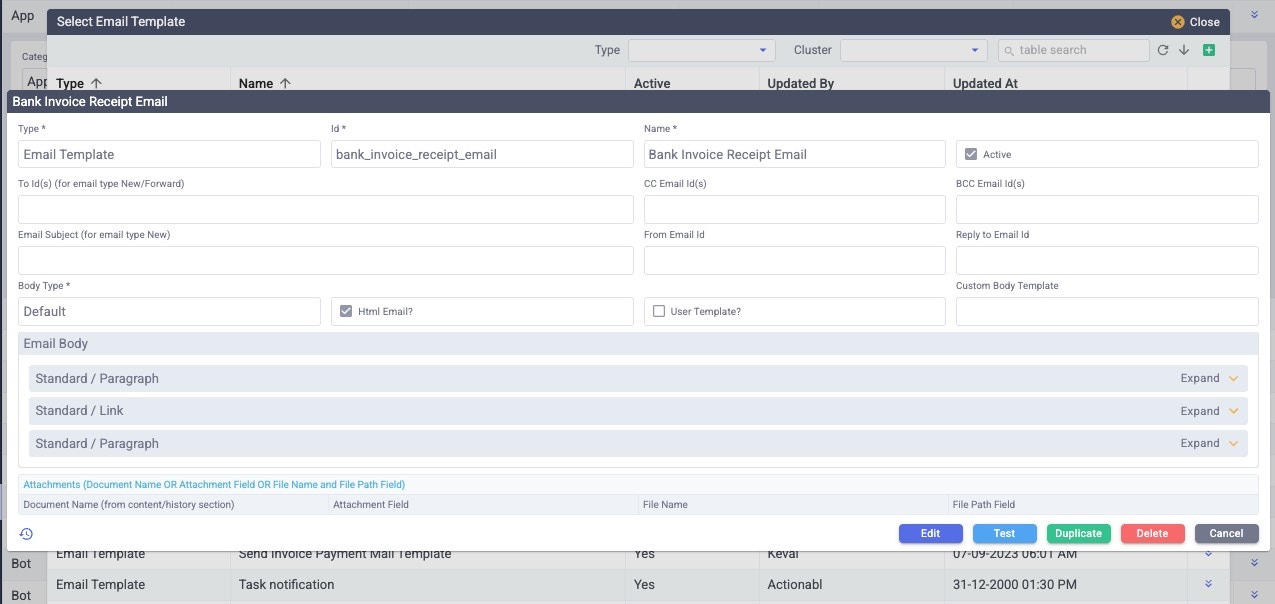
MANAGING RECORDS
Records are definitions of connections or templates that can be used in a process, task management, or a connector. They include things like:- FTP site definitions
- Email account definitions
- Email templates
- Messaging templates
- External site credentials
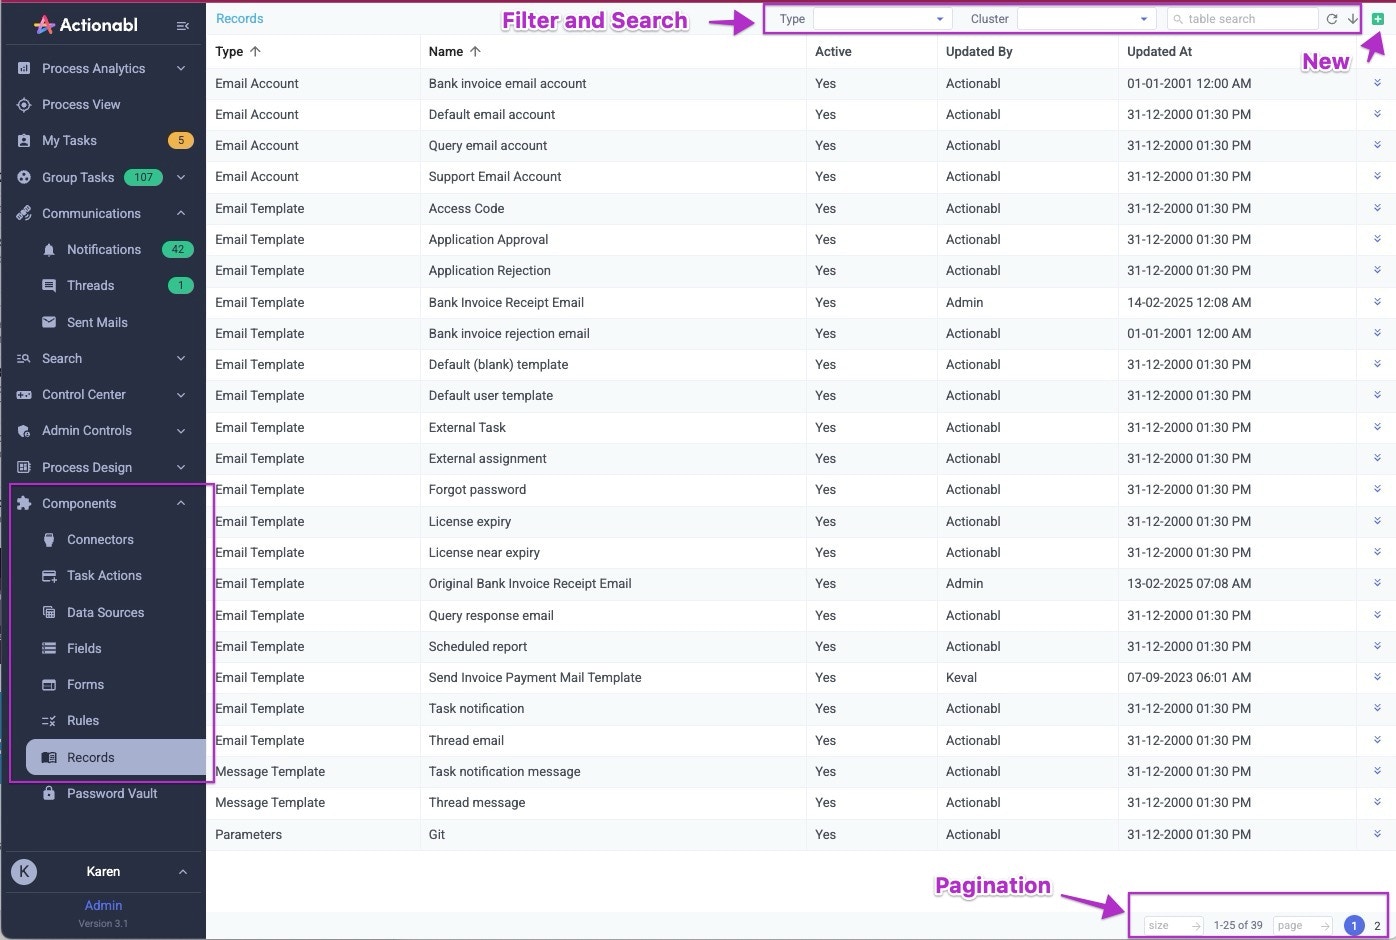
Managing Existing Records
To see the content of an existing record, click the Expand icon on its far right. The fields displayed will vary based on the type of record you’re viewing. Example of an email template record: Example Service Account Profile record:
Creating New Records
Start by clicking the green plus icon at the top right of the record list. The New Entry dialog appears:
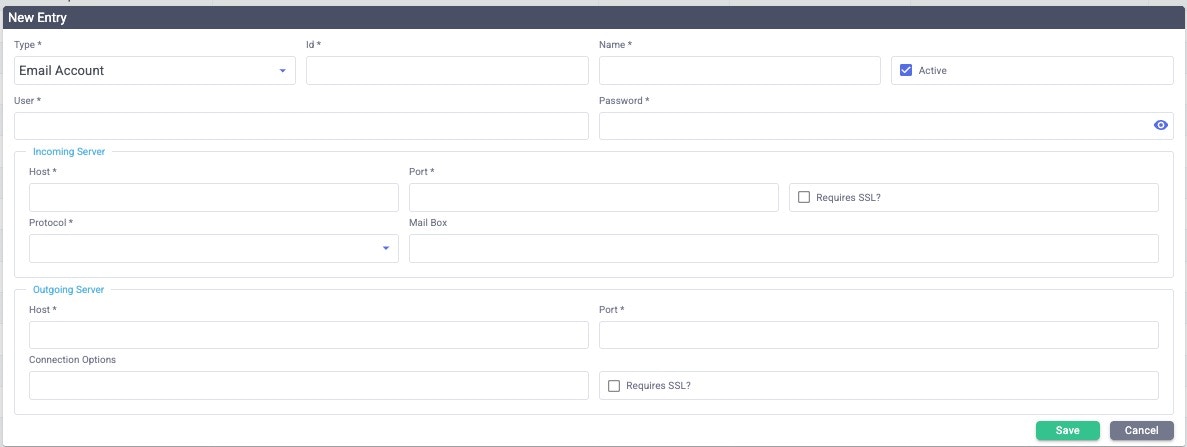
- Email Account: Access definition for an email account that can be used by the system to read or send emails.
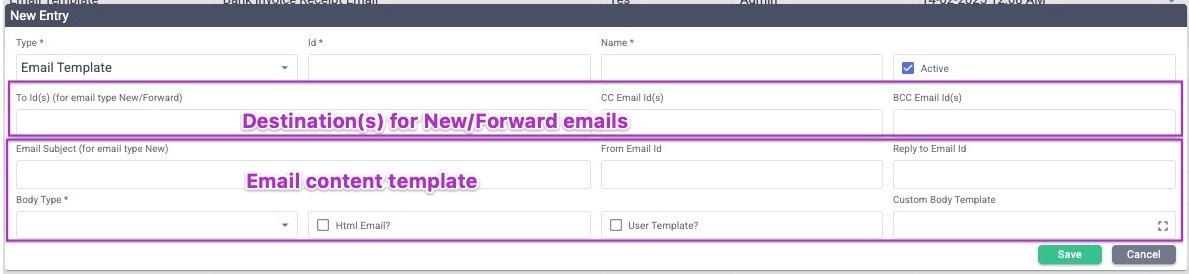
- Email Template: Content template for an email that can be sent by the system.
- FTP site: Access definition for an FTP account
- Message Template: Content template for SMS or notification messages that can be sent by the system.
- Parameters: key:value pairs of commonly used parameters that can be called into other processes
- Service Account: Access definition for a Google, Dropbox, Microsoft, Box, or Docusign service account that the system can use.
- Service Profile: Defines the authorization and security access for a service account
- Email Template Section: Reusable section of content that can be called into an email template, such as support contact information.
- ESign Template: Template that creates and defines the routing for a DocuSign document requiring electronic signatures.
Creating Email Account Records
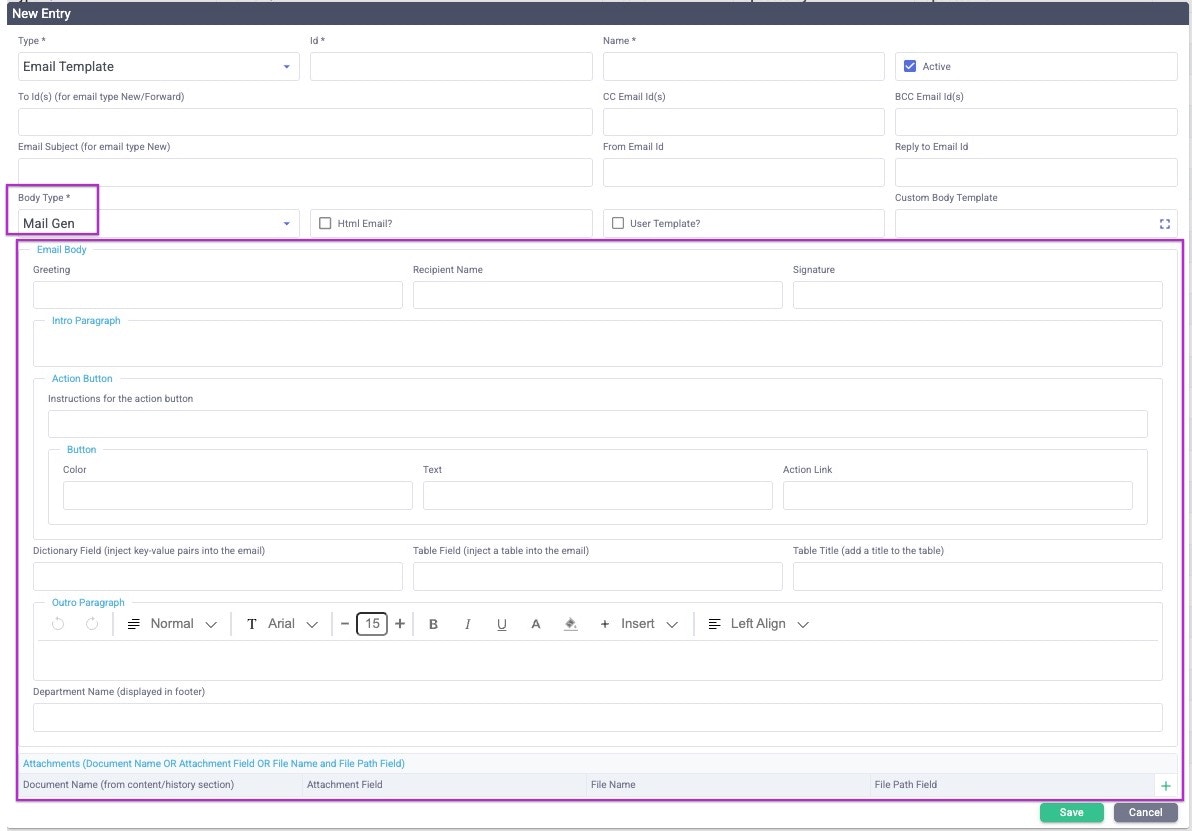
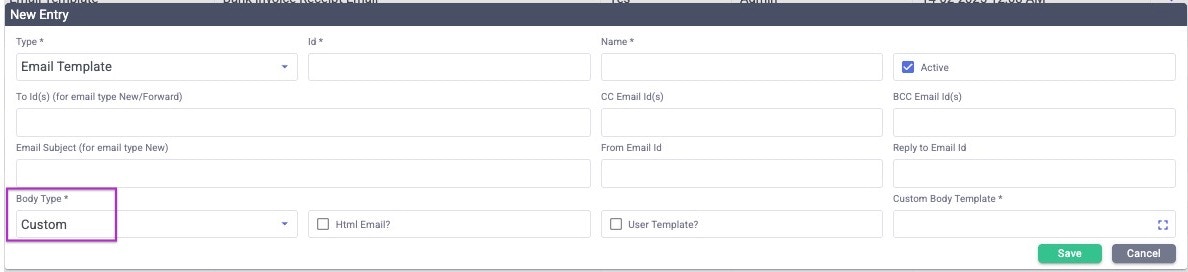
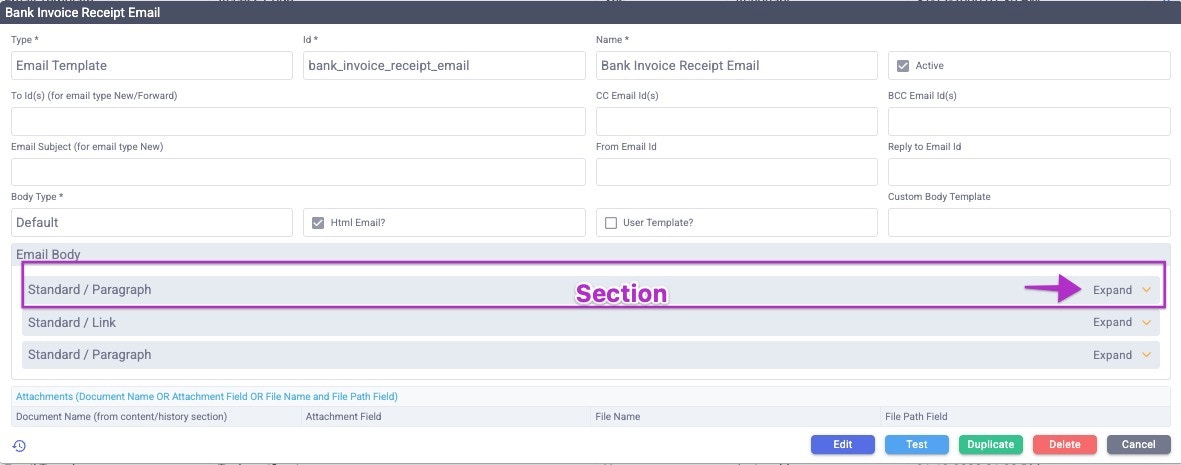
Creating Email Templates
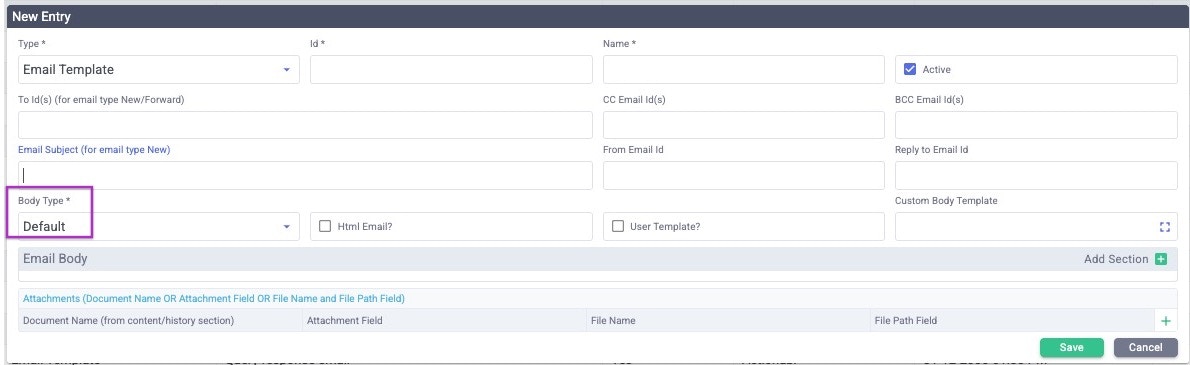
Creating Email Template Sections
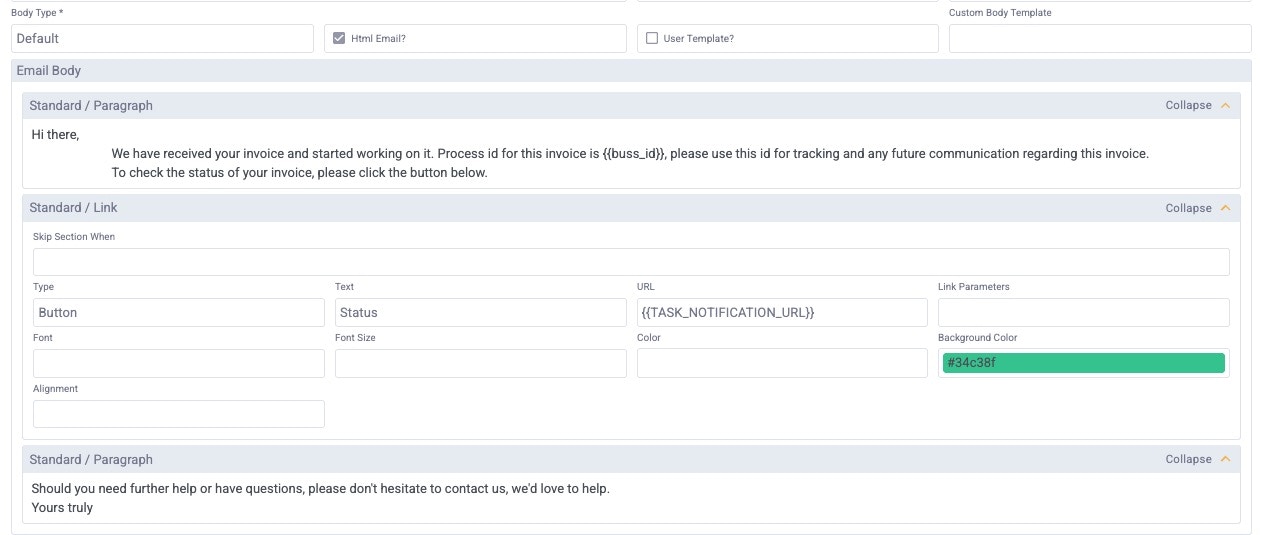
When you use the Mail Gen email template type, you can use predefined sections to build your email. Email sections are reusable snippets that can be brought into multiple email templates to provide consistent messaging, formatting, or functionality.Examples:When a section is used in an email template, it appears like this.
- Greetings / Salutations
- Tables of data
- Contact and hours of operation
- Paragraphs containing a refund policy
- Links to learning and documentation resources for your product
If you are in Edit mode on the email template, you can also edit the section’s content. For text items, clicking “Edit Paragraph” opens a rich-text editor in a separate popup. Other items can be directly edited.Click Save in the popups and when finished editing the sections to ensure your work is saved.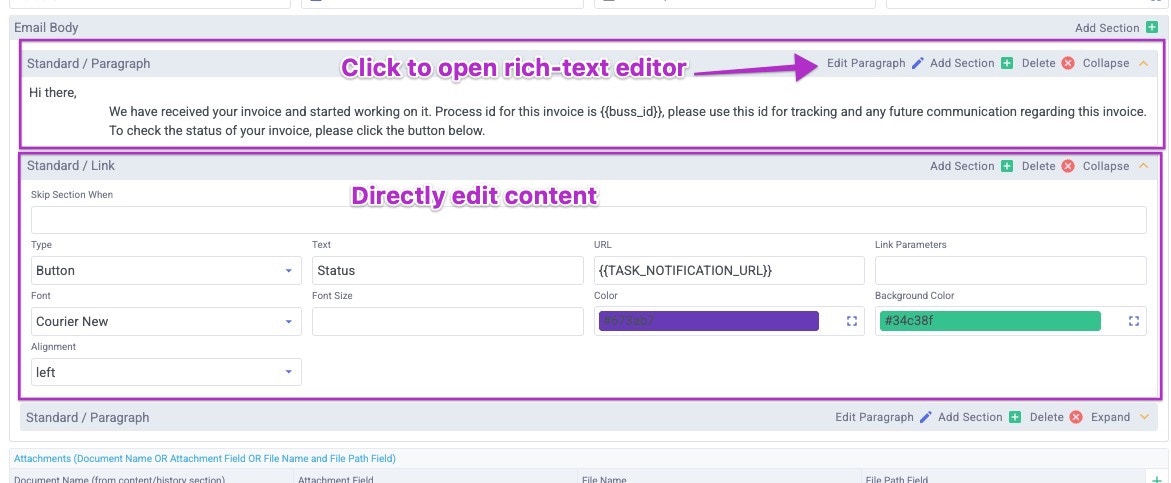
Creating Message Templates
Message templates are used for SMS messages and threads. The structure of the message templates is simple because there is no formatting involved, but they can include variables, which are enclosed in double curly braces .

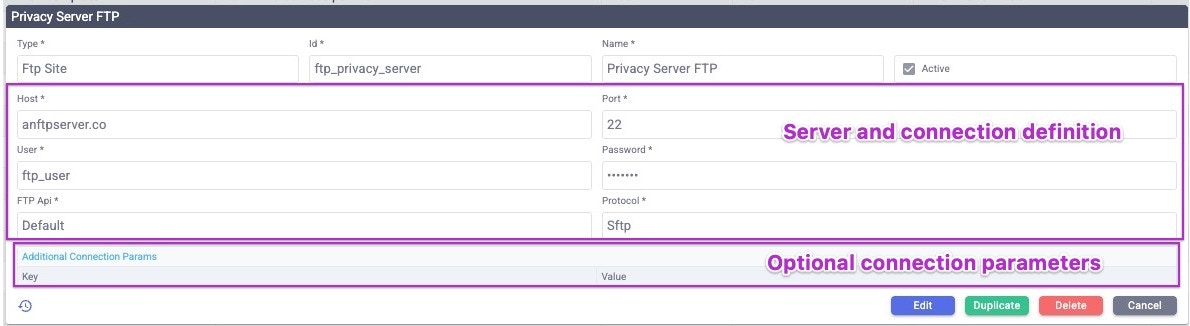
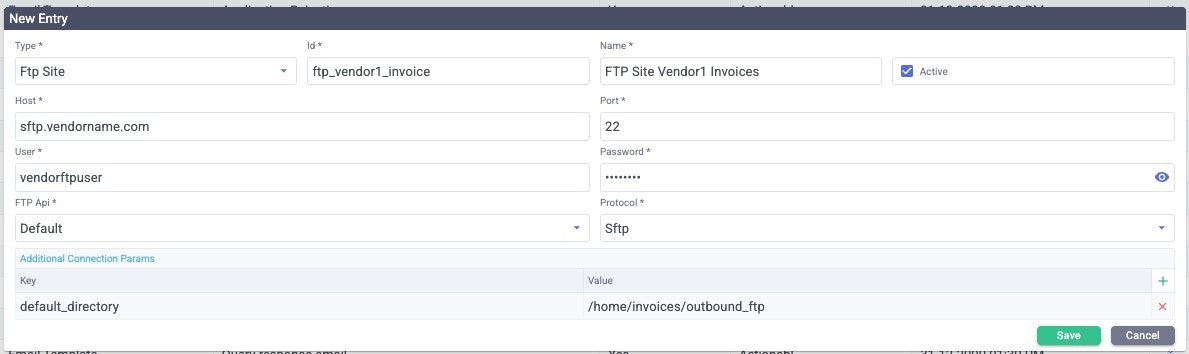
Creating FTP Site Records
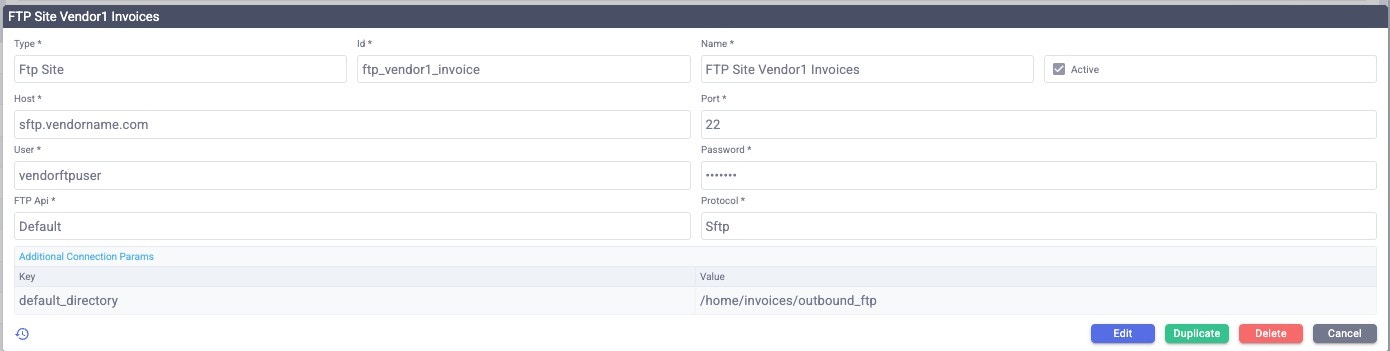
An FTP Site record provides a full definition for connecting to and using an FTP or SFTP site. It looks like this:
- The Host should be entered as a plain URL like ftp.domain.com
- The Port number should correspond with the Protocol and FTP Api you select. If you are unsure which port to use, check with the technical support for the FTP server to determine how to connect.
- The User and Password are the credentials used to connect to the FTP user account.
- FTP Api is your selection of the type of FTP service to use. Default is the most usual choice, but you can also select Win Scp or Win Scp Api if needed. Consult with your technical support if you aren’t certain.
- Protocol is where you choose between FTP, SFTP, or SCP. If using SCP, you’ll need to select one of the SCP options in the FTP Api field.
- If there are additional connecting parameters for connecting to FTP, such as a default directory, add them in the bottom section.
Creating Parameter Records
Parameter records are lists of parameters (Name, Type, and Value) that can be used by Connectors and Tasks to complete actions. They are helpful when the same parameters are frequently used to define a task, such as a company name, address, filename, or path.
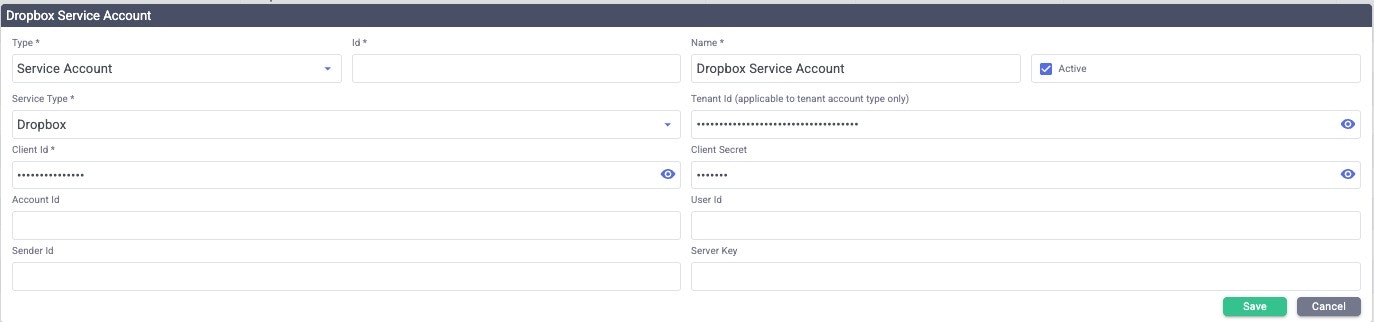
Creating Service Account Records
Service accounts define an external account that the system can use to connect to and perform actions in an external service.Available Account Types:Setting up a service account requires the full credentials to the remote account and, when appropriate, also allows you to create or revoke an access token in the account. Multiple service accounts can connect to the same service as long as they use different account credentials. For security, each service account should use a dedicated login and have the least privileges needed to perform its role. The fields available when setting up a service account will vary with your selection of service type.
- Docusign
- Google Workspace
- Microsoft
- Dropbox
- Box
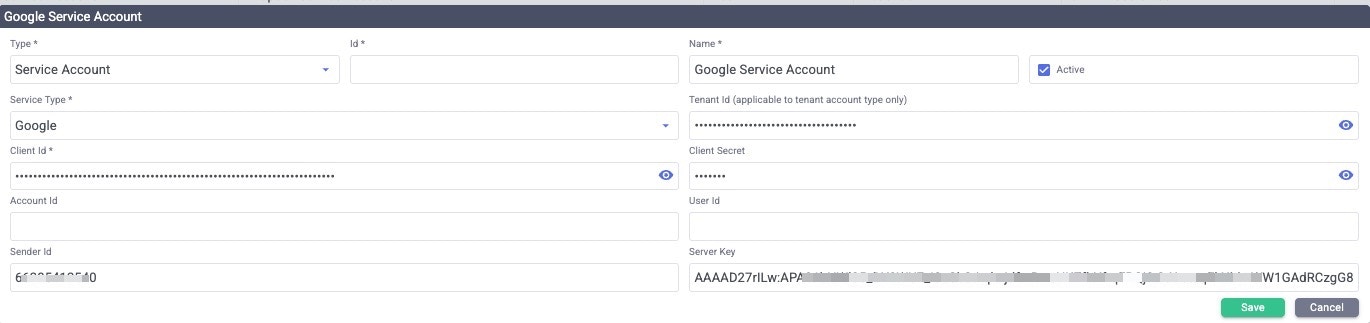
Setting up a Google Service Account
For a Google Service Account you will need a Client ID and a Client Secret as well as your Google Tenant ID. Details for setup in Google are available in their Developer Documentation. The Client ID and Secret are only shown once in Google and are NOT visible after you enter them in Actionabl, so save them in a safe place. In Actionabl, select a Service Type of Google to set up the service account.- Enter the Client ID and Client Secret in the fields in the Service Account configuration on Actionabl.
- Enter the Tenant ID of your Google account.
- Account ID and User ID can be left blank.
- Enter the Sender ID, which is your unique Google account ID. It’s found in the project information section in your Google Cloud project.
- Enter the Server Key. This is the API key for your project. It can be found in the APIs & Services section under Credentials in your Google Cloud Console, or for some projects, in the project settings in Google Cloud.
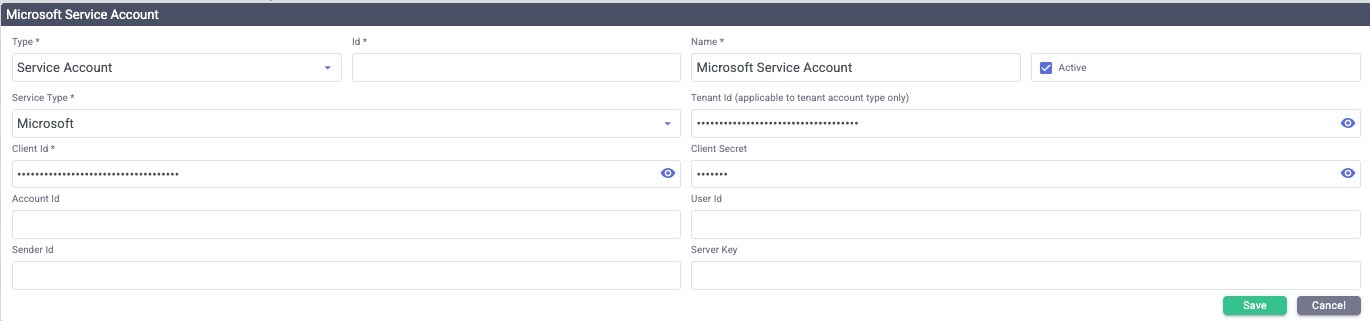
- Enter the Client ID and Client Secret you just generated.
- Enter the Tenant ID.
- You can leave Account ID and User ID blank.
- You can leave Sender ID and Server Key blank.
- Enter the Client ID and Client Secret generated in Box.
- Enter your Box Tenant ID.
- No other information is required on the popup.
- Click Save.
- Enter the Dropbox App Key in the Client ID field.
- Enter the Dropbox App Secret in the Client Secret field.
- Enter either your Dropbox Tenant ID or Team ID in the Tenant ID field.
- No other information is required in this popup.
- Click Save.
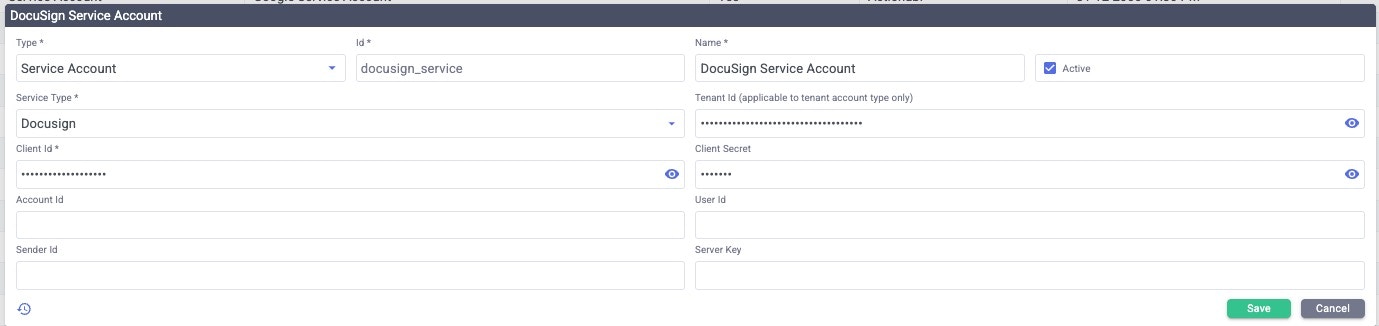
- Select a Service Type of DocuSign.
- Enter the Client ID and Client Secret in the appropriate fields.
- Enter your DocuSign API Account ID in the Tenant ID field.
- No other information is required in this popup.
- Click Save.
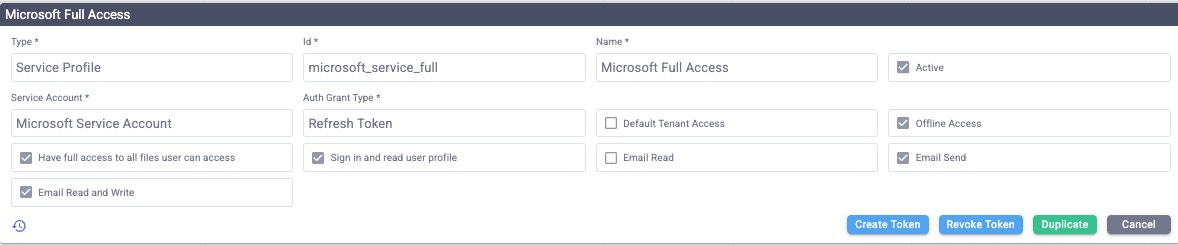
Creating Service Profile Records
A service profile record uses the service account previously defined to connect to the external service so an action can be performed. The Profile is what a Connector uses to log in to the remote service and complete a specific task. For the Google Service Account that was created, for example, we may have 6 Profile Records that have unique privileges and accesses.


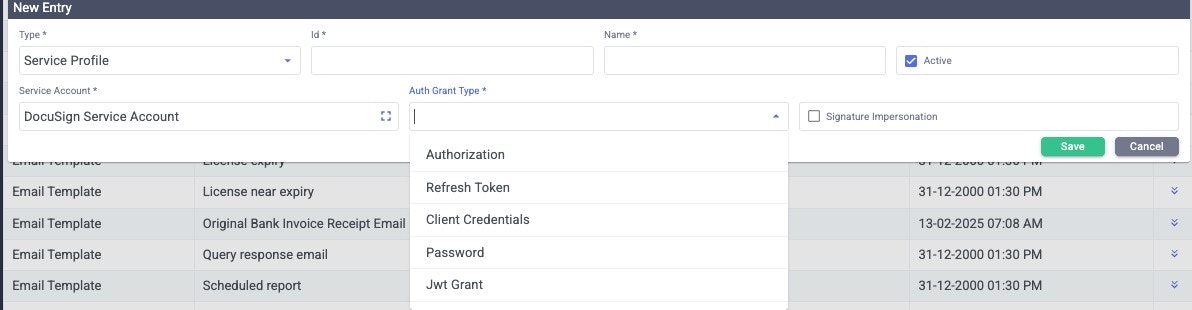
- Authorization allows the app to act as the user after logging in and consenting.
- Refresh Token allows the app to act as the user long-term (over multiple sessions) after logging in and consenting
- Client Credentials allow the app to act on its own (using its own credentials) using app secrets
- Password should be avoided if possible as it’s a much less secure authentication type
- JWT Grant allows the app to act on its own (using its own credentials) using securely signed tokens
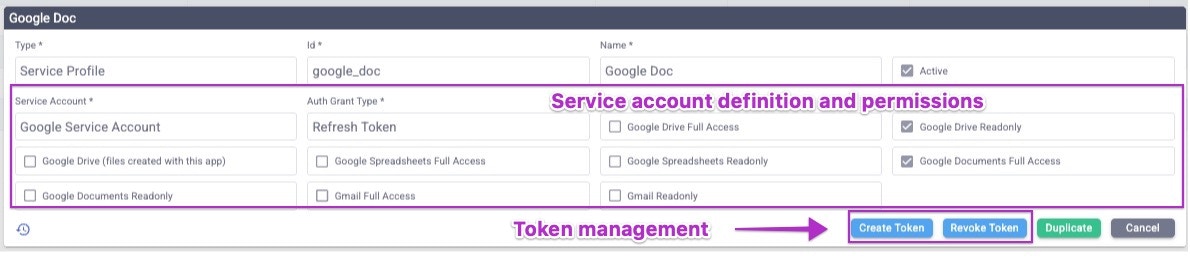
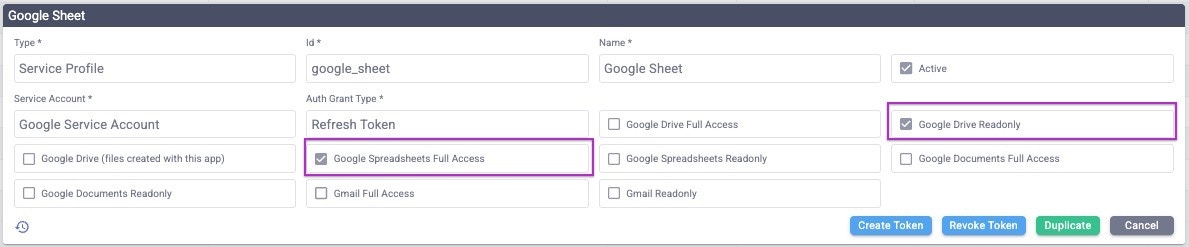
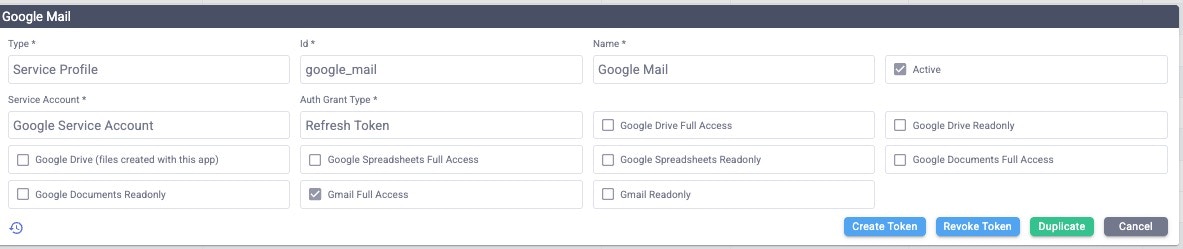
Creating a Google Service Profile
It’s strongly recommended that you define the profile’s ID and Name based on the authorization scope(s) being granted to the profile. If you have multiple Google accounts, include the account name in the ID and profile name as well.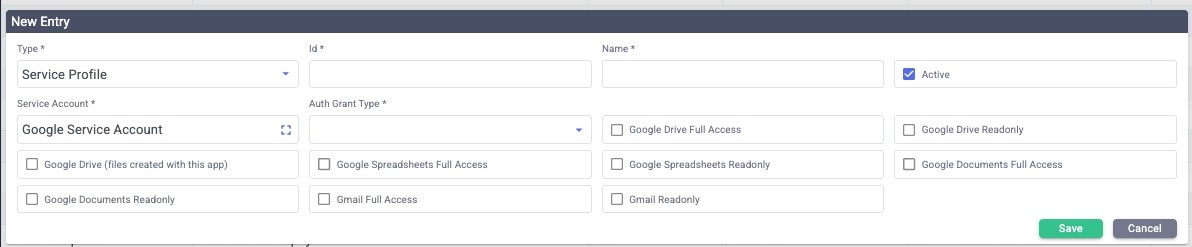
- Google Drive Full Access provides read/write and create/delete access to the Google Drive account and all files and folders within it or shared to it.
- Google Drive Readonly provides read only access to the full Google Drive and all of its files and folders. This can be overridden by app-specific access.
- Google Drive (files created with this app) provides full access (read/write and create/delete) throughout the Google Drive, but only to files created by Actionabl.
- Google Spreadsheets Full Access provides read/write and create/delete access to all spreadsheet files in the Google Drive, regardless of their folder. If Drive access is “readonly” and you select this option, you will only be able to create/delete and read/write spreadsheet files in the drive or to files shared to the account.
- Google Spreadsheets Readonly provides read only access to spreadsheet files throughout the Google Drive. If Drive access is “full access” and you select Readonly for spreadsheets, spreadsheet files will be read only.
- Google Documents Full Access provides read/write and create/delete access to all documet files in the Google Drive, regardless of their folder. If Drive access is “readonly” and you select this option, you will only be able to create/delete and read/write spreadsheet files in the drive.
- Google Documents Readonly provides read only access to document files throughout the Google Drive. If Drive access is “full access” and you select Readonly for documents, document files will be read only.
- Gmail Full Access provides full access to the Gmail account to read and send emails as that account. This works independently from Drive access unless there is a need to also manage file attachments.
- Gmail Readonly provides read only access to the Gmail account. This will allow inbound and outbound emails to be read but will prevent attachments from being saved or responses from being drafted or sent.
Creating a Microsoft Service Profile
The Microsoft Service Profile has 7 authentication scopes available: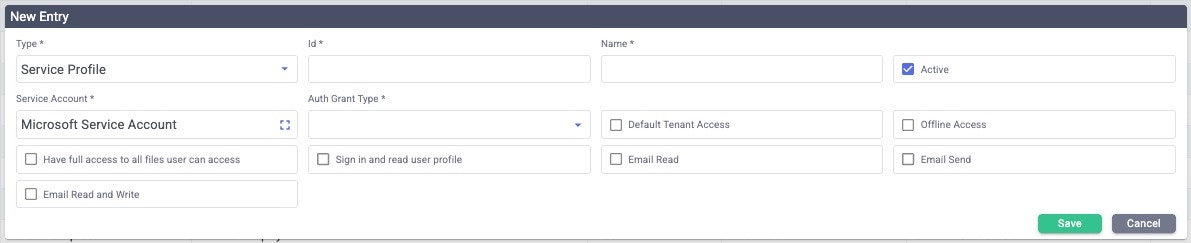
- **Default Tenant Access **uses the tenant ID from the connector to identify your organization in the connection.
- Offline access grants permission for the application to save a local copy of files so they can be accessed even when a network connection is not available
- Have full access to all files user can access grants the Actionabl app permission to act completely as the user, including read/write and create/delete access to the user’s accessible files.
- Sign in and read user profile gives the ability to read data from the user’s profile
- Email Read provides read-only access to the user’s email but no ability to save attachments
- Email Send provides the ability to send email as the user, but not to read emails or responses. It does not automatically provide access to attach files from the user’s Microsoft account to the email.
- Email Read and Write grants full access to read and write emails. However, it does not automatically provide access to attach files from the user’s Microsoft account to the email.
Creating a Box Service Profile
For Box, the only service profile option is whether to grant full access.
Creating a DocuSign Service Profile
For DocuSIgn, the service profile designates whether this account can “impersonate” a signature. This would provide the authority to sign a document on behalf of a person or organization.
Creating ESign Template Records
ESign Template Records use the DosuSign Service Profile to route a signature “packet” of documents (as file attachments to emails) to signers for their approvals.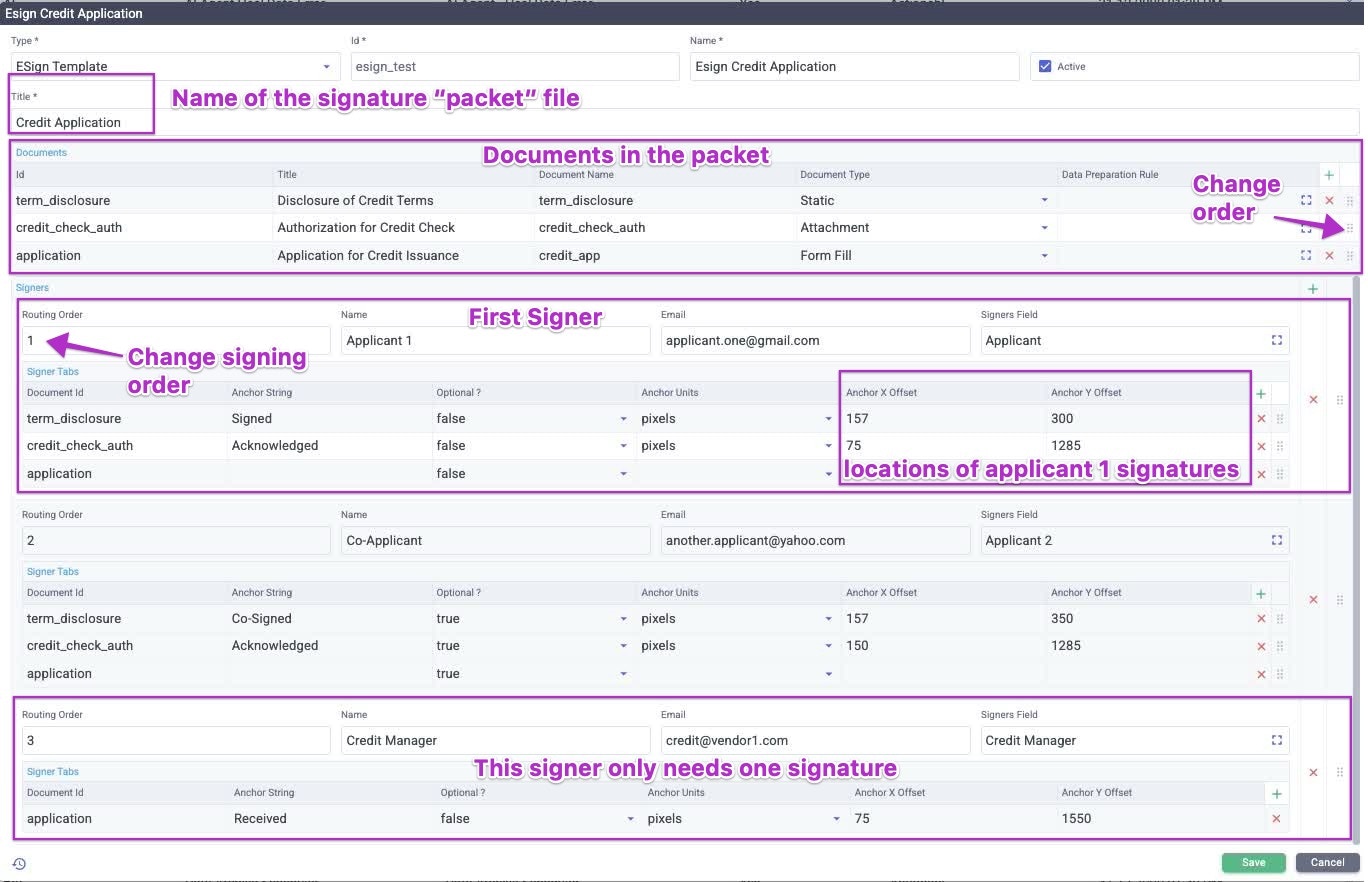
For example, let’s assume you are sending a set of 3 documents, each of which need to be signed:These documents will be sent in a single packet called “Credit Application” to the applicant and co-applicant, plus the business’ credit manager.
- Disclosure of terms
- Credit check authorization
- Application for credit issuance
- Title is used as the file name for the signing “packet” document that is generated from this template.
- The Documents section includes each of the documents being sent and defines the order in which the user sees them when signing. Documents designated as “Form Fill” contain variables in certain fields that the system will populate (using a data preparation rule) before generating the document and sending it out for signature. For example, this could prepopulate each applicant’s name, address, and phone.
- The Signers section defines the recipients and the order in which they need to sign.
- Each Signer has a Signer Tabs section, which specifies exactly where in each document they need to sign.
- The Anchors define the X,Y coordinates for their signature or input. These are defined in the document when it is created outside of Actionabl.
MANAGING CONNECTORS
While tasks represent a set of internal actions and rules that achieve a specific goal, connectors are where the actions actually take place. There are 6 categories of connectors in Actionabl, each of which is covered in detail below:- Start Event
- App
- OCR
- RPA
- Bot
- AI
Managing an Existing Connector
When you expand an existing connector, you see its details and can also take the following actions. You can take the following actions on connectors:- Edit lets you change the connector’s information and behavior.
- Test enables you to input test data and see how the connector processes it. You’ll also be able to see the output data and any messages generated.
- Duplicate copies the connector so you can use it to build a new one.
- Delete removes the connector from the system.
- Cancel closes the connector’s information without saving any changes.
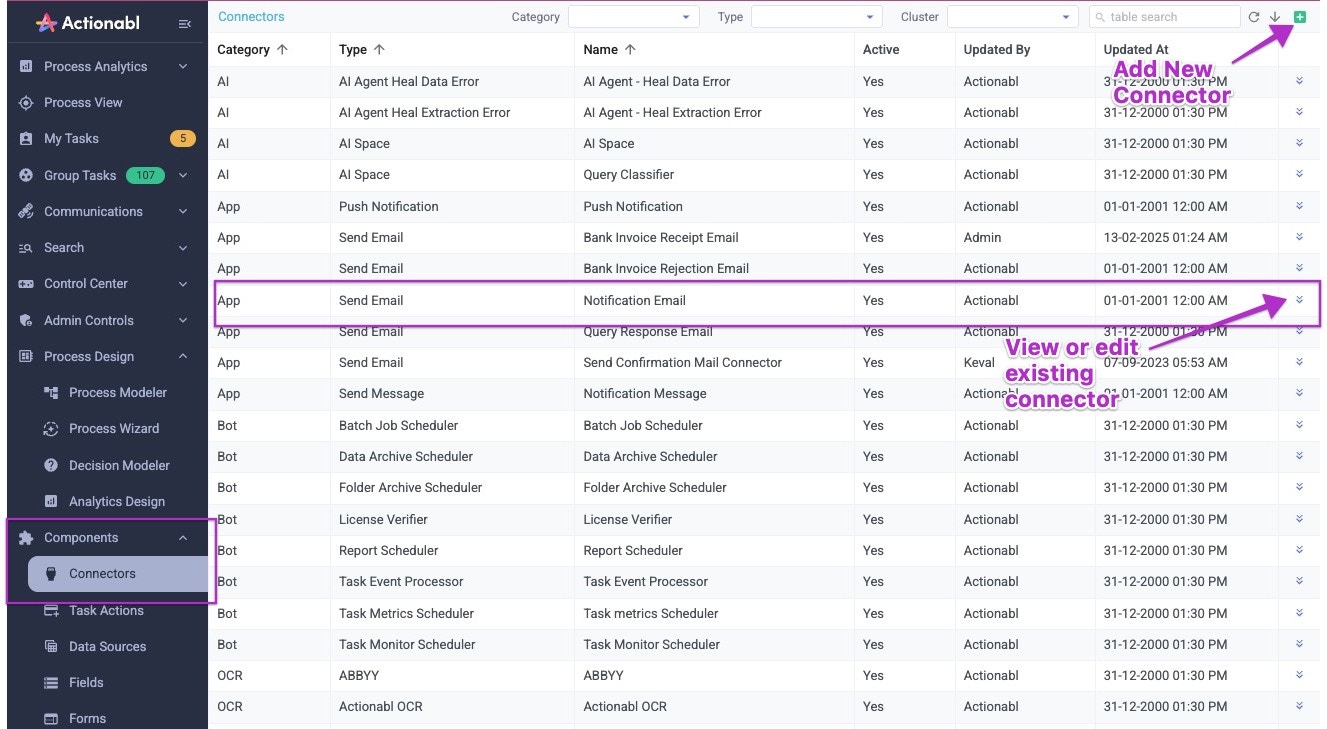
Creating Connectors
Click the green plus sign at the top right of the connector list to open a new connector dialog at the top of the first page of connectors.- Select a Category. This will change the available Types.
- Select a Type of event. Your selection will change the other inputs available, as detailed below.
- Enter a unique ID for the connector. This cannot contain spaces or special characters other than underscores (_).
- Enter a descriptive Name for the connector. This is used in lists, displays, process models, and anywhere the connector is shown.
- Enter a Task Retry Count. This value defaults to 3 and represents the number of times the system will automatically try to restart the connector’s task if it fails before showing the user an error and stopping the process execution.
- Select a custom task icon for this connector, which is used in process modeling and anywhere else that the connector is visually depicted. Your system administrator can upload additional icons to the /public_asset/images/bpmn or /public_asset/images/bpmn_png folders.
- Check the Active box to make this connector usable and visible in process modeling.
Start Event Connectors
The Start Event connector is the action that starts a process.Typical examples are:It can have one of the following Types:
- Receiving an email
- Monitoring a folder for a new or changed file
- A cron job that periodically runs the process
- Cron
- Http
- Read email
- Read Gmail
- Read Msmail
- Read Folder
- Read File
- FTP
- Custom Start
- DB Query
Cron Start Events
A cron start event indicates that a script, set up under Control Center -> Cron Job Scheduler, will run on a defined schedule and execute a script. The output of that script starts the process.For example:The cron job is scheduled like this.
- A cron job runs an external API query every night at 2 AM to pull in new account signups from a website.
- When that job runs and finds new accounts, that starts the process.


HTTP Start Events
The HTTP start event occurs when an outside system calls Actionabl from a preconfigured URL.For example, you may have a service that handles shipping of orders; when the order ships, their application calls Actionabl and provides a tracking number, shipping invoice, and date of shipment.

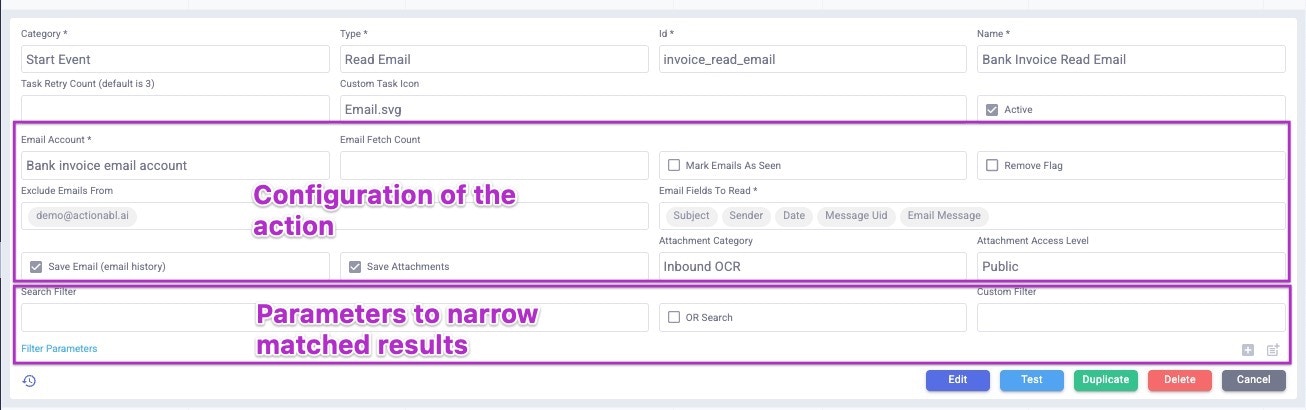
Read Email / Read Gmail / Read MSMail Start Events
A start event that monitors an email account and reads incoming messages that match specified criteria has a Read Email type. The specific sub-types of this event for Gmail and MSMail differ only in their background processing to correctly connect and authenticate to the type of email service.For example:The Process Schedule is set up like this:
- A process schedule in the Bank Invoice Process uses the Bank Invoice Read Email connector.
- This connector runs every 30 seconds to monitor for incoming emails that match its criteria.
- When one is found, it reads the specified fields and runs the Inbound OCR process on any attachments to create an item in the Actionabl system (such as INV-27), then moves that item into the first task in the Bank Invoice Process.


Read Folder Start Event
The Read Folder start event monitors the specified folder. When it finds new, changed, or deleted files that match the criteria in the filter, it triggers the start of the process.For example:This event can monitor any folder on the server; make sure to specify a full path to the folder. This connector looks like this:
- The Bank Invoice Process monitors a folder where some vendors upload their invoices instead of sending them via email.
- When it finds a new invoice in that folder, it starts the process.

- The Folder specifies the folder to monitor. To monitor a sub-folder, make sure that the full path is specified. For example invoice_folders/uploaded_invoices
- File Types are the file extensions to watch for. Enter each one, then press Enter to save it in the field. Only files whose names specifically match these extensions will be considered. To match any file in the folder, leave this field blank.
- Filter specifies a Javascript file that can be used to further narrow down the files to watch for.
- Save as Attachment indicates that when the file is found, it should be saved in Actionabl as an attachment (in the folder designated for attachments) and a reference to it is added to the item created. If this is checked:
- Specify an Attachment Category (Inbound, Inbound OCR, Outbound, User, or Generated).
- Indicate the access permissions for the attachment (Public, Group, or Individual)
Read File Start Event
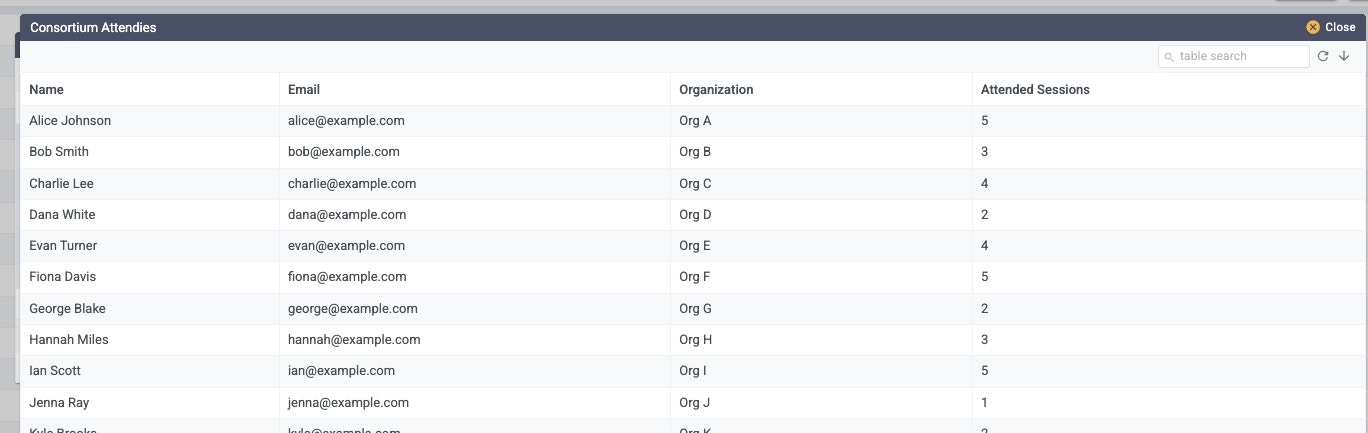
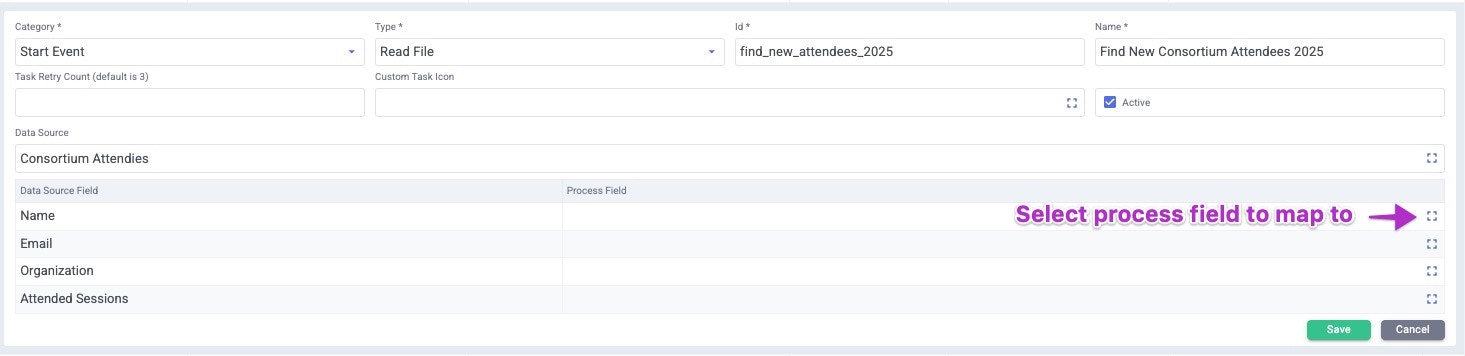
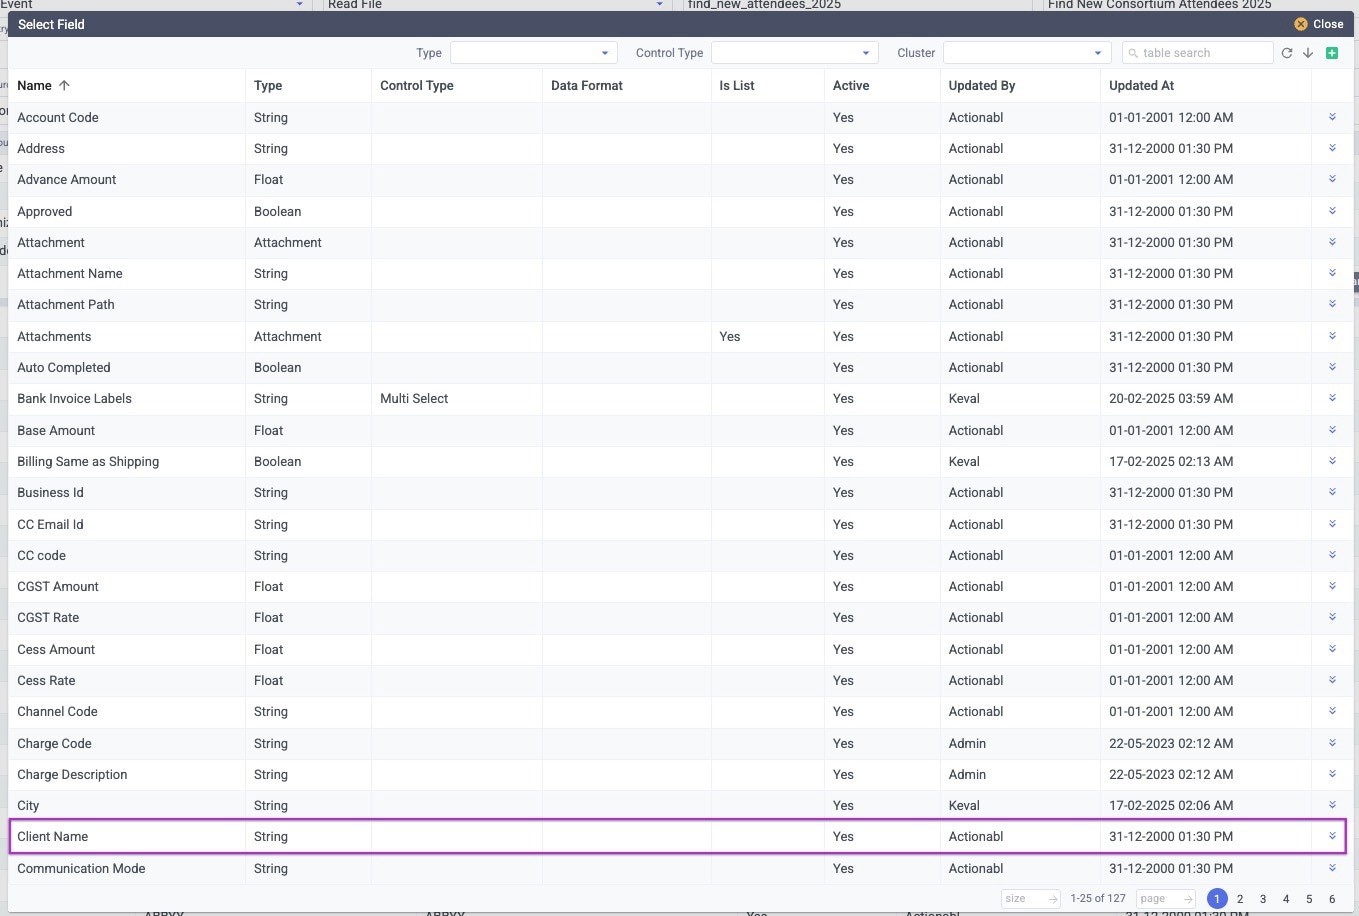
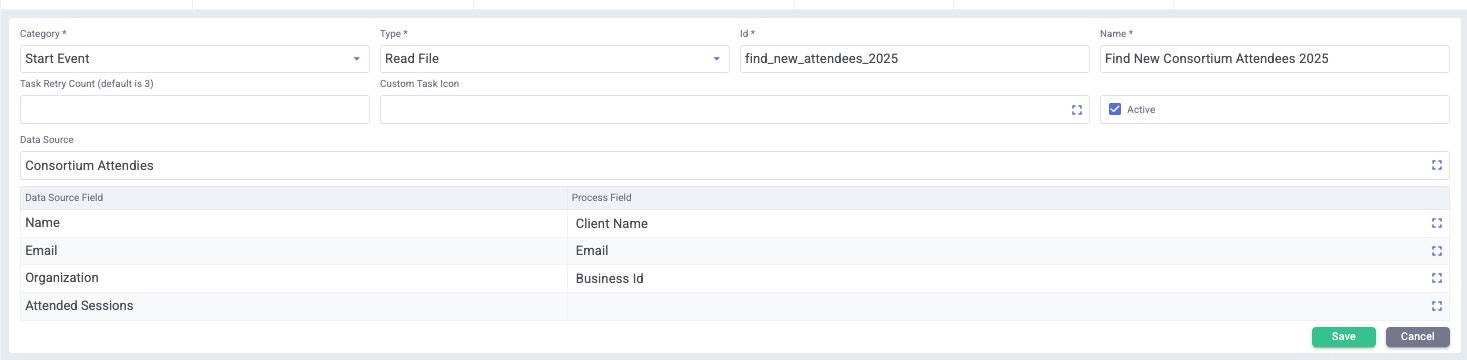
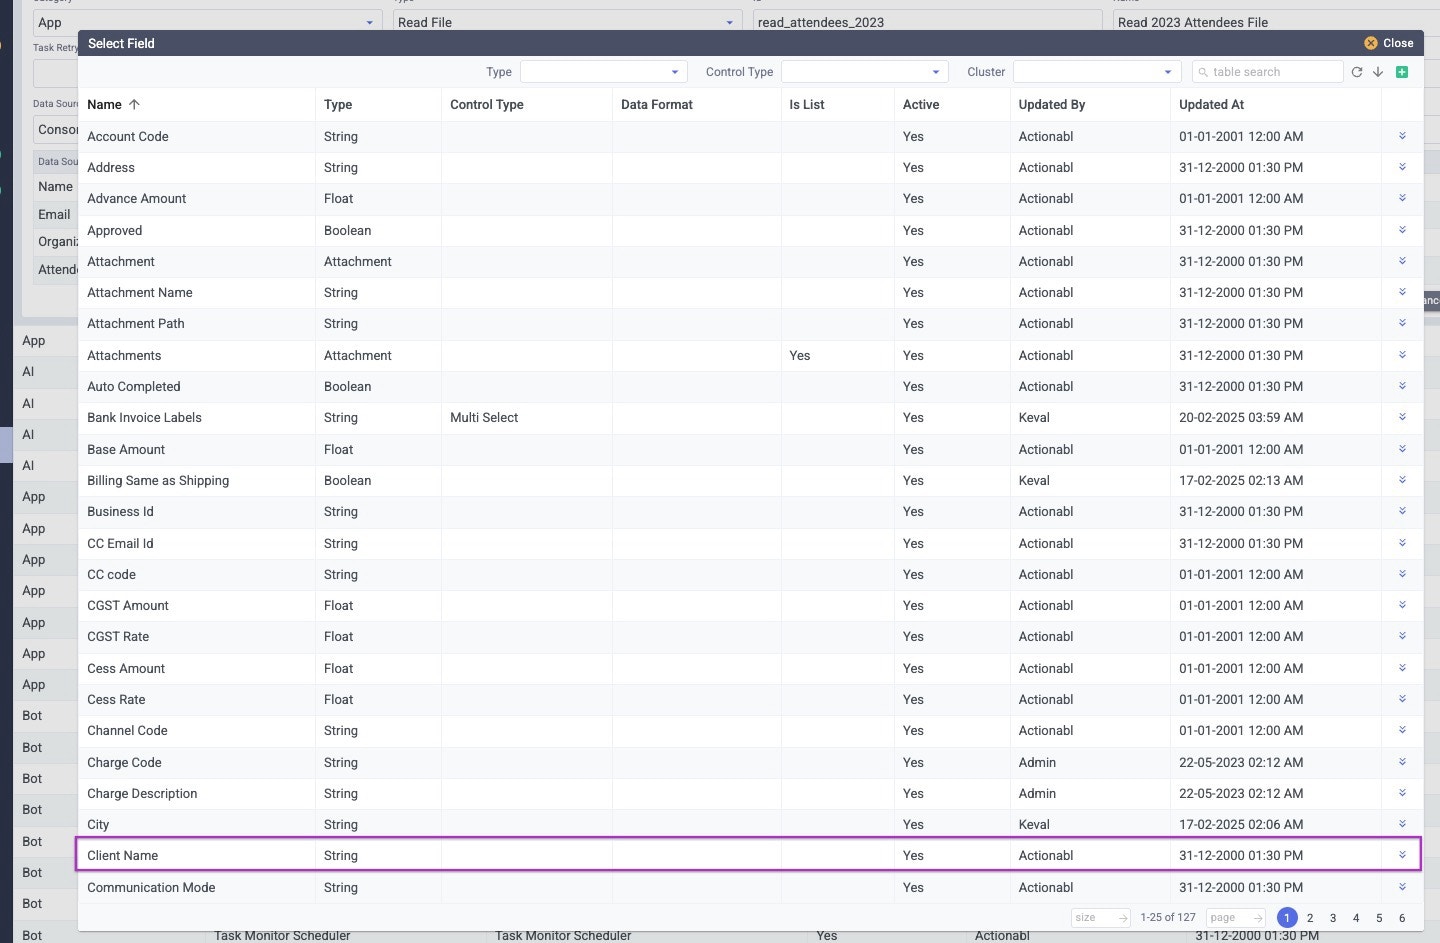
This event type monitors a specific file and starts a process when that file changes. For example, it could monitor a spreadsheet and start the process when rows are added or updated. For example, let’s look at the Consortium Attendees file we defined as a data source. Set up the start event and then click the browse icon [ ] next to Data Source.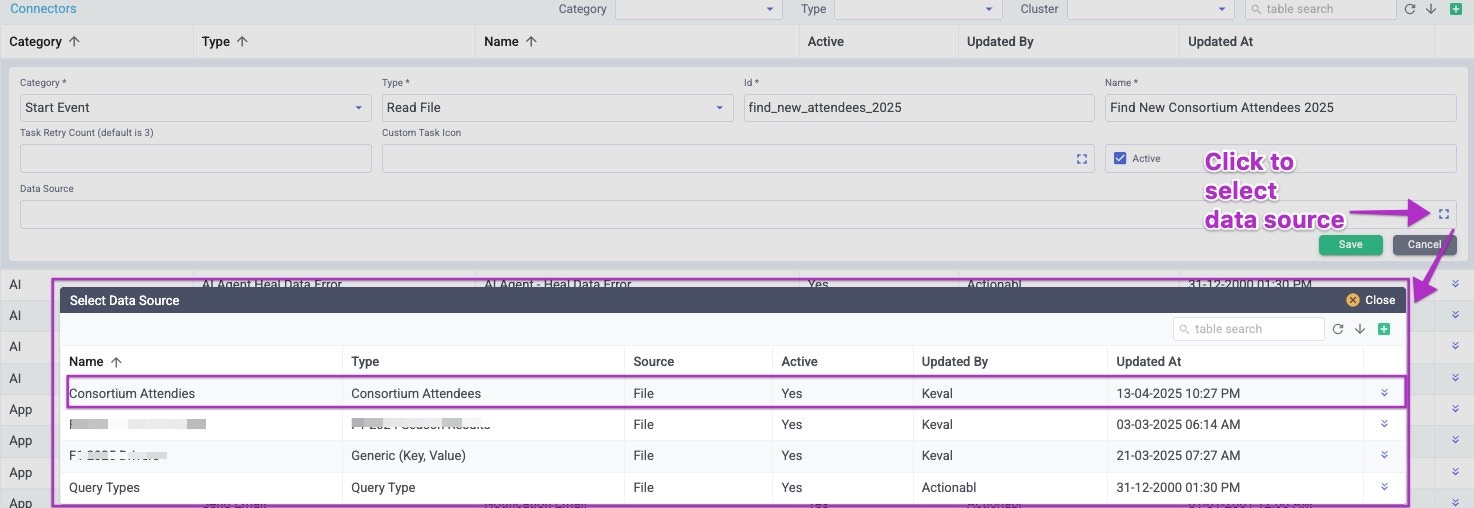
-
Click the Expand icon next to any of the data sources to see its definition and click Display Data to access its data.\
FTP Start Event
The FTP start event monitors the server on the FTP port. When defining this event, you can define the FTP commands to execute (both inbound and outbound) and the action to be taken when the process starts.Custom Start Event
A Custom Start event executes the code script specified using the event’s parameters. The script’s output is used as input to the first task in the process. Custom Start Events are run manually when a user clicks them in the task list.DB Query Start Event
The database query start event connects to a database using the connection parameters in the connector. Once connected, it runs an optional Data Processing Script and executes an SQL query. The query’s output triggers the start of the process and serves as the input to the first task in the process. This start event is triggered by a cron that runs the database query event on a scheduled basis.OCR Connectors
OCR connectors pass items from the previous task into an OCR task. They may perform pre-processing on the item, such as ensuring that the file matches a type that can be read through OCR. There are 4 types of OCR connectors:- Actionabl OCR uses the built-in Tesseract platform
- Hyper Science uses the Hyperscience platform on a separate account that you license and configure
- Vidado uses the Vidado platform (integration by request)
- ABBYY uses the ABBYY FineReader platform (integration by request)
Actionabl OCR Connector
The Actionabl OCR connector uses our built-in Tesseract instance. It asks you to specify whether to extract plain text or fields from the document. If you select this connector type, you can also specify which cluster to run the process in. Clusters are used primarily for load-balancing processes that use intensive CPU resources.
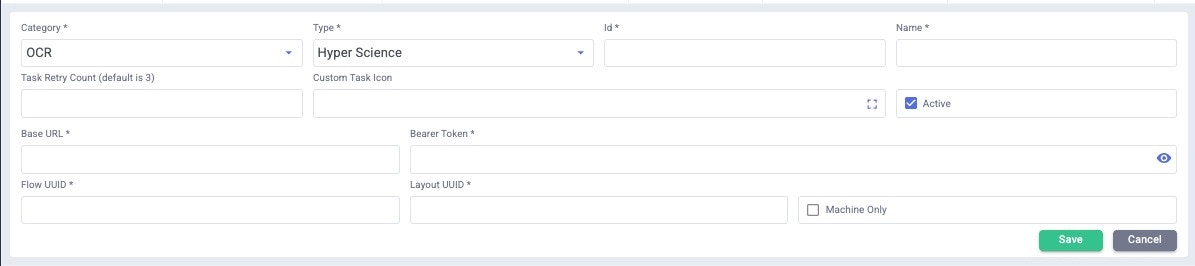
Hyper Science OCR Connector
The Hyper Science connector launches an instance of your own Hyperscience account that you define by inputting:- Base URL of your Hyperscience account
- Bearer Token for your account
- Flow UUID defined in Hyperscience
- Layout UUID defined in Hyperscience
- You can designate it as Machine Only which causes it to execute in Hyperscience without any human intervention. This uses the the machine learning models to make decisions and perform actions without human approval or correction.
Vidado OCR Connector
Available by request. Please contact Actionabl for information.ABBYY OCR Connector
Available by request. Please contact Actionabl for information.RPA (Robotic Process Automation) Connectors
RPA connectors enable the software “robot” to mimic a human’s interaction with a site or piece of software to complete repetitive, rule-based tasks. This can include things like making selections from dropdown menus, entering data, interacting with popup menus, or picking a date in a date-picker field. There are four “engines,” referred to as Types, that RPAs use to interact with external resources:- Actionabl RPA (the built-in engine)
- Ui Path
- Automation Anywhere
- Blue Prism (COMING SOON)
- Websites (Web RPA)
- Windows applications (Win RPA)
- Java applications (Java RPA)
- Custom-defined interactions (Custom RPA)
- SAP (SAP RPA)
- Android applications (Android RPA)
Actionabl RPA Connector
The Actionabl RPA connector defines the connector and its actions, as well as the authentication to the external resource it interacts with.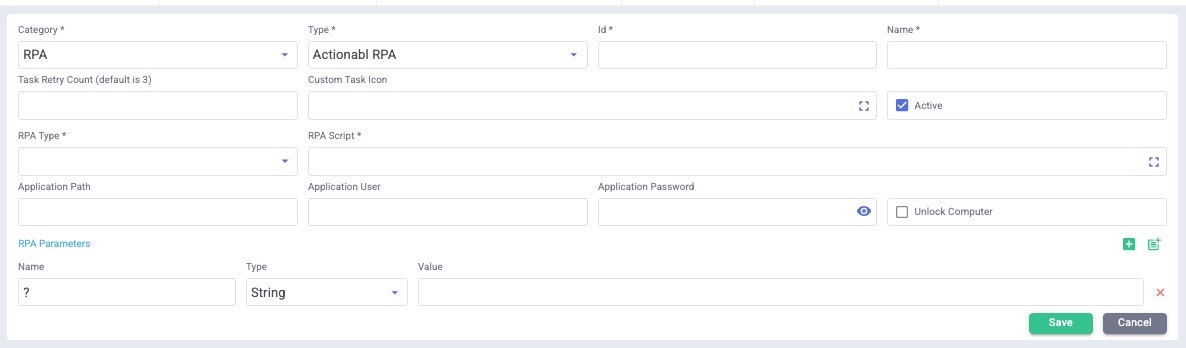
- The RPA Type is the type of resource that the script will interact with
- RPA Script is your selection of the script file to be run, which tells the script precisely how to interact with that resource. These are JSON files, which may be organized into folders by RPA Type and topic for ease of maintenance.
- Application path, application user, andapplication password define how the script will connect to the external resource.
- Click Unlock computer if the script is interacting with a computer or device that may need to be unlocked before it can run.
- The RPA Parameters section is where you specify the inputs that the script will use or other parameters that the script needs to perform its tasks. These inputs are unique to this connector; the same RPA script can be called by other connectors with other information, if appropriate.
For example,
- You have an RPA script that checks a calendar for available time slots to schedule.
- When Connector A runs, it uses the script to check the calendar for availability on weekdays, so its RPA parameters specify that.
- When Connector B runs, it checks the calendar for weekend availability only, as specified in the RPA parameters.
UI Path RPA Connector
This RPA connector uses the UI Path service to complete the RPA operations. This connector’s input specifies how to connect to UI Path and which definitions and priorities to use to execute it. The actual RPA script definition is set up within UI Path and the parameters for it are set there, as well.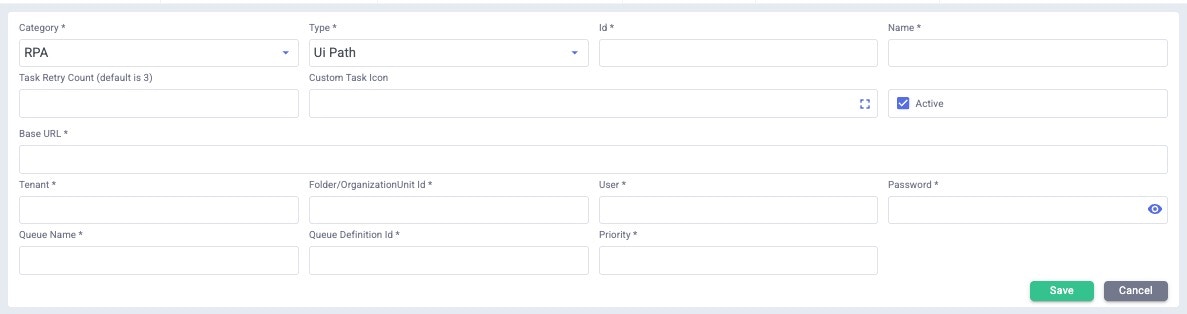
Automation Anywhere RPA Connector
This RPA connector completes RPA operations using the Automation Anywhere service. Its input specifies how to connect to Automation Anywhere. The actual RPA script definition and parameters are set up within Automation Anywhere, as well.
Blue Prism RPA Connector
COMING SOON. Integration available by request.AI Connectors
There are many AI connector types available. Each plays a very specific role in moving an item between two tasks. When you select the Type, the dialog changes the fields available for configuration.| Type | Definition |
|---|---|
| AI Space | Allows the user to run a model and execute actions against it. |
| AI Agent Heal Extraction Error | After extracting data from a document using OCR, this agent corrects any errors in the data. |
| AI Agent Heal Data Error | After validating data, this agent corrects any errors found in it. |
| AI Agent Web RPA | Performs a Web RPA action, such as logging into a system and entering invoice data into a web form. |
| AI Agent Win RPA | Performs automation on Windows applications. |
| AI Agent SAPRPA | Performs automations on SAP. |
| AI Agent Form OCR | Extracts data from a form using OCR. |
| AI Agent Card OCR | Extracts data from an ID card, such as a driver’s license or PAN card. |
| AI Agent Document OCR | Extracts data from a document. |
| AI Agent Doc Classification | Identifies the type of document being read, such as a driver’s license or PAN card. |
| AI Agent Page Classification | Classifies each page in a document and returns classifierwise page numbers. |
| AI Agent Summarization | Summarizes the document being read. |
| AI Agent Topic Summarization | Summarizes a specific topic within the document being read. |
| AI Agent Sentiment Analysis | Given a text block, identifies the sentiment (e.g., humorous, informative, sad, hateful, etc.) |
| AI Agent Entity Extraction | Extracts structures data from a mixed (structured/unstructured) document. |
| AI Agent Question Answering | Asking questions based on the document provided for which user will receive answers. |
| AI Agent JH Validations | Validations information such as account or loan data from the SymXchange/JackHenry account. |
| AI Agent Custom | Custom-created AI Agent, which runs locally on the AI model. Used when you need something that differs from the existing agents. |
| AI Agent External | Custom-created AI Agent, which runs on the AI model on the cloud. Used when you need something that differs from the existing agents. |
App Connectors
The App connectors represent core task functionality. These are some of the most powerful types of connectors and are widely used throughout a typical Actionabl process flow. They include:- Sending an email, message, or push notification
- Reading a file or folder
- Generating a document
- Extracting a PDF
- Sending or retrieving something via FTP
- Interacting with a system via a REST or SOAP API
- Executing code
- Completing an External Task
- Sending or completing an action via Docusign
- Executing a SQL query
- Jack Henry SymXchange connector for credit union use
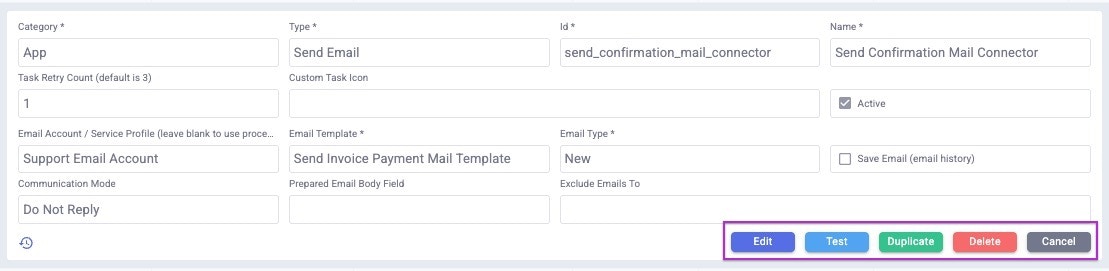
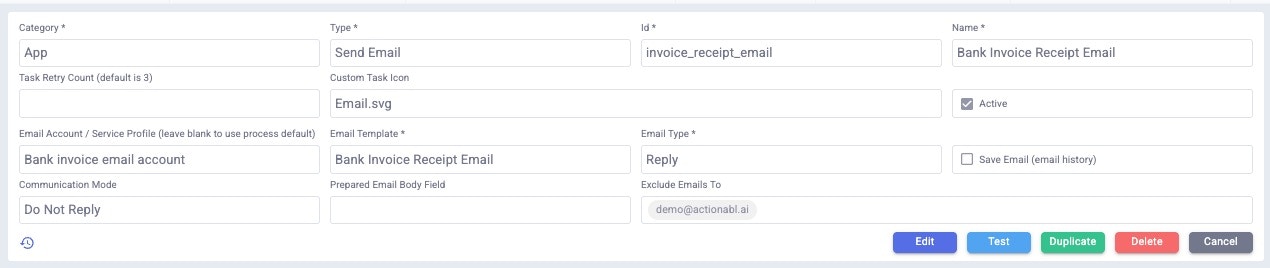
Send Email App Connector
Email app connectors send emails from the system and allow for customization of the template and contents based on where the connector is used.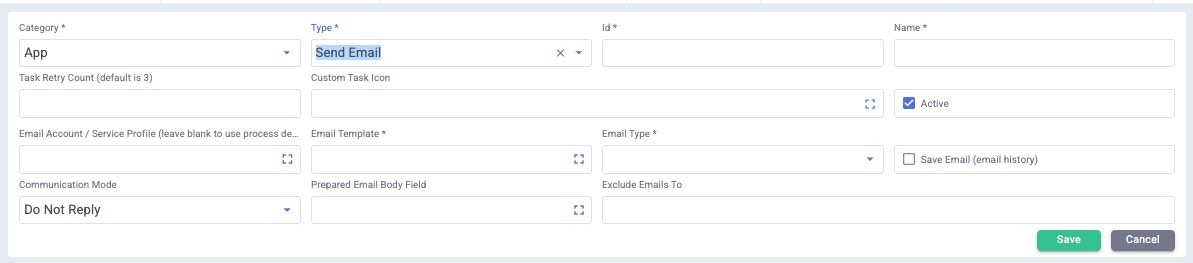
- Email Account / Service Profile is the sending account to use for the email. Leaving this blank uses the default email or service account as defined at the process level.
- Email Template selects the template that defines the email’s contents and recipients. These templates usually include variables, representing the data passed into the process step.
- The Email Type is Reply, Reply All, New, or Forward. Your choice determines which fields within the email template are needed and who is included in the sending list.
- Save Email should be checked if you want to keep a copy of the email in the email history.
- Communication Mode determines whether the recipient is able to respond to the email directly.
- Prepared Email Body Field is used if the sender is manually drafting the body of the email. This field contains the draft of the email content that will be sent by the Send Mail connector.
- Exclude Emails To is a list of email senders who should be excluded from any replies or reply-alls.
Send Message App Connector
The send message app connectors send SMS text messages from the system using a template you create within the connector or a predefined message template. The template can reference variables for data fields that are passed into the task where the connector is called. If the template references a variable that is empty, the field will simply be left blank in the message. The connector is set up like this:


Push Notification App Connector
In Actionabl, push notifications are found in the Communications dashboard under Notifications. The Push Notification app connector creates a push notification for the item. They are commonly used to alert that a task has been created or completed. The connector is very simple.

Read Folder App Connector
The Read Folder app connector monitors a specified folder on the system and takes action when it finds files that match the configuration and/or filter specified. When a new, matching file is found, the connector can save it as an attachment to the item, configure access to it, and assign it a category. The connector is set up like this:
- TheFolder must specify the full path to the folder to be monitored. Any folder on the server can be monitored, not just paths in the Actionabl application.
- File types are the extensions to watch for. Each is entered separately followed by Enter, creating selection “cards” within the field. Keep in mind that for extensions such as JPEG where the filename could be either .jpg or .jpeg, both entries are needed.
- Filter lets you select existing filter scripts in the system that can be used to determine matching criteria.
- Click Save as Attachment to save the file as an attachment to the current item. The file is saved in the “attachments” folder configured for this project and a link to the attachment is added to the item.
- If you select Save as Attachment, you must also:
- Specify an Attachment Category (Inbound, Inbound OCR, Outbound, User, or Generated).
- Indicate the access permissions for the attachment (Public, Group, or Individual)

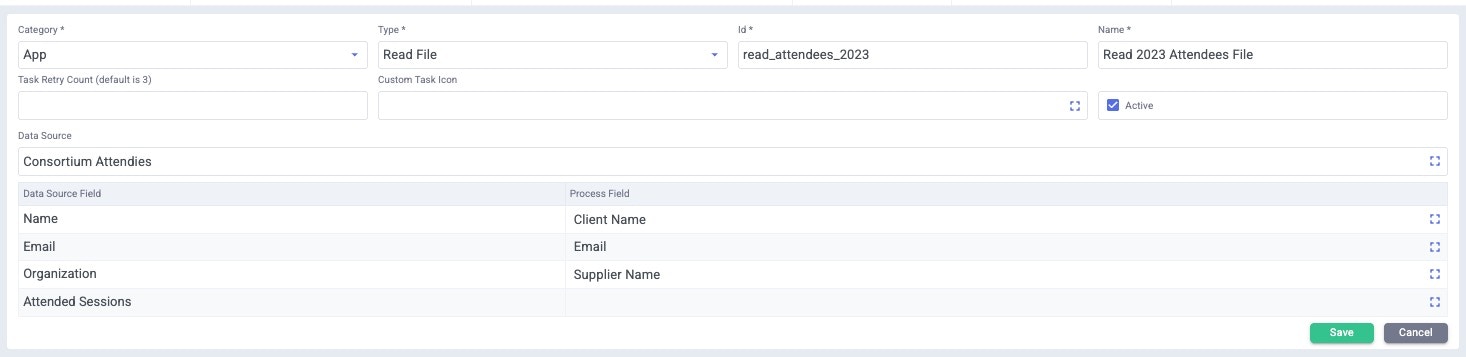
Read File App Connector
This event type reads the specified file and uses the file’s content to add to the item. Once the file has been read, a corresponding file with the suffix .done is created, which prevents the file from being read again. For example, let’s look at the Consortium Attendees file we previously defined as a data source. Click the browse icon [ ] next to Data Source and select the file. The connector looks like this after selecting a file: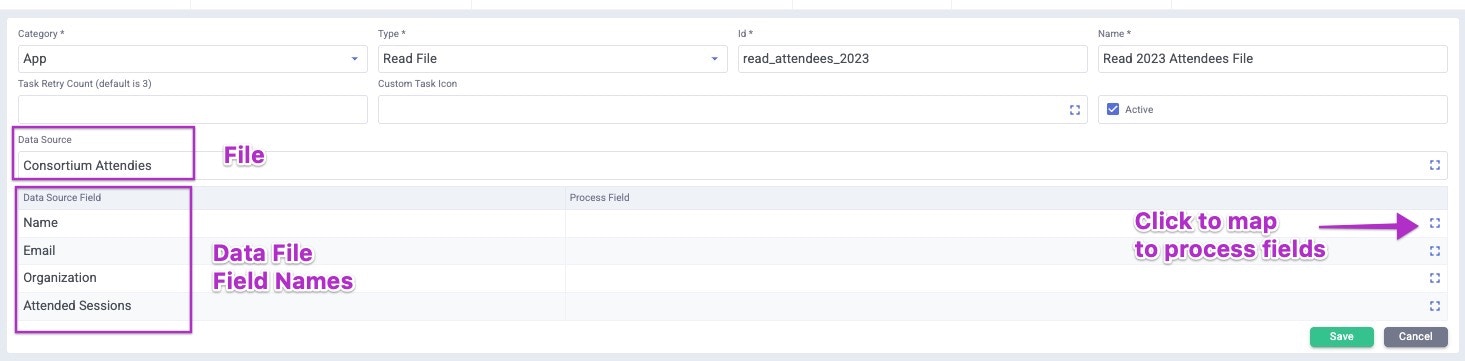
Generate Document App Connector
The Generate Document app connector lets you generate a document based on data passed into the connector from the task.For example, this connector can be used to:The connector configuration starts out looking like this:
- Generate a nicely formatted Order Confirmation in Microsoft Word
- Create an inquiry update that can be viewed online in HTML
- Generate a certificate of completion in PDF.

- Document Name is the filename for the document as it’s saved in the system without the file type extension. File names can contain spaces but not special characters. For example: order confirmation, not order confirmation.docx
- Document Type is where you select the type of file you’re creating from the dropdown list (PDF, Excel, CSV, HTML, Word, PDFForm)
- Document Template is where you select the pre-built template, which also contains variables that will be used to generate the output document.
- If you are not sure whether a template is the right one or if you need to see its contents, click the 3-dot menu on its right to download it to your computer and view it in the appropriate application.
- The downloaded template will show you all of the variables it uses, such as in this example from Word.\
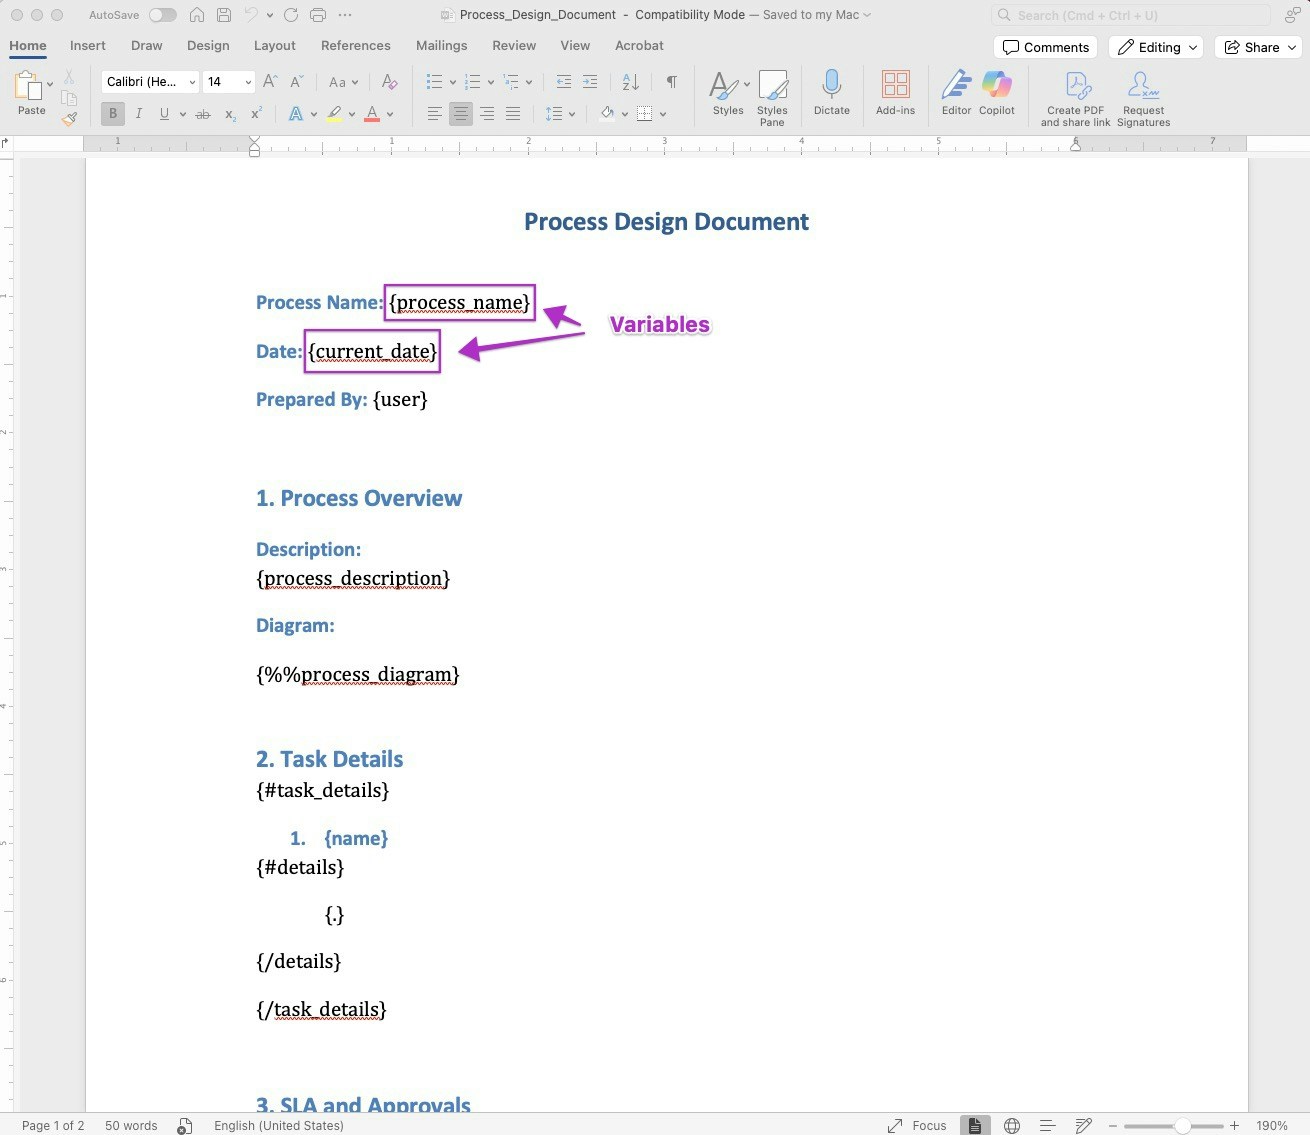


- The Name of each parameter must exactly match the way the variable is defined in the template file including capitalization. Do not include the curly braces or any special characters (like slashes or percent signs) in the name.
- The Type of the parameter determines how it will be entered and processed.
- String requires alphanumeric input and accepts all special characters that can be used in a Javascript JSON object. It is not necessary to escape or backslash special characters when entering them. Strings are directly typed in the field.
- Integer accepts only whole numbers without decimals. Integers are directly typed in the field.
- Float accepts decimal numbers, which are directly typed in the field.
- Boolean generates a checkbox for a yes/no value. If checked, the parameter evaluates to “True.”
- Date provides a date-picker to select a calendar date in DD-MM-YYYY format (or the format specified in your system’s configuration)
- Date Time provides a date picker that includes a time selector to indicate time in 12-hour format and AM or PM.
- Time allows you to type in a time in 12-hour format, specifying AM or PM, directly in the field.
- Field maps the contents of a field in this item from the browse selector into the document.
- Record lets you browse and select a messaging template or other data record to embed into this document.
- Cron Schedule shows the available cron schedules when you click the browse icon and maps the selected schedule’s descriptor into the document.
- Excel Cluster shows the available Excel templates in the systemwhen you click the browse icon. When you select a template, this item will be matched against it to check if it complies with that template’s format**.**
Extract PDF App Connector
COMING SOONFTP App Connector
This connector logs in to a FTP site and executes one or more FTP commands. It ca be configured to retry multiple times in case of failure or an incomplete command or response.
-
FTP Site is a selection of an FTP site record. Click the expand icon next to any site to see or edit its full record. You can also click the green plus at the top right to add a new site record.\

-
**Max Number of Tries **is the number of times that each FTP command defined in the connector should be retried if it fails the first time. This defaults to 1.
This differs from the Task Retry Count on the previous line, which defines how many times the overall connector can be restarted if it fails. - The Try Interval is the time in milliseconds that the connector should wait before trying a failed task again.
- Cutoff Time specifies a time in 12-hour format (HH:MM am/pm) after which no further FTP commands in this task should be attempted. This could be used, for example, to ensure that no items are retrieved after a business cutoff of 05:00 PM until the connector re-starts on the next business day.
- Error on incomplete commands is a flag that stops the connector from continuing to attempt FTP commands if an incomplete or erroneous command is encountered. For example, if there is a command to get a file in a specific folder and that folder is not found, no further commands would be executed.
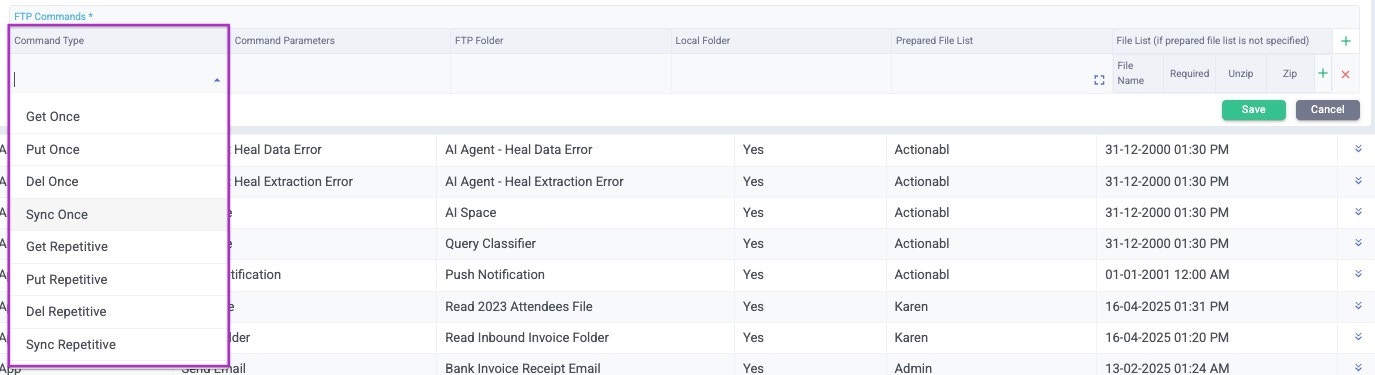
- Get Once
- Put Once
- Del Once
- Sync Once
- Get Repetitive
- Put Reptitive
- Del Repetive
- Sync Repetitive
- Get retrieves the matching file(s) from the remote FTP server and copies it onto the Actionabl system.
- Put places the file(s) from the Actionabl system into the designated folder on the FTP server.
- Del deletes the file(s) from the remote FTP server.
- Sync finds the most recent copy of the file(s) on the remote FTP server and the Actionabl server and copies it to the other server.
- Command Parameters are optional parameters that would be entered on the FTP command line to further define the action to be taken. The parameters that can be used here are the Linux ones relating to file transfer found on the FTP man page.
- FTP Folder is the path of the targeted folder on the remote FTP site, starting at the default folder defined in the connection.
- Local Folder is the full path to the Actionabl folder targeted by the command.
-
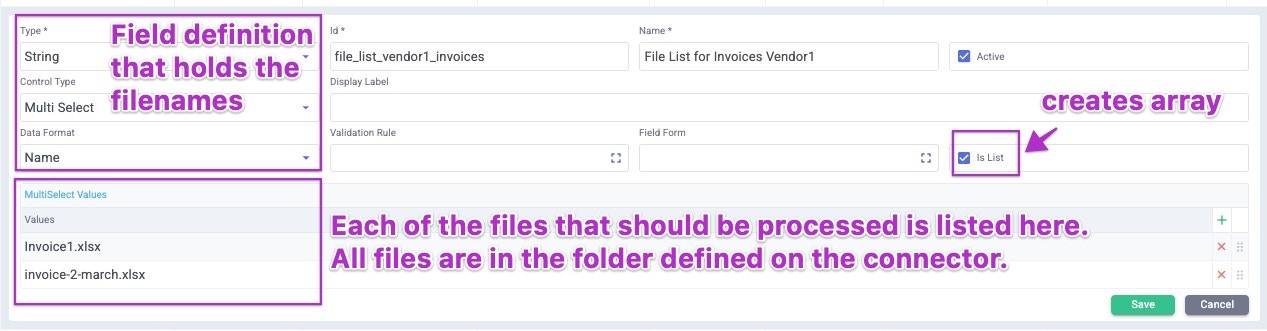
Prepared File List is where you select or create the file(s) on the Actionabl site to be acted on by the command. In the Field List that pops up, you can create a new file list like this:
-
If you don’t have or want a prepared file list or if the file to be acted on is on the remote site, define it in the File List instead. Click the green plus sign to add the file.\
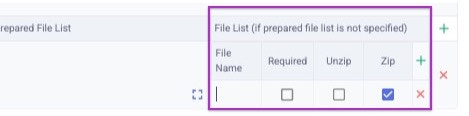
- Type in the File Name to be acted on. You can use wildcards to select groups of files or can enter additional matching filenames by using the green plus sign.
- Click Required if this file is required in the action. If you do and the file is not found, the command will stop. If “Error on incomplete commands” is selected above, the connector will stop processing and generate an error; otherwise, the next FTP command in the list will start.
- If you are receiving a Zip file and need to unzip it for the next command to use, click Unzip.
- If you’ve used wildcards to select a group of files and need to Zip them for the next command, click Zip.
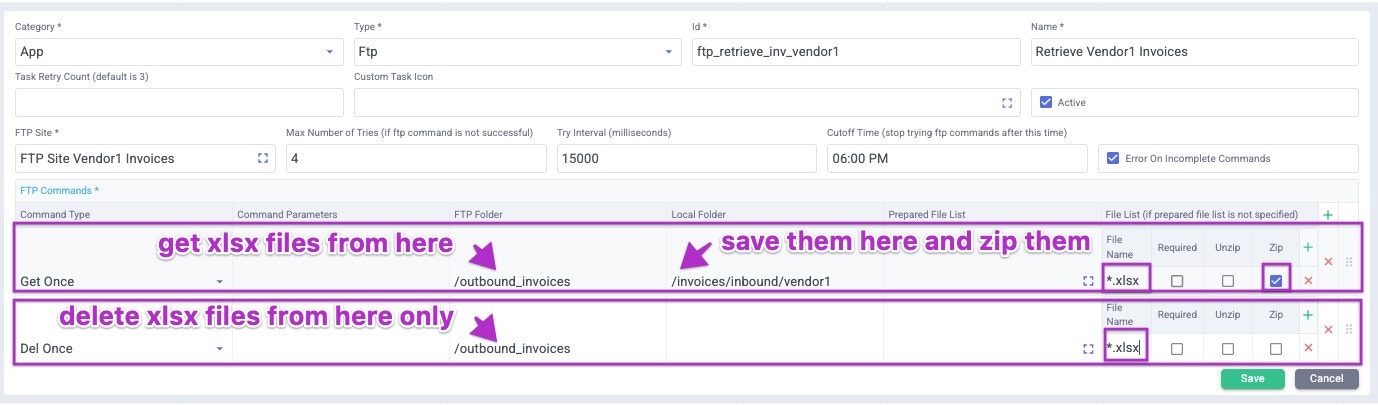
Examples: Retrieve all .xlsx invoices from an outbound_invoices folder on Vendor1’s site, zip them, then delete them on the remote site so they aren’t retrieved again.Retrieve all xlsx files from the outbound_invoices folder on the site. This looks for multiple files and bring each one over in a separate FTP command until no more matching files are found. Sync the balance_due.pdf file between the Actionabl site and the Vendor1 site. Throw an error if either of the files are missing.


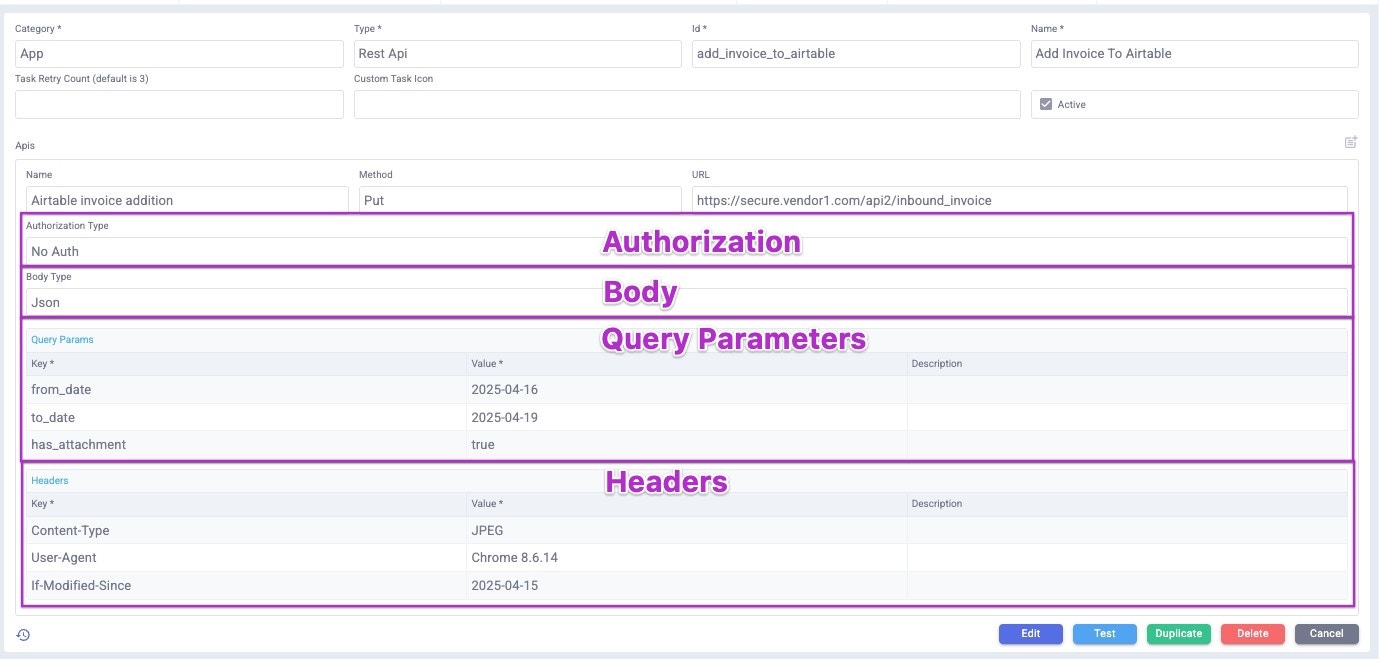
REST API App Connector
The REST API connector sends a request to the defined API and ingests a response (data) or status code. The response from that request is passed into the task in Actionabl. A REST API call can retrieve data, identify the status of a request, send data, or delete a record on the remote system, depending on how the system integrations are set up. Actionabl supports the following methods:- Get - retrieves the full content of the called URL. It makes no server-side changes.
- Put - creates a single, specific new resource or replaces the existing resource at the called URL. A Put call is idempotent, so if it is sent identically multiple times it doesn’t create multiple resources on the other end.
- Post - Can create one or more resources in the called folder URL. Unlike a Put call, it is NOT idempotent so each time it is called it will create another copy or resource on the other other end. This is the most common type of call used by HTML forms; each time it is sent represents another submission of the form.
- Delete - deletes the specified resource at the called URL.
- Patch - modifies only part of the called URL, such as updating one field or a counter
- Options - requests the called URL to respond with information about which methods it supports and whether a proposed request will work before submitting it. It makes no server-side changes.
- Head - retrieves the called URL’s metadata headers. This can be used, for example, to check a document’s length before retrieving it. It makes no server-side changes.
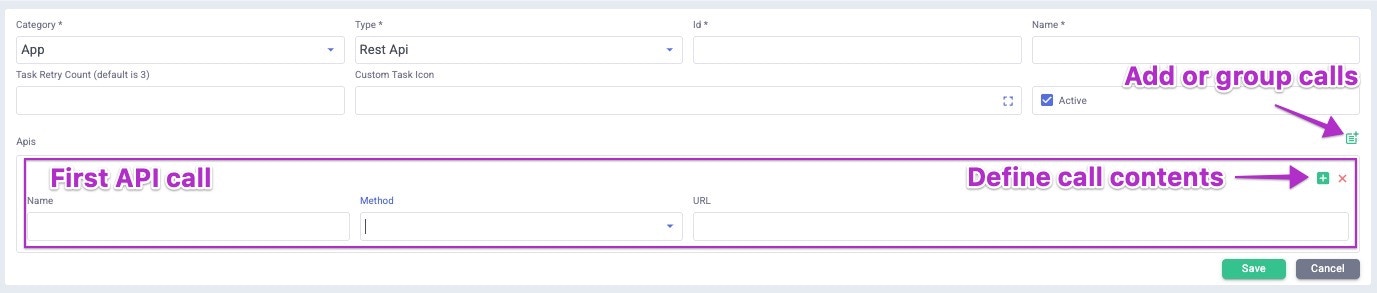
- Name will be shown in the list for execution management. It should be descriptive.
- Method is one of the above methods, which dictates the structure of what is sent.
- URL is the destination URL on the remote system.

- No Auth doesn’t require any further input
- Basic requires a username and password
- Bearer asks for a Bearer Token
- API Key asks for a Key and Value.
- Click Save, and the authorization is saved.
- Body asks you to specify a Body Type and then will provide the appropriate field(s) to enter the data. You can choose from None, JSON, Encoded form, XML, Text, and Binary.
- Select a Body Type, click Save, and the type definition is saved.
- Once you select a Body Type, you’ll be able to enter the Body Fields, which define the mappings between that type and the recipient API’s data.\
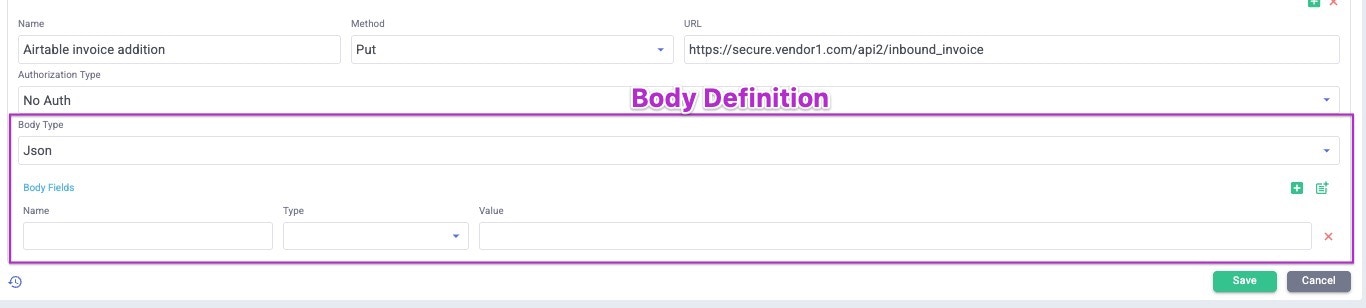
- The Name should be the field name on the recipient API
- Type is the field type of the source data. Field allows you to select a field in the current process to send.
- Value is either a hardcoded value or the contents of a field in the current process.\

- Click Save and the body definition is saved as detail within the Body Type.\

- Click Edit, then click the green plus sign to continue building the Request Details.


The Completed Connector Once all of the elements of the API call are built and saved, the connector looks something like this:
SOAP API App Connector
The SOAP API protocol is more closely based on XML and has a more rigid structure and control of datatypes than the REST protocol. As such, it’s more widely used for scenarios where standardized data is being passed between systems. Details are coming soon!Code App Connector
The Code app connector is the most powerful and flexible option for experienced and technical users. It enables you to define a script that completes the actions for the connector, which can include connections to external APIs, data manipulation and transformation, and much more. These can be Javascript or Python scripts, which are saved in folders on the file system. The connector definition points to the file to be executed.
External Task App Connector
COMING SOONDocusign App Connector
The DocuSign App Connector sends a set of documents out for signatures using a Service Profile and an ESign template you previously created.
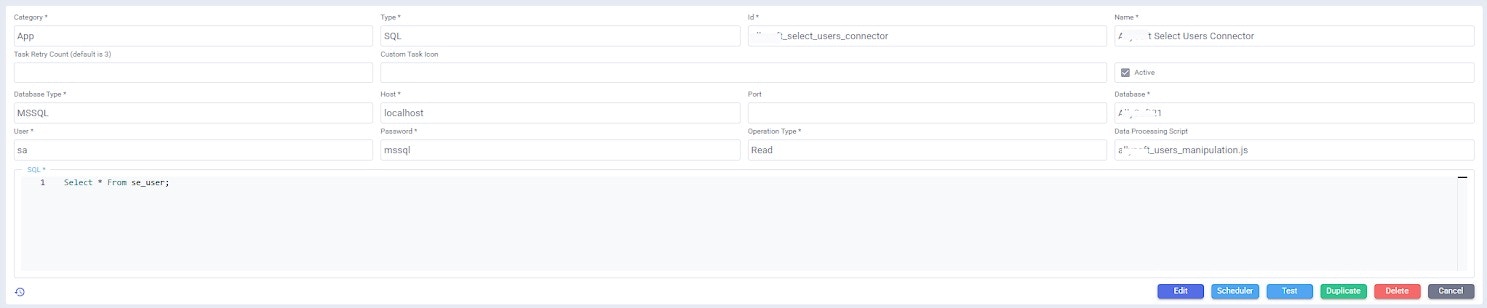
SQL App Connector
A SQL app connector lets you enter a SQL query and define a database on which to run it. The output of the query is then available to the next task in the process. The structure of the connector is this: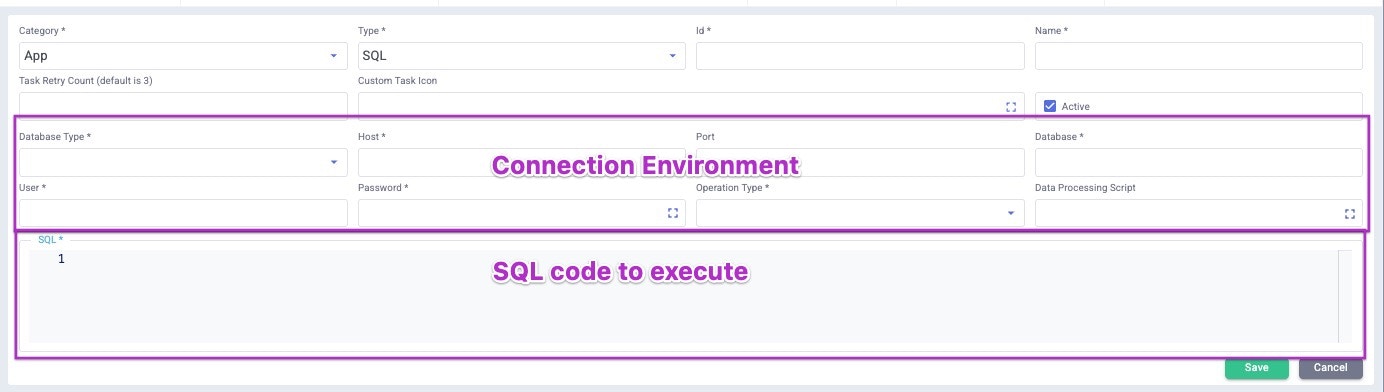
- Operation Type: Read, Update, Create, or Delete
- You can also select a Data Processing Script file, which is run after the SQL query.\
Jack Henry SymXChange API App Connector
If you have defined your Jack Henry integration via a Service Profile, you can run a Jack Henry operation using this connector type. Use the Browse icon on the Jack Henry Operation line to select from a JSON file containing the operation’s definition.MANAGING TASK RULES
COMING SOONMANAGING REMOTE WORKERS
COMING SOONMANAGING EXTERNAL ACCESSES
COMING SOONBUILDING THE PROCESS MODEL
The process model is a flow that includes:- Start event
- Tasks
- Flows that connect tasks
- Decisions that provide branching logic
- Resolution point(s)
Methods of Building Process Models
There are various ways to approach building the process model; the output of all of them is a BPMN flow, which is implemented in Actionabl to activate it. You should build your flow using whichever methodology best fits your needs and preferences.Process Modeler
TheProcess Modeler lets you start with a blank page and flowcharting tools, which you then place and define to build the flow. We will use this method as we build the process in this section.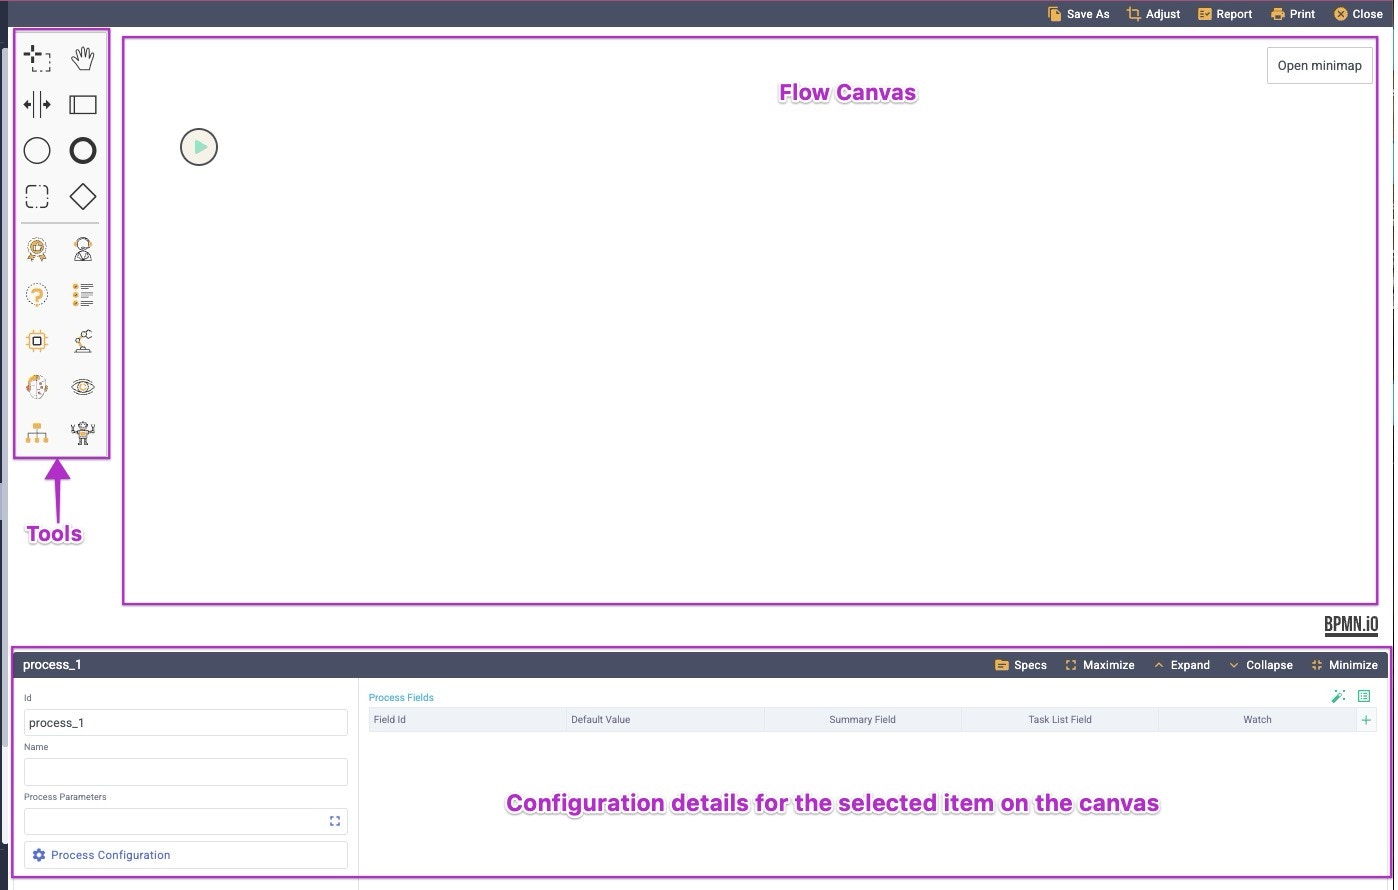

Process Wizard
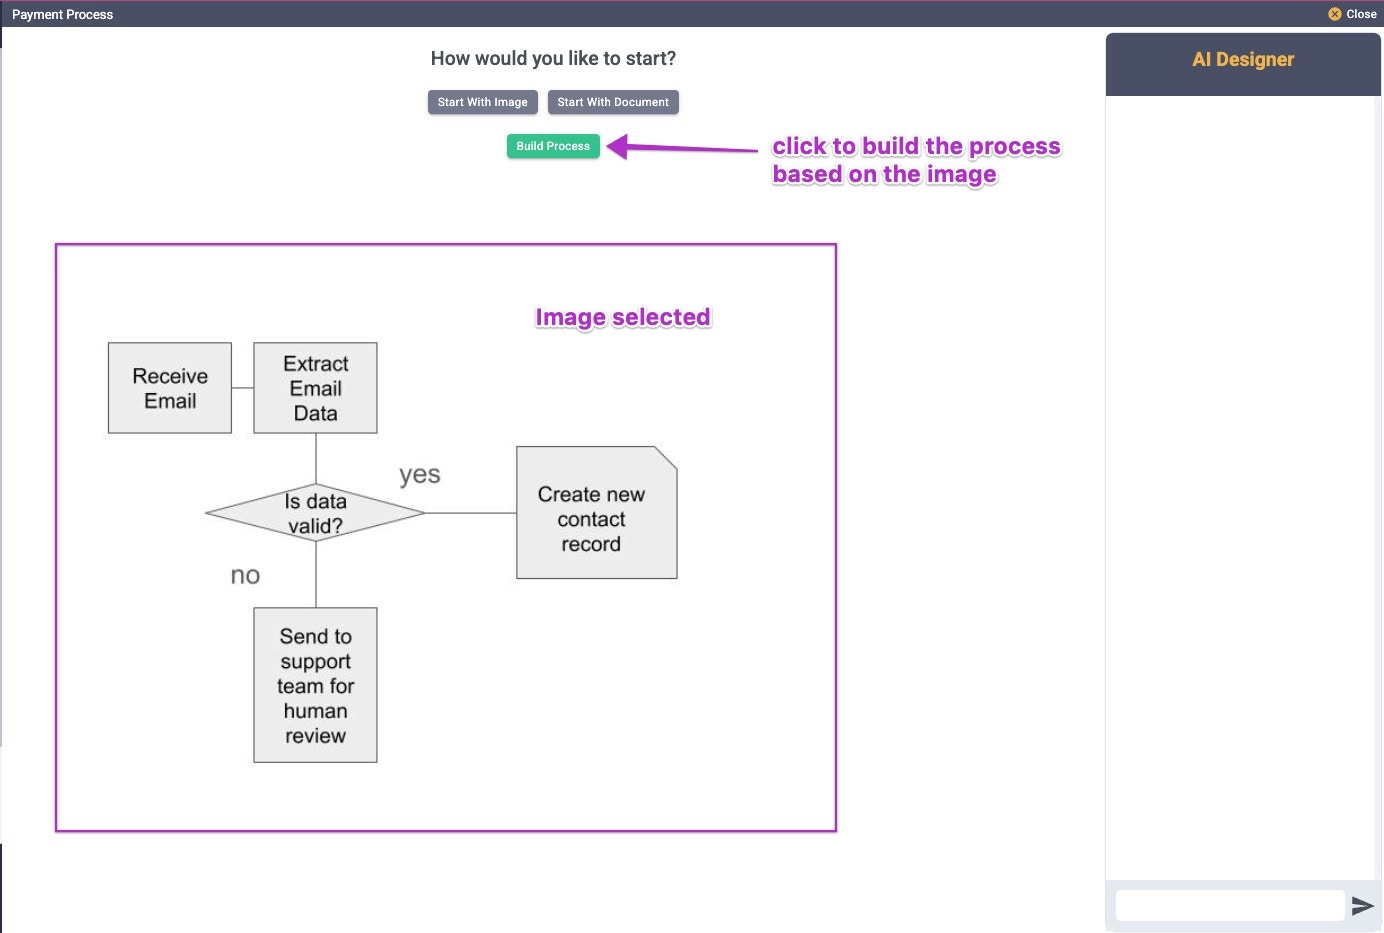
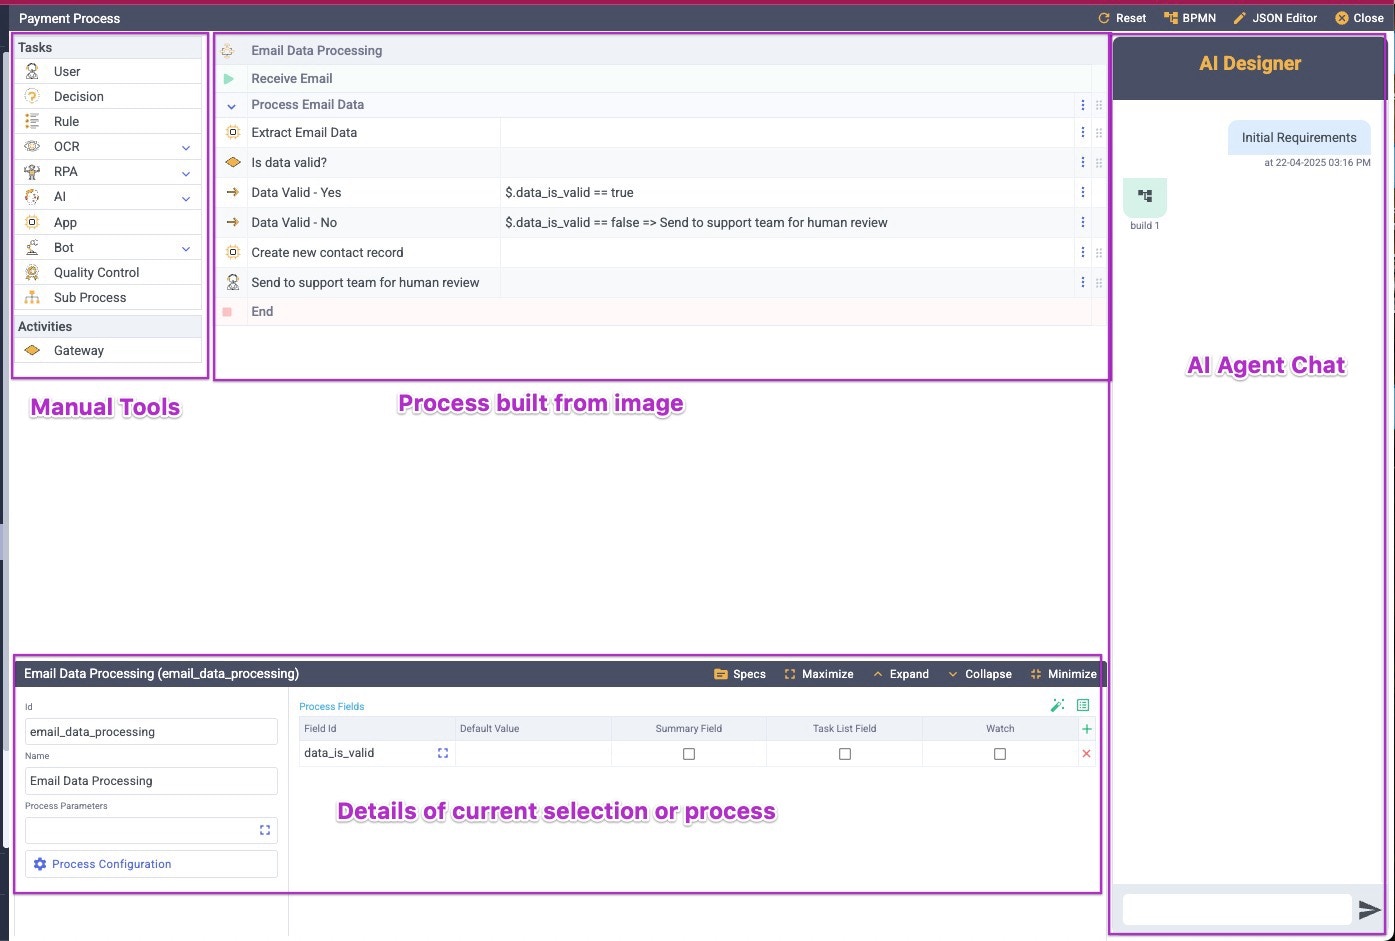
In the Process Wizard, you have three options: AI Modeler, Linear Modeler, and Template Modeler.- The AI Modeler starts with an image or a document and builds the process draft for you from that.
-
Image can be any flowchart image in JPEG or PNG format.\
- Document (COMING SOON)
-
Image can be any flowchart image in JPEG or PNG format.\
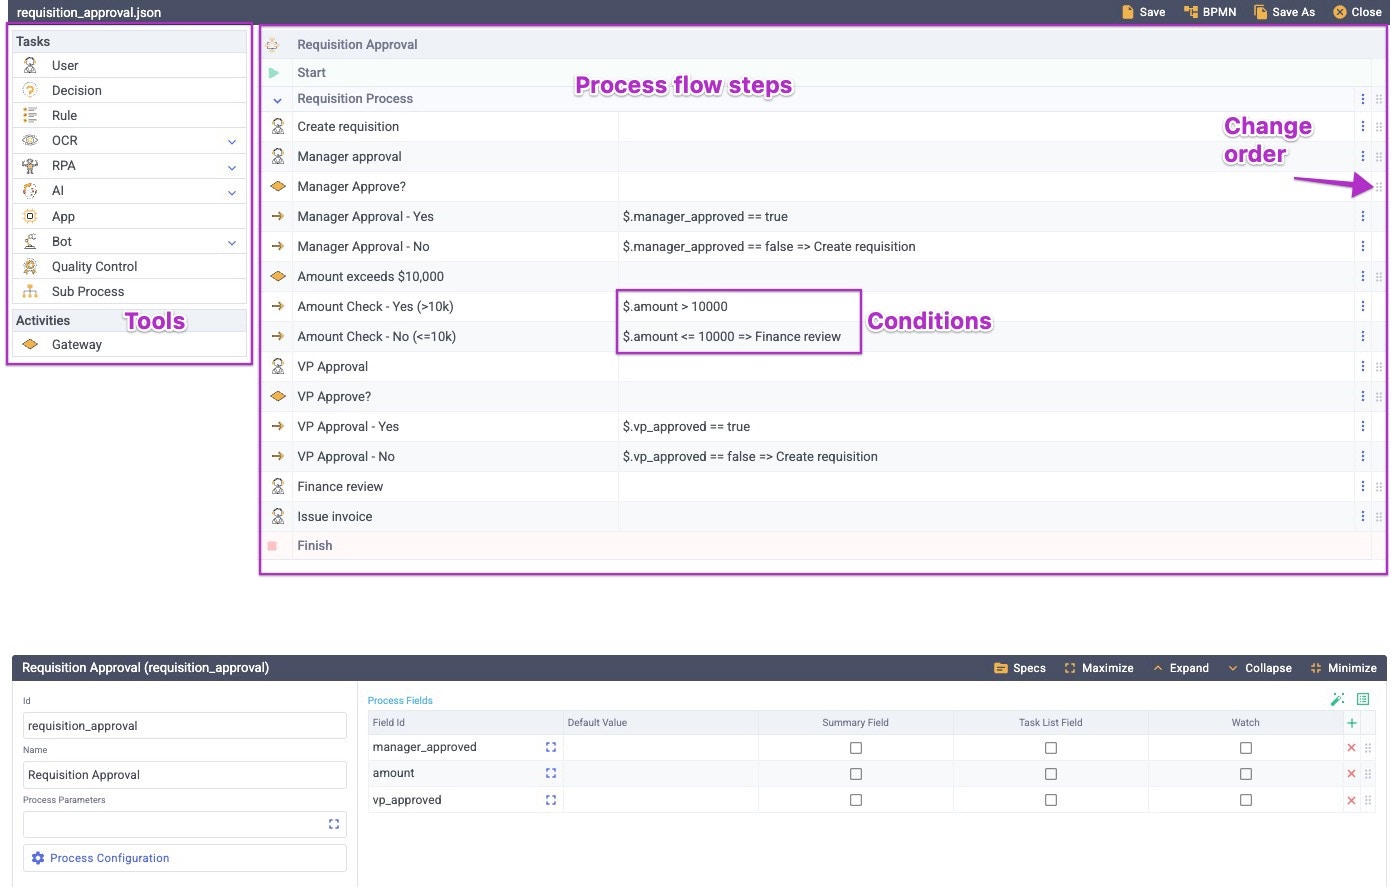
- The Linear Modeler enables you to build the process using line-by-line text definitions of its tasks and rules. This is an ideal choice if your process is evolving and you may need to add steps or rearrange the order of items later. After building the process this way, you would generate the BPMN for it, which is used to implement it in Actionabl.\
- Template Modeler (COMING SOON)
Tasks and Decisions
Tasks are the steps that an item moves through as it works its way through a process. A task calls connectors and actions and uses rules to complete a clear goal, then moves the data resulting from those elements across the flow to the next task or decision. Decisions (and Gateways) are special tasks that evaluate a set of data against a Decision Model or a set of task rules, which determine which flow the item should follow.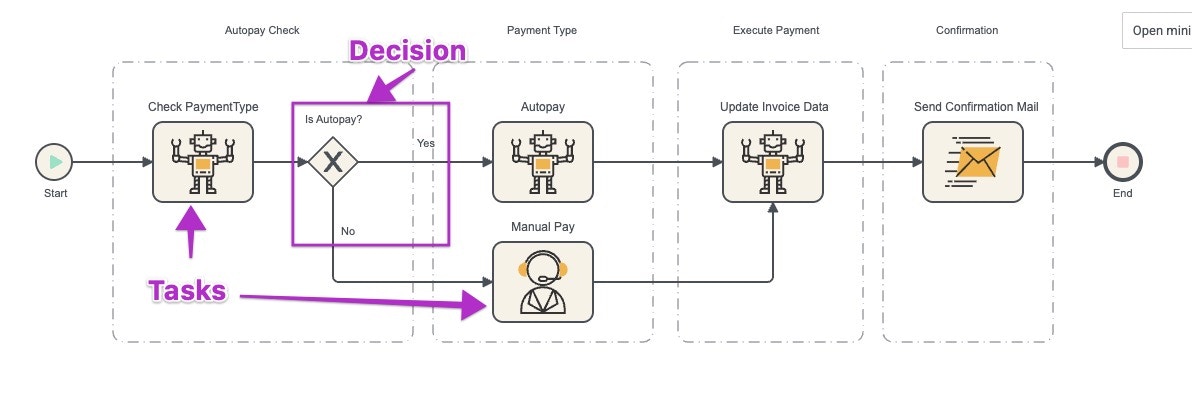
Building the Model from Scratch
When you open a new process model, you’ll see the process configuration at the bottom and a default Start Event icon on the canvas.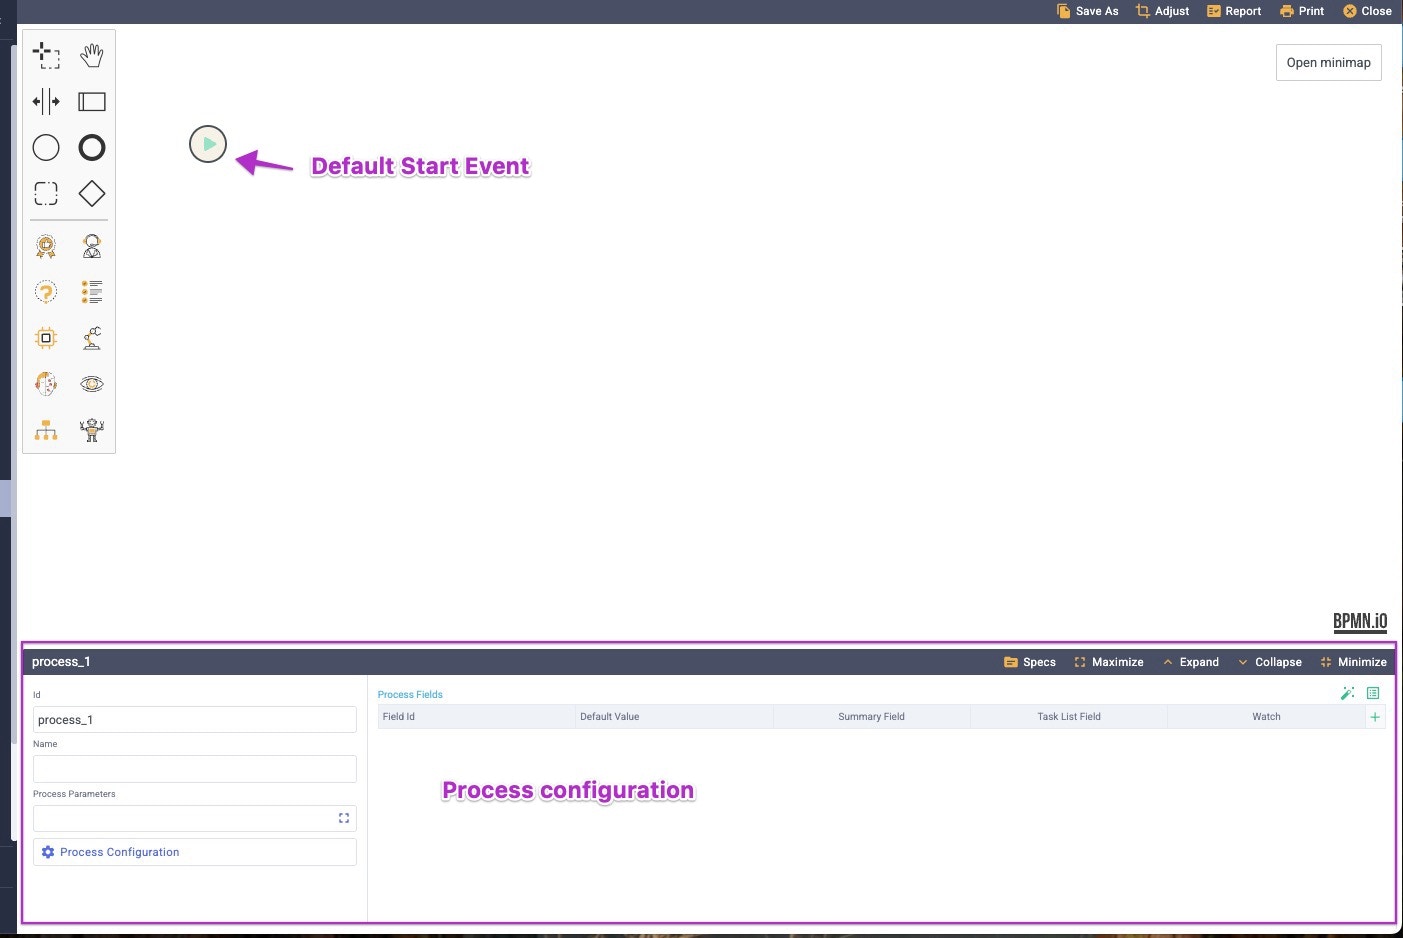
- Start by adding an ID and Name for the process.
- Define any parameters you know you’ll need at the process level (you can always build and fill these in as you go or at the end before deploying).
-
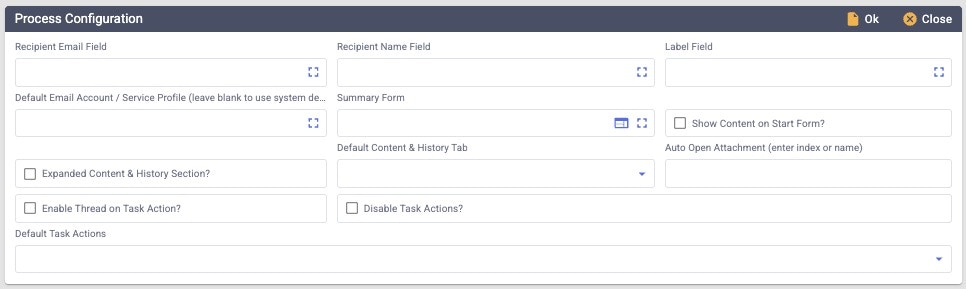
Click the Process Configuration settings icon to set up defaults like a default Service Profile or email account that the tasks should use.\
 At any point, you can Maximize, Expand, or Collapse the configuration section at the bottom to make more room to lay out your process flow.\
-
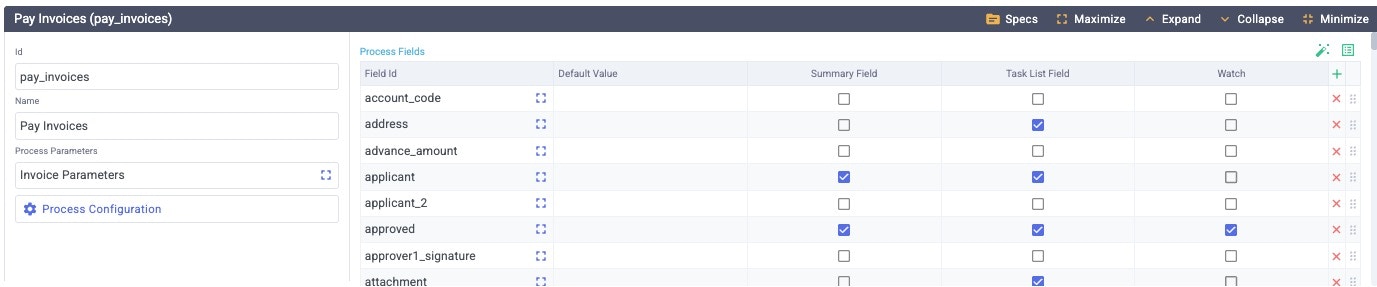
In the Process Fields section, add all of the data fields that should be available to this process as inputs OR as outputs. There are three ways to do this:
- Click the green plus sign to add fields individually
- Click the green “table” icon to select multiple (or all) fields and add them in bulk
- Click the magic wand to use the wizard to add fields.\

-
For each field that you add to the process, you can:
- Add a default value, which is the starting value that the field provides for each item as it enters the process if it’s blank. This value can be overwritten by subsequent steps in the process.
- Summary Field should be checked if this field should appear in the search result summary when items are listed.
- Task List Field should be checked if this field should be an “available column” that can be selected in the task list.
- Watch should be checked if this field should be part of Watch Data in the Content & History section on the item details.\
- Click Save As in the top right menu and name the process to save your work so far. Remember to do this frequently as you work!
-
Click the default Start Event icon on the canvas. It becomes active and the configuration panel at the bottom now relates to it.\
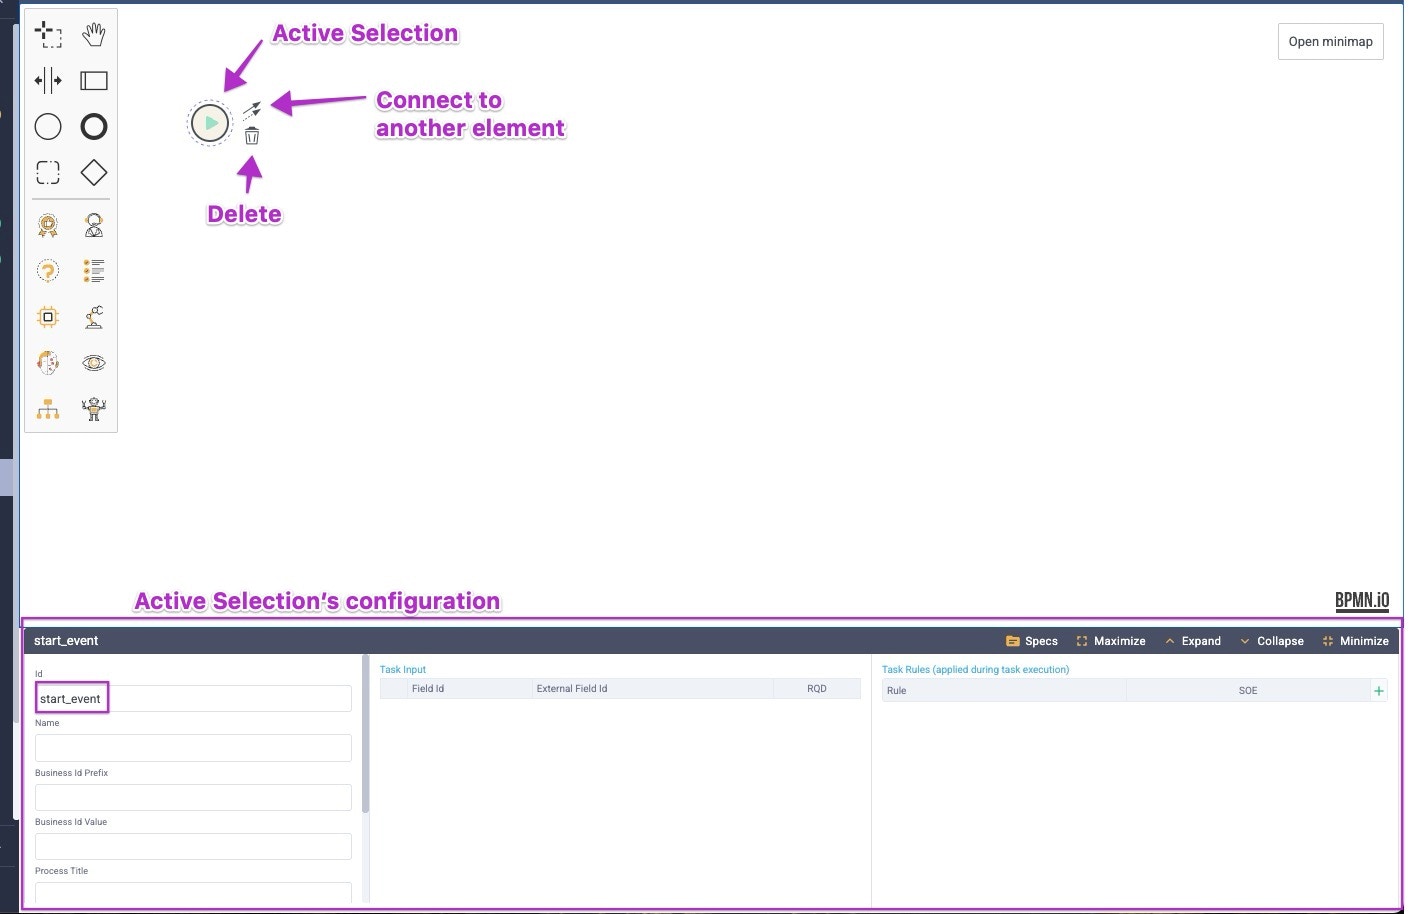
-
Add the configuration settings for this task, which will follow the item it creates through the process:
- Business ID Prefix is used in conjunction with the numeric Business ID Value to uniquely identify each item. For example: INV-24 is invoice 24. PAY-38 is payment 38.
- Business ID Value is the unique identifier that combines with the Business ID prefix. It can be a sequence number, current time, or a random unique ID.
- Process Title is the value for the item shown on the Task Lists, and can be the value of a field in the record. \
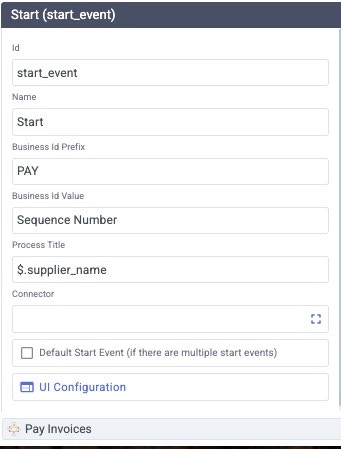
- Select the Connector that this start event will use.
- If this process can have multiple start events indicate whether this is the default one. For example, if invoice auto-payment can be started manually with a form OR by receiving an invoice via email, indicate which one of these is the default.
-
If the start event is something requiring a user interface, such as a form or user selection, click UI Configuration.
- Click Create Start Form if you want the user to see a form on the screen when this process starts.
- Select the Form to present to them (or create a new form, if appropriate).
- Add a Title for the form to display.
- If this form should only be available to members of a workgroup, select that.
- If the form should open in full screen mode, check the box.
- If you want to represent this start event form with a custom icon, select it here.\

- Click OK to save the UI configuration.
-
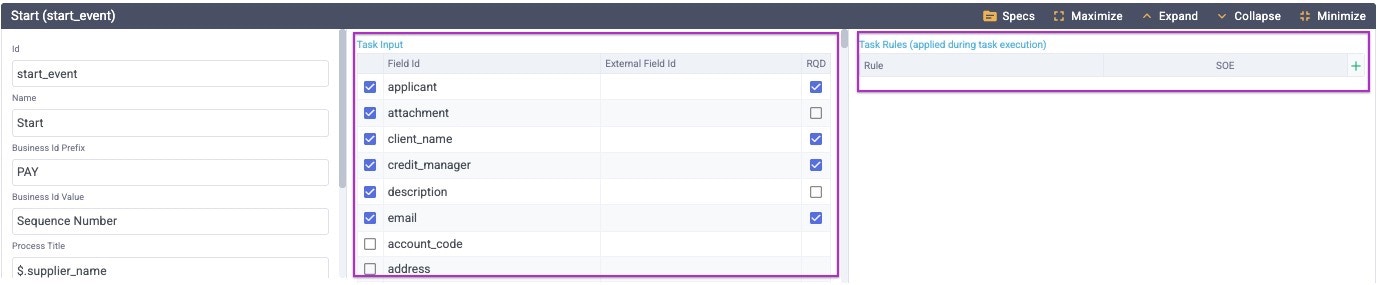
In the Start Event and in every other task, select the Task Input fields that will be used as Input and Output, as well as any Rules that should apply to this task. As you select the fields, they are automatically moved to the top of the Task Input list. If an input is required, click its RQD box.\
-
Add the first Task in the flow. In this case, we’re going to add an RPA that will check the invoice to determine if it’s eligible for auto payment.
- Click and drag the task’s icon from the Tools onto the canvas to the right of the Start Event icon.
- Click the Start Event icon and select its “connection” arrows, then drag to connect the two icons.\
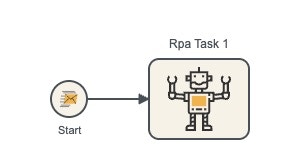
- Click the RPA task and review its configuration at the bottom.
- Update its ID and Name to signal what its goal is.
- Select the Connector to use for this task’s actions.
- If the task has a UI component, select Task UI Configuration and make the appropriate selections.
- Add a Stage for this task and name it.
- If desired, select a background color for the task.
- If desired, select a color to use for the outline and descriptive text for the task.\
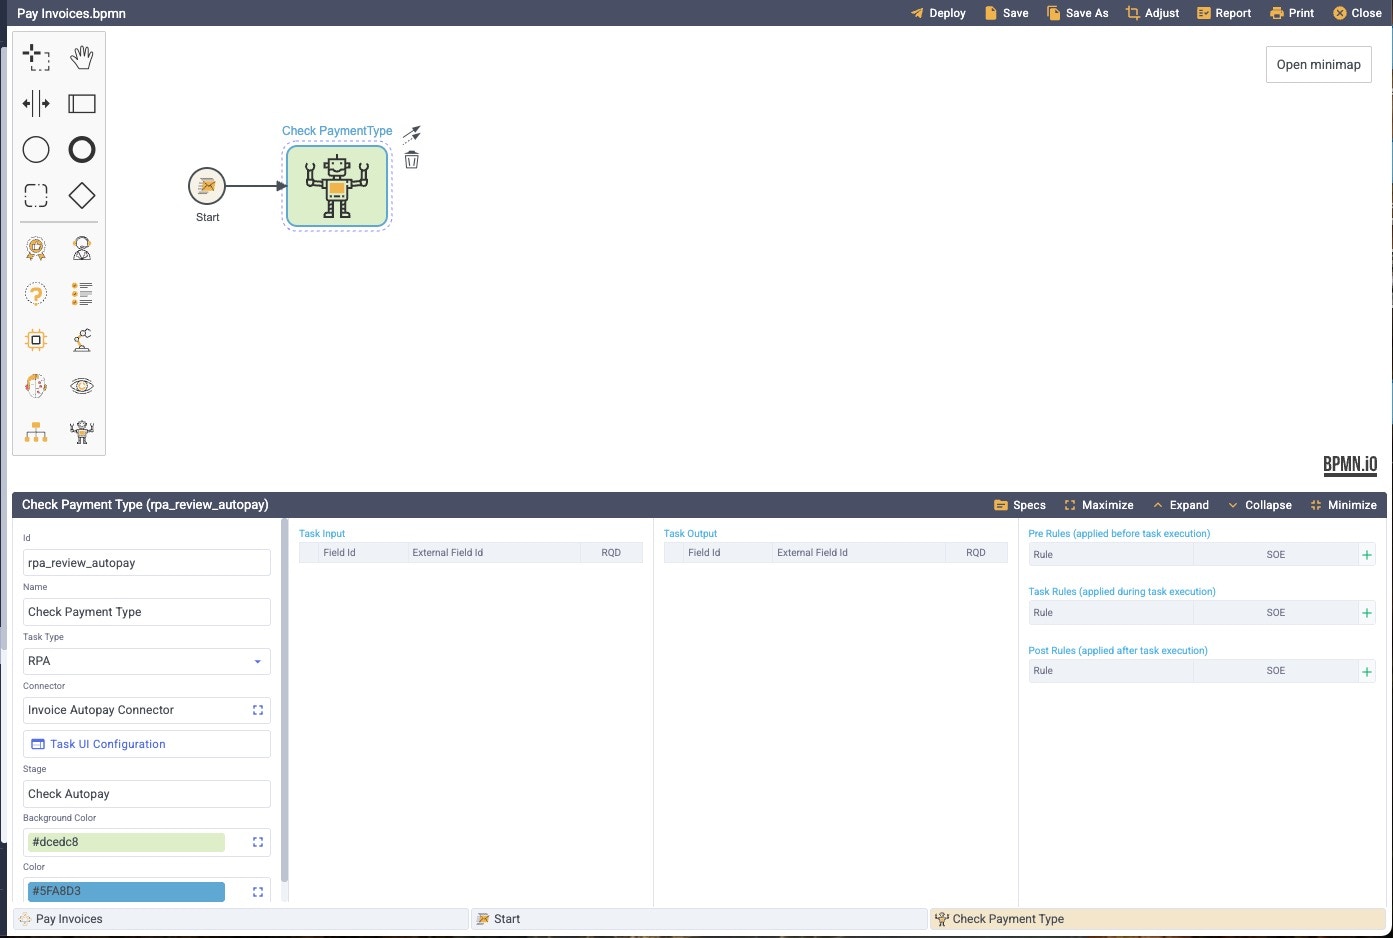
- Select the Task Input and Task Output fields specific to this task. As you select the fields, they are automatically moved to the top of the Task Input list. If an input is required, click its RQD box.\
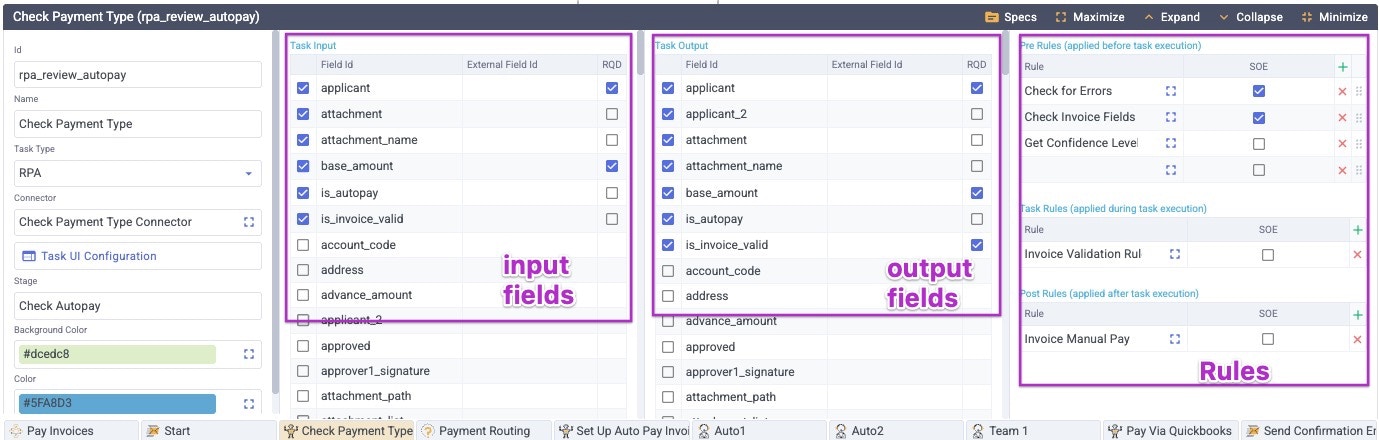
- Select the Rules that are involved with this task.
- Pre Rules are applied to the item as it is passed to into this task and before the task takes any other action on it. These are typically things like error checking and basic data validation.
- Task Rules are the rules that apply during the task’s execution. These can include data transformation or checking conditions.
- Post Rules are applied after the task’s execution completes and before the item passes into the flow to go to the next task. These may be data transformation like updating a status code or flag.
- SOE (stop on error) should be set if a rule should stop processing if an error is encountered. This will cause the item to stop flowing through the process and will generate an error task.
- Add the next tasks in the sequence using the same steps. For each item you add, make sure:
- The ID is unique and contains only lowercase letters, numbers, dashes (-), and underscores (_).
- You’ve identified the input and output fields and the rules that apply to this task.
- The Task Type is correct and a connector is defined.
- Flows connect each new task to its predecessors.
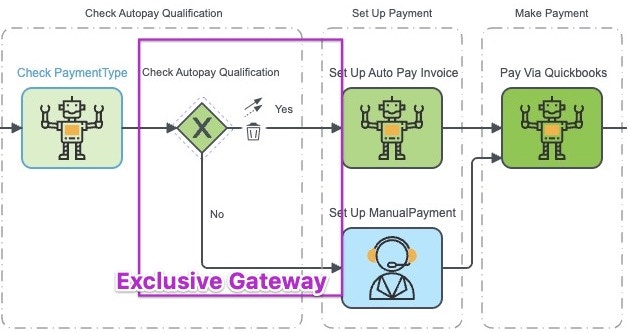
Decisions
Decisions can be handled in two ways:- Using a Decision task
- Using an Exclusive Gateway
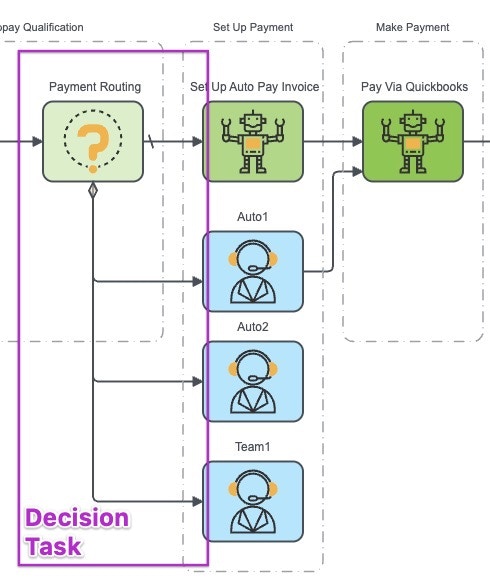
The Decision Modeler
To build complex rules that assess items against multiple criteria and route them within the flow, use the Decision Modeler.Groups and Stages
Stages represent a set of statuses that an item can have as it moves through a process. For example, in the “Pay Invoice” stage, an item might have either manual_pay or auto_pay as its status, but in either case it has been approved and is waiting for a payment action to take place. Groups are an easy way to visualize the stages in a process, but they don’t have an active function. They are represented by dashed lines in the process model.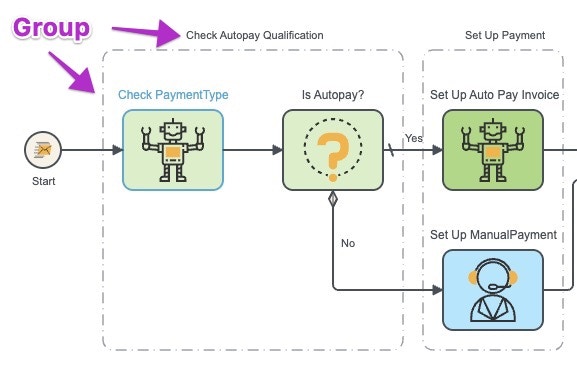
Flow Connectors
The arrows that connect tasks to each other represent the flow of items. Flows may contain logical expressions that determine whether an item can use them, such as autopay=false in the example below. They may also have visible Names that can help a user understand the diagram, such as “No” in this example. You can also select a Color for the flow, if desired.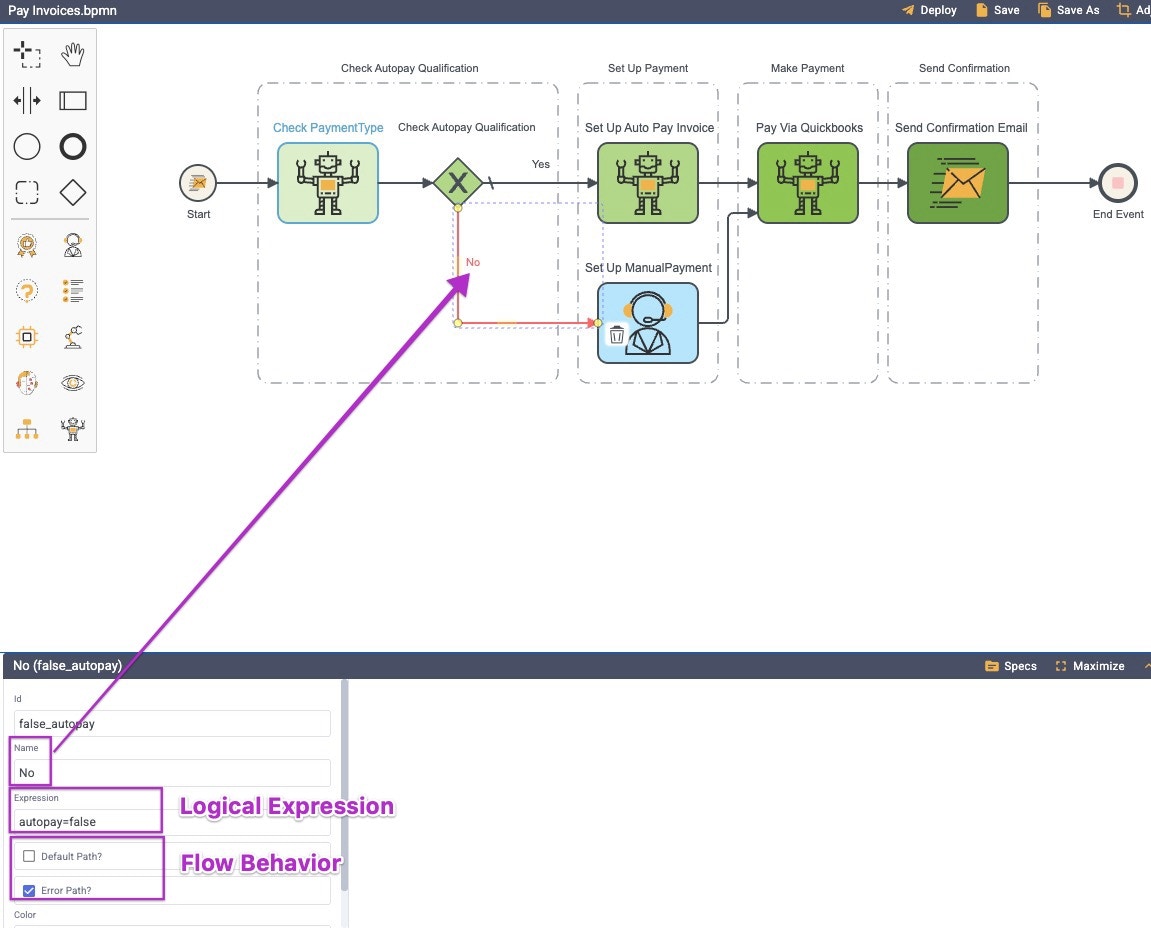
- Default Path is followed when multiple flows exit a task. It indicates which flow should be followed if the item doesn’t match the Expression in any of the other flows when it exits the task’s execution.
- Error Path is followed when a problem occurs that prevents the item from flowing further during or after the tasks’s execution. This could be things like the presence of invalid data, required attachments that are missing, or other issues.
End Event
Every process requires an End Event, just as it had a Start Event. While there may be multiple resolution tasks at the end of different flows, such as an invoice rejection email being sent vs an invoice payment confirmation, all of those resolution tasks must flow into an End Event. This signals to the process that it is complete and should stop processing.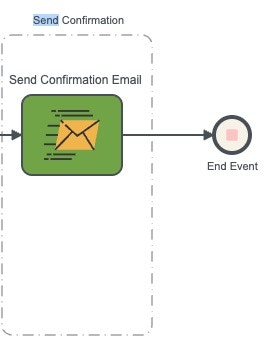
USING THE PROCESS REPORT
The process report can be generated by clicking Report at the top of the process manager view.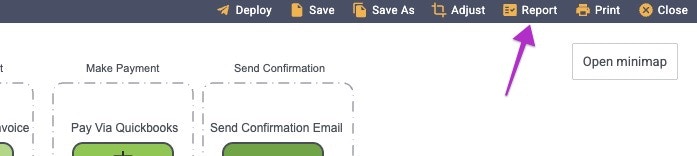

TESTING THE PROCESS AUTOMATION
As you’re building your process, you should be testing each element to make sure that it works as you expect. Using the Test command in the menu for the items gives you a quick and reliable way to do this. As the process comes together, there are pieces that you cannot test individually, such as the flows and logic. Before deploying to your production environments, we recommend using the Process View in your test environment to manually start the process using test items that you create for each of the scenarios. It’s important to make sure that your test items cover each of the decision flows and rules within the process.IMPLEMENTING THE PROCESS AUTOMATION
Once you have built and tested the process flow and are ready to use it, clicking Deploy in the top menu makes it active.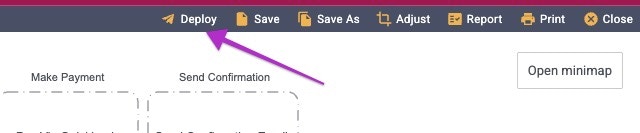
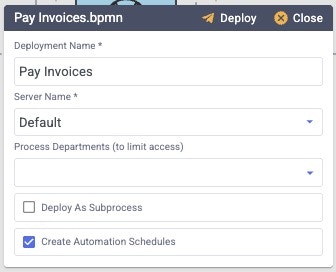
- The Deployment Name should match the name of the process
- Select the Server on which this deployment should run
- If the process should be restricted to certain workgroup(s), select them in the Process Departments dropdown.
- If this process is a subprocess that is referenced as a step in another process, click the Deploy as Subprocess checkbox.
- Create Automation Schedules is required to be checked on the first deploy of this process to activate its schedules. After that, it’s optional unless you change any of the process’ schedules or connectors.
- Run immediately (Custom start, DB query, FTP)
- Run when the next matching Cron schedule occurs (Cron)
- Start listening for inbound events (HTTP, Read Email, Read Folder)