OVERVIEW
Actionabl.ai is a platform that automates your business processes and alerts users whenever human intervention is needed. This guide covers the Controller Dashboard, which is central to managing the flow of automated processes through the system and enables monitoring and reporting on the workflows being managed in Actionabl.
- Task Management covers all aspects of the Task Manager dashboard, which includes:
- Process and Task concepts, organization, and management
- Process View basics
- Automation management, including processes, tasks, connectors, and rules
- User Management includes asset and access control for users through Groups and Departments
- Automation, Task, & Rule Administration covers the core of setting up and managing the tasks, automations, connectors, and rules that make up the process flows.
- Process Administration Guide is used to learn how to create, edit, and manage processes and all of their components. This includes the creation of tasks, connectors, data fields, data sources, and more.
CONTROLLER DASHBOARD OVERVIEW
Two modules are unique to the Controller dashboard: Control Center and Process Analytics. For convenience, you can also access the Search tools, Process View, and Error Tasks queue directly from the Controller menu.Control Center
The Control Center can be thought of as air traffic control at a busy airport. This is where you:- Manage the flow of data and items through the system via automations and tasks
- Schedule routine and repetitive operations through cron jobs
- Manage the AI Spaces that automate machine-learning tasks by checking their status, pausing them, or starting them.
Process Analytics
The Process Analytics dashboard gives you a visual overview of how items are moving through your automation based on reports and charts that your system administrator builds to monitor your metrics.AUTOMATION MANAGER
The Automation Manager module shows you all automations and tasks configured in the system, with an at-a-glance view of their status (running, paused, failed, etc.). It contains 2 tabs:- Automations is the overview of all tasks and processes running in the system.
- Schedules lists all of the schedules that can be used to manage a task or process listed on the Automations tab.
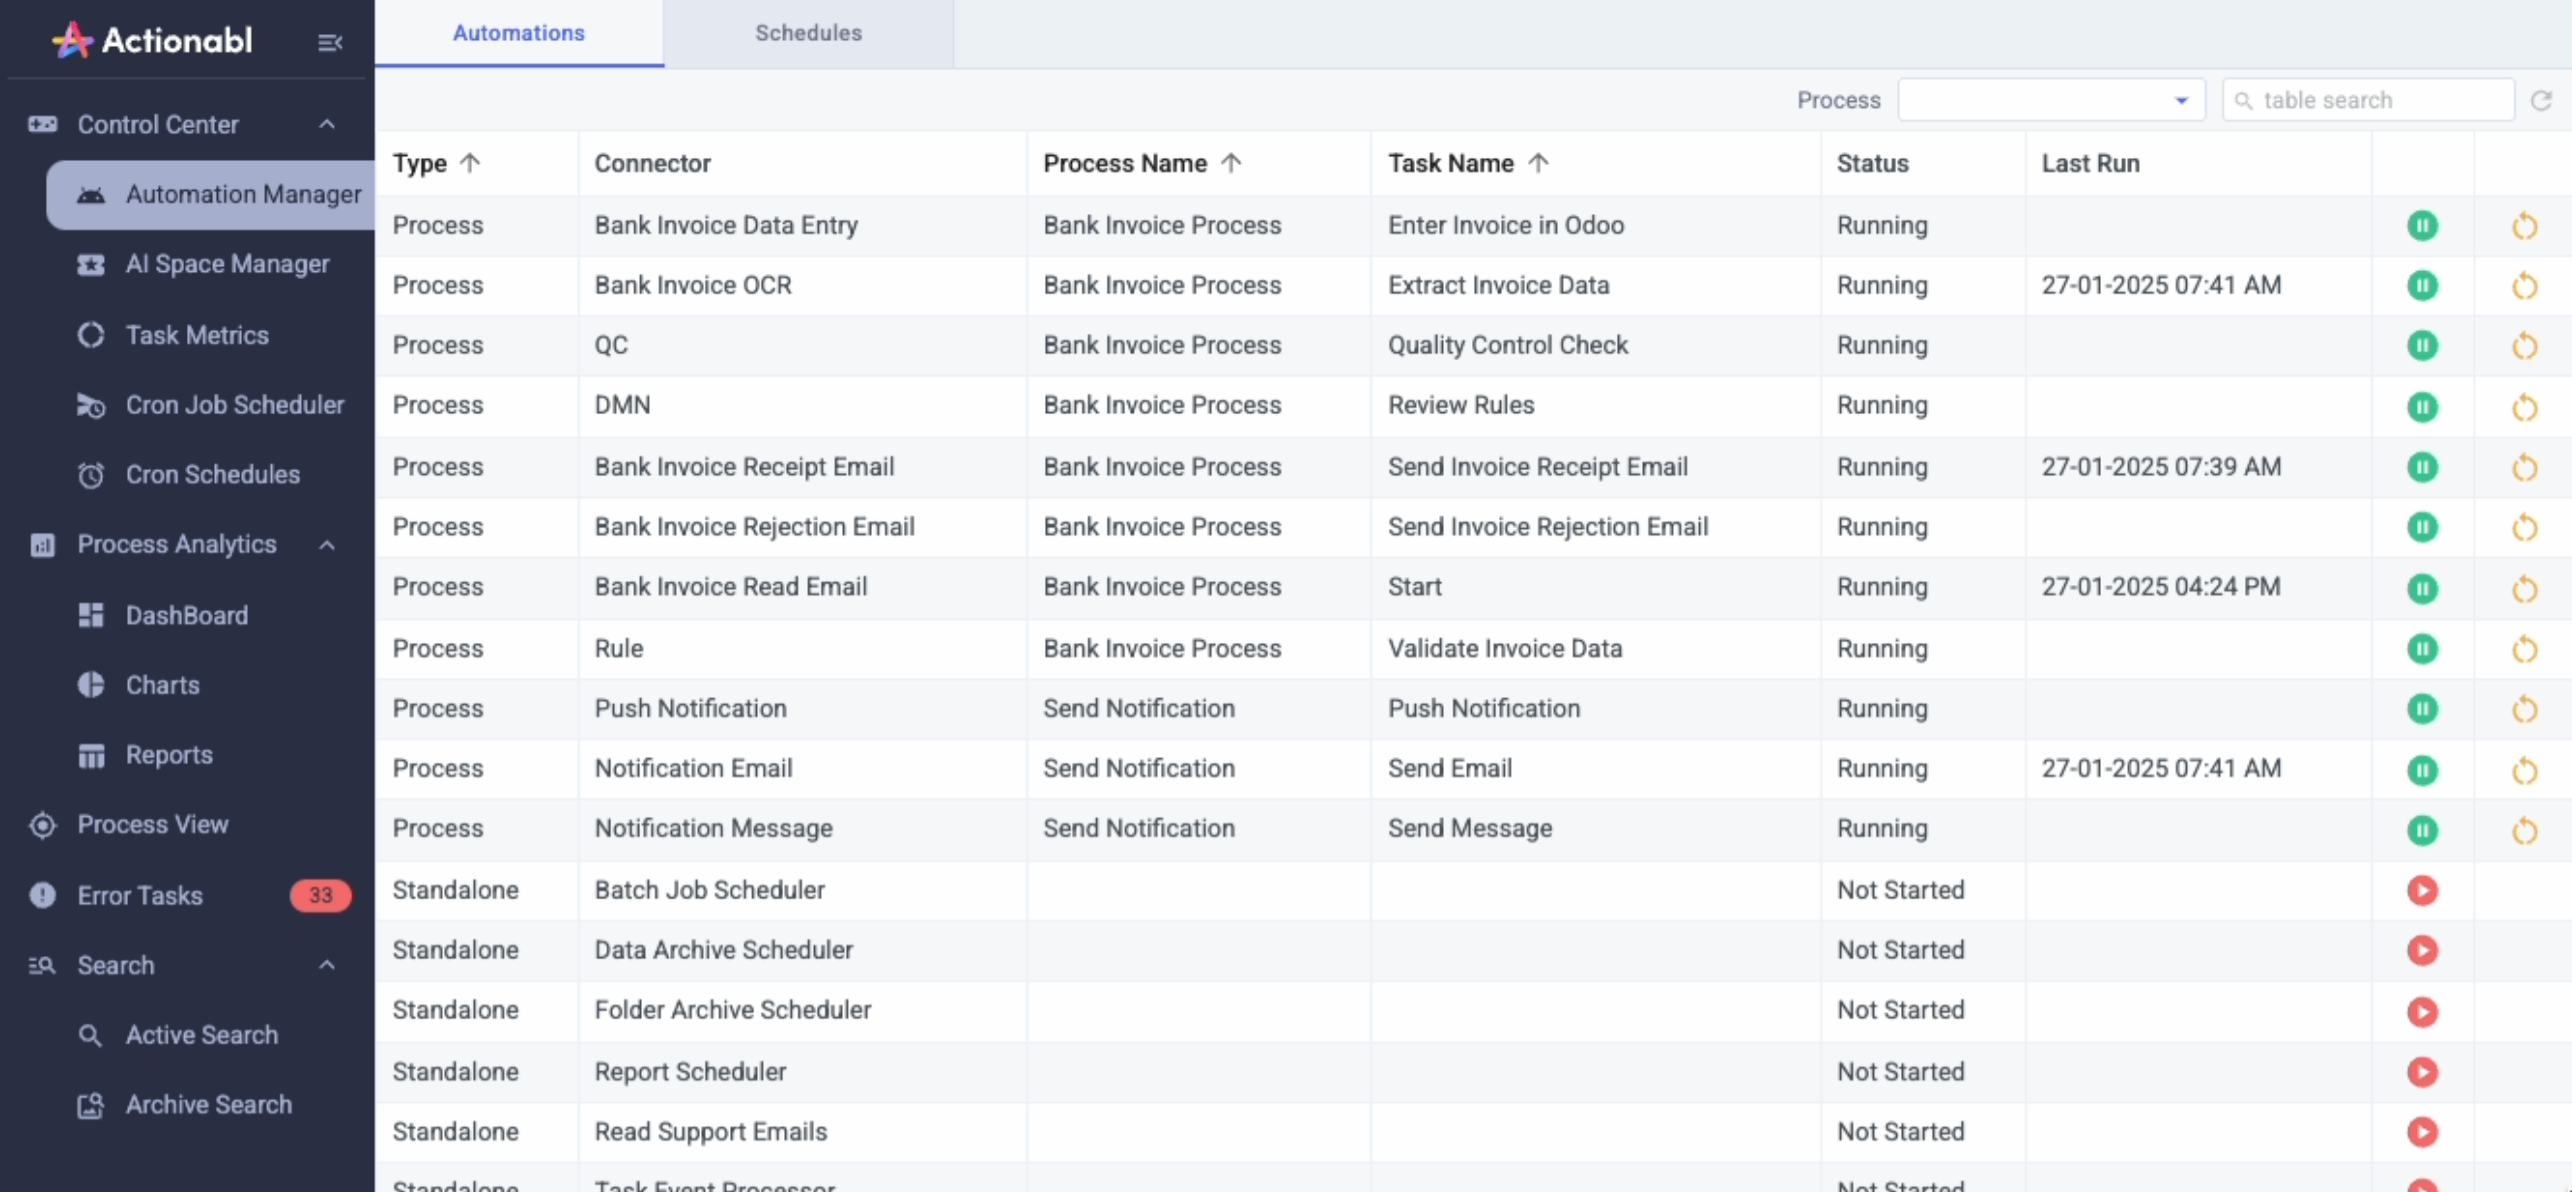
- The process in which it’s running
- The task associated with it
- How it is executing (Standalone, Call, External, or Polling)
- Its current status and last run time


Refreshing Automation Status
To refresh any automation, click the yellow “refresh” icon on the far right of the line. This will pause the current job and restart it. This can be useful in troubleshooting if a process or item appears “stuck.”AUTOMATION SCHEDULER
The Automation Scheduler is where you build or edit the schedules that manage the automations and tasks listed in the Automation Manager.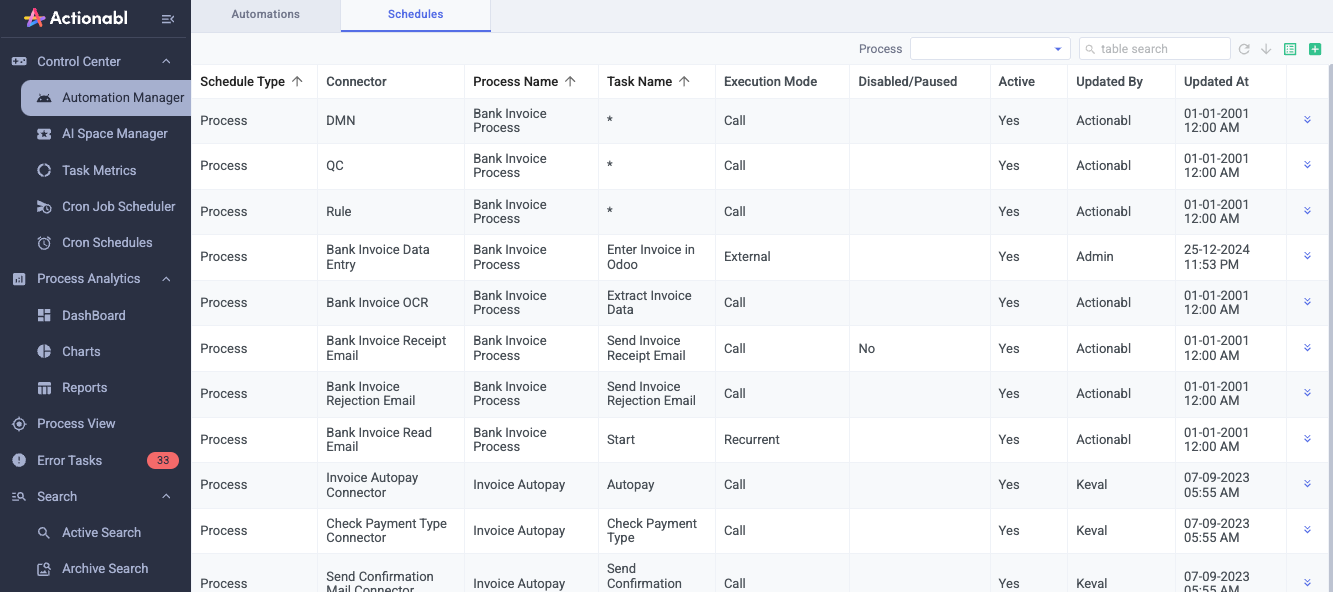
- Standalone schedules are applied to any matching item flowing through the system, regardless of the process or task it is in. In the example, the Standalone schedule “Read Support Emails” runs each time a new email is received that matches the definition within the schedule.
- Process-specific schedules only examine items while they are flowing through the specified process or task. If they match during that time, the schedule applies to them. In the example, the Process schedule “Task Notification Email” will be run only against items currently in the send_notification process and the send_email task.
Viewing and Editing Automation Schedule Details
View Schedule Details
Click the expand icon on the right of any schedule to open its details.The automation editor popup will appear. The popup will show different options for each type of automation (by execution mode). This is an example of a “Call” automation.\
Change Automation Configuration
- Click the blue Edit button to change the automation’s configuration. Click the gray Cancel button to cancel without saving any changes.
-
The Schedule Type can be set to process or standalone, as previously described. For process automations, you must specify the process and (optionally) task to which the schedule should apply. If the automation should span all processes and/or tasks, enter an asterisk (*) in the appropriate field.
NOTE: The Process Name and Task Name must exactly match the way they are shown in the Process View, including capitalization. This will happen automatically if you select “Create Automation Schedules” while you’re deploying the process.
- All automations require a Connector. Click the selection icon to pick the connector from the list.
Set an Execution Mode
The Execution Mode for the automation determines how it runs. The options are:
- Call automations run on-demand when an item flowing through the system triggers the appropriate criteria. Some examples would be sending an email or updating a database entry.
- External - The task is started when it is called by an external process using the API. It is called and controlled using the token that can be generated here.
-
Recurrent automations run on a fixed schedule. Examples are checking for new items or inbound emails.

- A Recurrent schedule, defined by its Frequency and Time Unit, schedules the job to run based on a wait interval after the last run of the job is completed.
- A Cron schedules the job to run periodically at a specific scheduled time, date, or interval, like every day at 3 AM or on the 15th of each month.
Set up a Recurrent Schedule or Cron
-
Select Run Interval from the dropdown:\
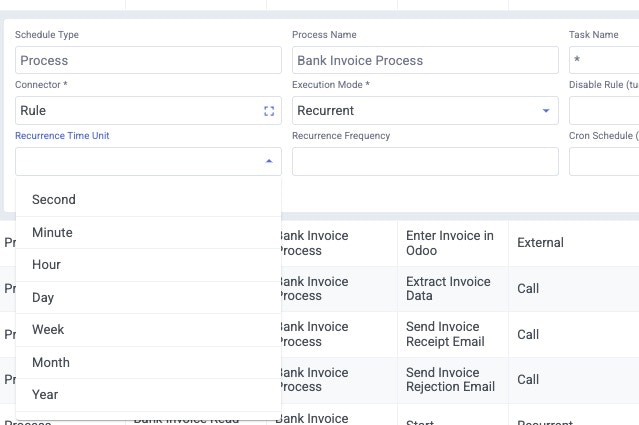
- Select a Time Unit and enter a Recurrence Frequency (in the selected time unit). This is the wait time between the end of one execution and the start of the next. OR
-
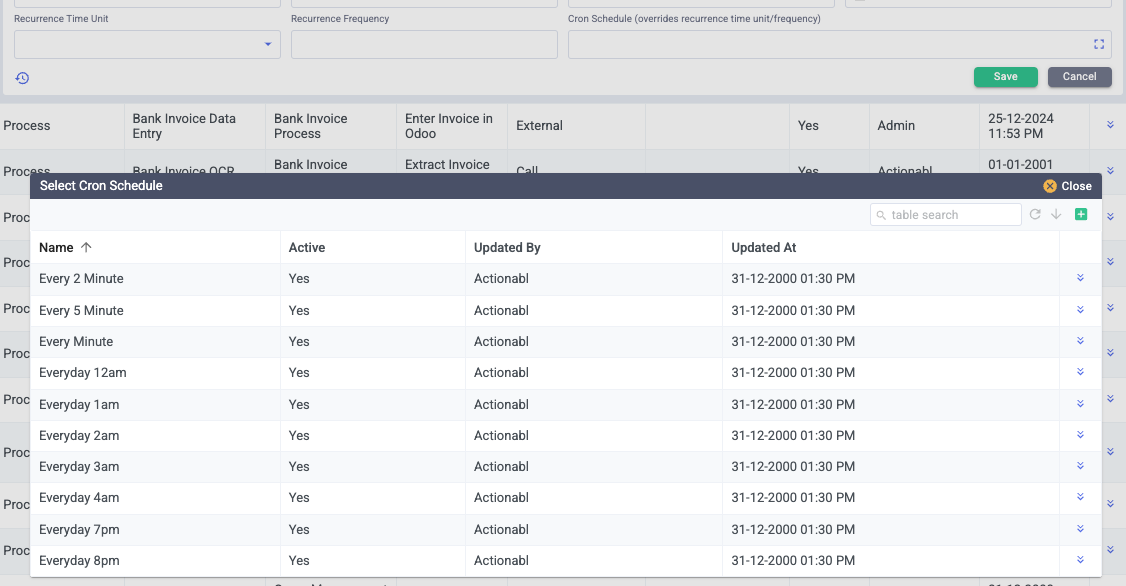
Select a Cron Schedule by clicking the selection icon in the field. Making a selection here overrides any entries in the Run Interval.\
- Max Concurrent Runs specifies how many instances of this automation can run simultaneously (maximum is 25). This is an optional field used only when you need to fine-tune the performance of your system. For processing-intensive automations, you may choose to set this to a lower number to avoid system slowdowns.
- Disable Rule is available only on Process automations. Click the selection icon to set the conditional rules in which this automation doesn’t run. See Configuring Disable Rules (below) for details on how to create and edit these rules.
- Disabled/Paused toggle indicates whether the automation is running within the system. You can pause an automation for troubleshooting, editing, or similar temporary situations and then restart it when you are ready for it to begin processing again.
- Active indicates whether the automation is even available to the automation manager. When you deactivate an automation, it is considered to be in a “pre-deletion” status, pending future cleanup and removal. The automation will no longer show up in lists or reports.
- Updated By and Updated At show the user who last edited this automation and when they were done.
Configuring Disable Rules for Automations
There are cases where you will want an automation rule to be selective about when and how it runs within a process. Some examples include:
- You want to notify customers about proofing only if an invoice exceeds a threshold amount.
- Certain vendors have asked not to receive emails about individual order invoice payments because they prefer an end-of-month summary statement.
- You want a conditional case that alerts a user and shows new fields if a field has a specific value. For example, in processing a loan application, if a user has input “Owns” for home ownership, pause the automation and display new fields asking about mortgage balances, real estate taxes, etc.
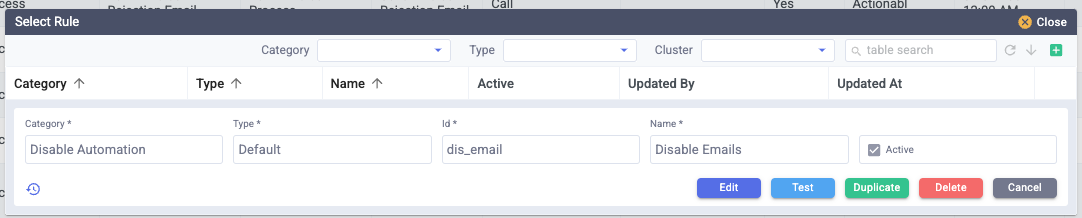
Using An Existing Rule
- In the Automation Scheduler list, click the expander icon to the right of the automation you want to apply the rule to.
-
Click the blue Edit button to enter Edit mode.\

- Click the selection icon in the Disable Rule field.
-
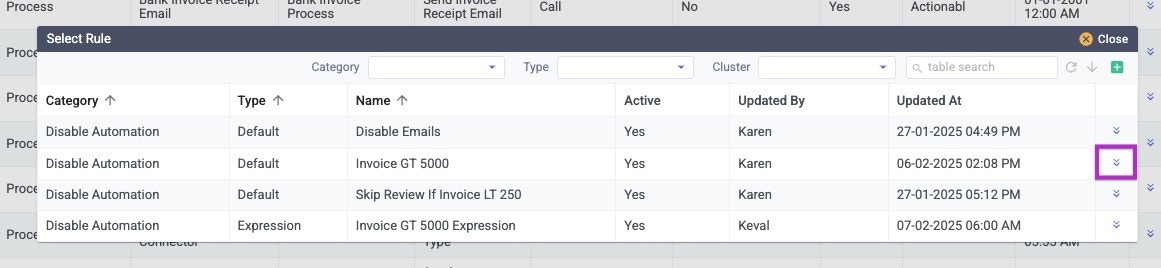
The existing rules are displayed in the list. To view their details, click on the expand icon to the right of any rule.\
-
If the changes apply only to this automation, click the green Duplicate button to create a new copy of the rule. The copy appears immediately below the existing one. Make changes in this NEW copy, then save and select the new rule.\
- Go to Automation Manager in the Control Center.
- Find the automation on the list.
- If you deactivated it before making changes, all you need to do is click the red play button to restart it.
- If you did not deactivate it first, you need to refresh it so the changes take effect. This will stop the automation and restart it. Click the orange refresh button on the right of the rule, then click Yes in the pop-up. You will see the automation’s status change to “Restarting” for a few seconds and then back to “Running” once the refresh is complete.

Creating a New Disable Rule
If none of the rules match your needs, you can create a new disable rule. There are two ways to do this:- Duplicate an existing rule as a starting point. This is recommended where possible as it will save you time and promote better consistency.
- Create a rule from scratch. Best used when no existing rules are close to your desired result.
- In the Automation Scheduler list, click the expand icon to the right of the automation you want to apply the rule to.
- Click the blue Edit button to enter Edit mode.
- Click the selection icon in the Disable Rule field and view the existing rules in the list.\

- Click the expand icon to the right of any of the rules to see its details.\
- If one is fairly close to the rule you want to create, click the green Duplicate button while viewing the rule. This makes a copy that will open just underneath the original rule.
Edit the rule as needed, then save it to activate it in the Automation.\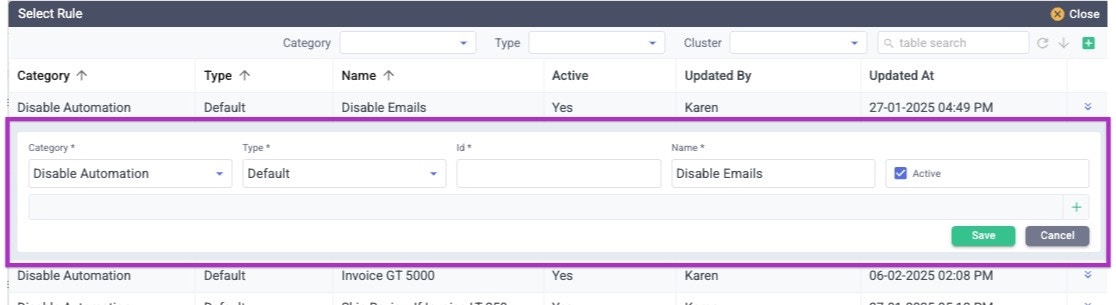
Creating a Rule from Scratch
If no rules in the list are close to the one you need, click the green plus sign at the top right of the popup to create a new rule from scratch.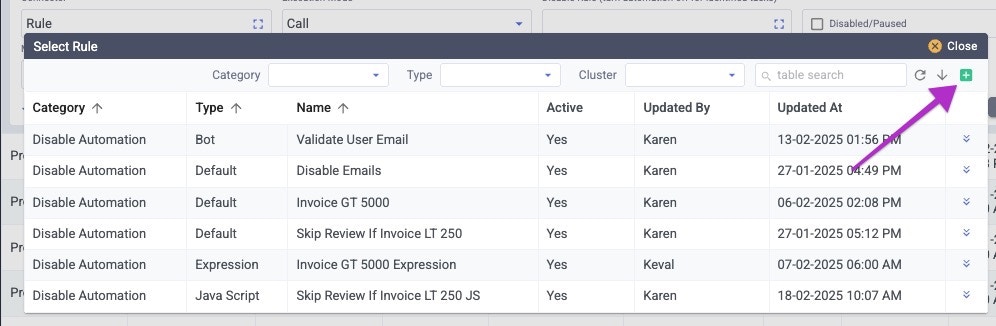
-
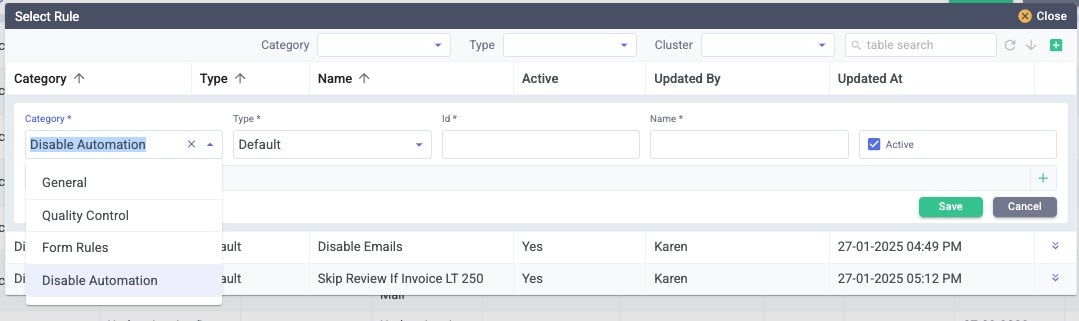
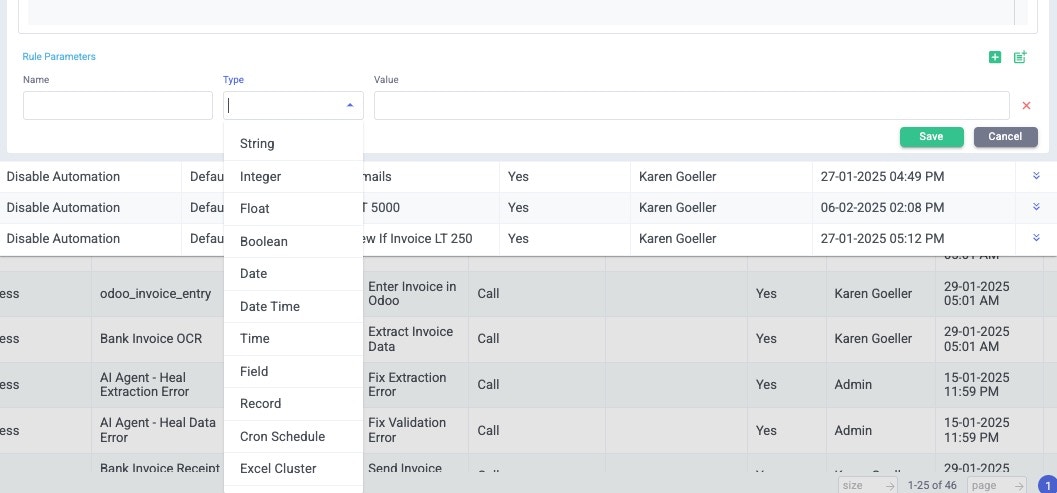
Select a Category for the new rule.\
-
Select the rule’s Type. This determines the fields you have available to build the logic for the rule. The next section, Building Rule Logic, covers the logic available for each type.\

- Enter a unique ID. This ID is restricted to letters, numbers, and underscores. No spaces or special characters are allowed.
-
Enter the rule’s Name. This is what appears on the popups when you select a rule or when you view an automation’s configuration, so it should be unique and clearly describe the rule’s scope. For example, “Amount LT 1000” or “Opted out of daily invoices”
NOTE: Names must contain no special characters other than underscore (_), dash (-), and period (.). They can contain spaces and alphanumeric characters.
- Click the “Active” box (if it is not already selected) to indicate that the rule should apply when it is saved and the automation is restarted.
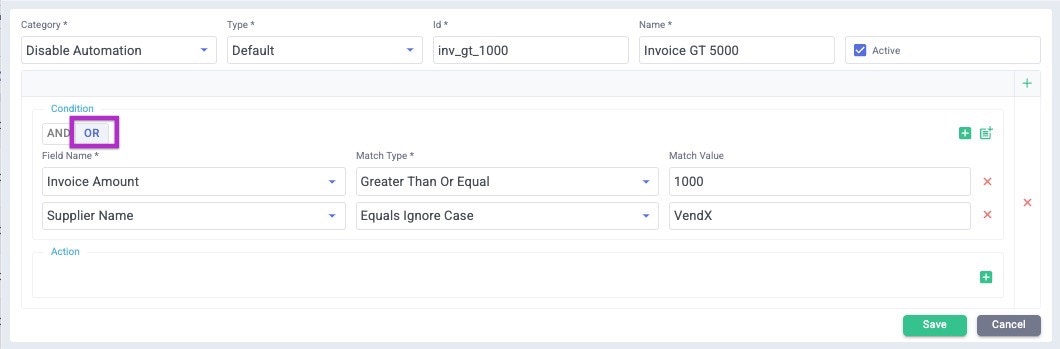
Building Rule Logic
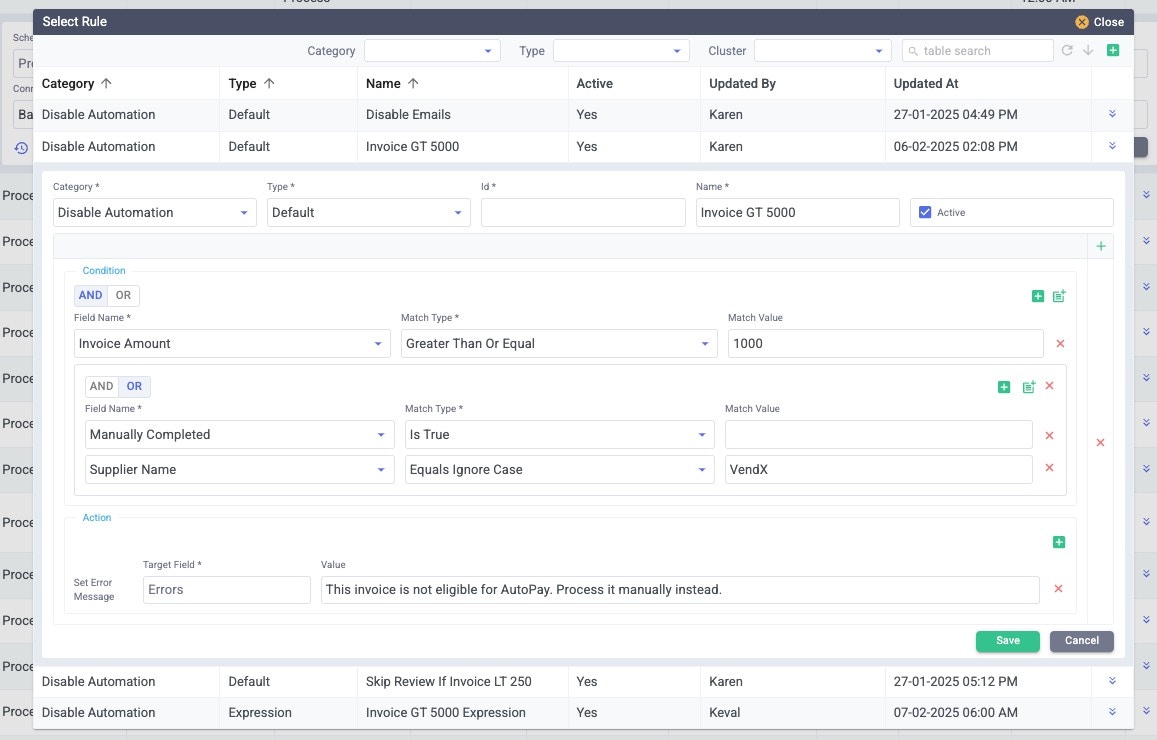
Actionabl looks at the values and criteria defined here in the logic section and bypasses the automation for any record that evaluates “YES” against these criteria. The logic section, where you build this logic, changes depending on the Type selected in the top line. Regardless of the rule type, click the green plus sign to the right of the criteria header to get started adding the logic: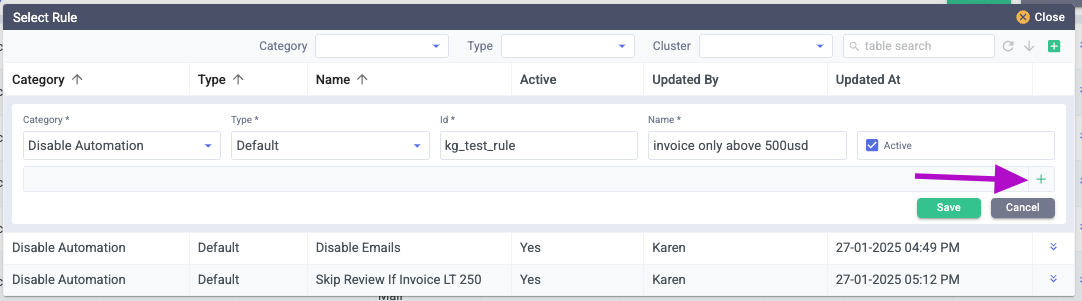
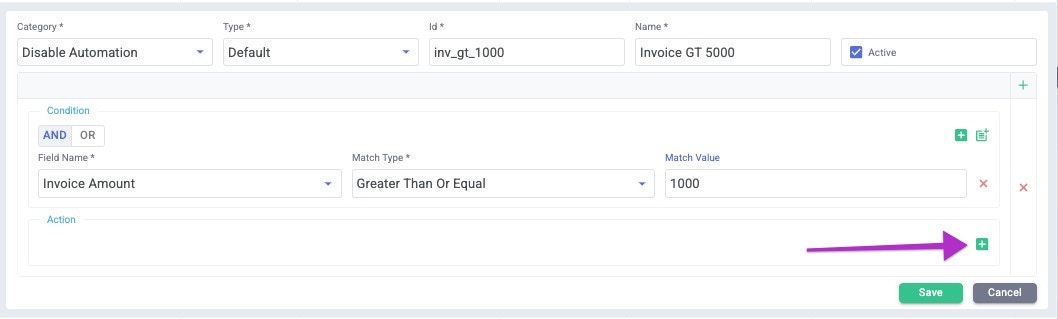
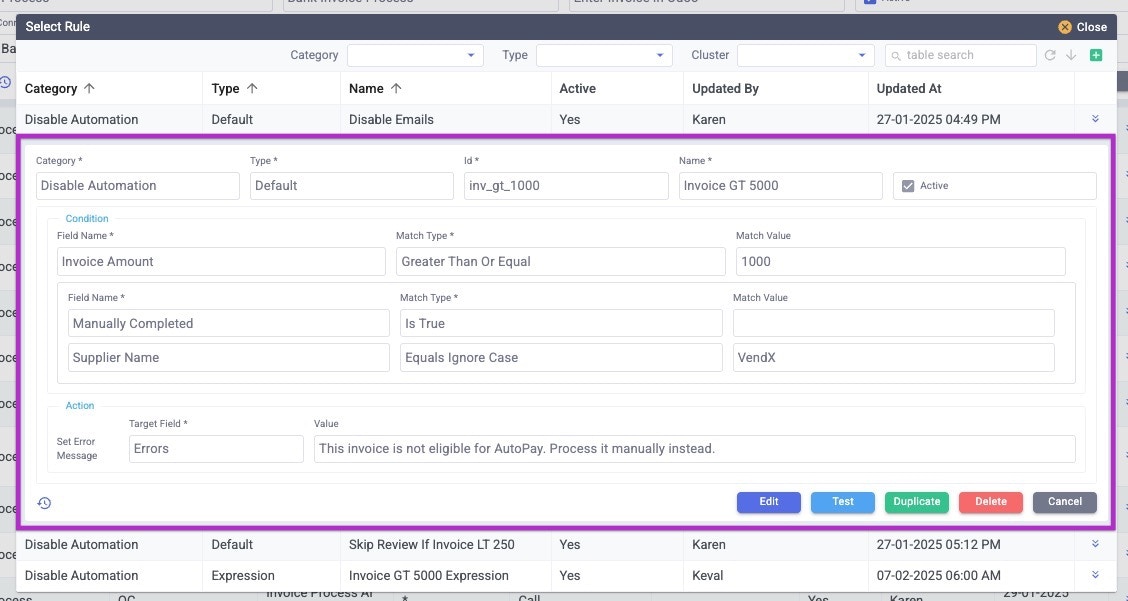
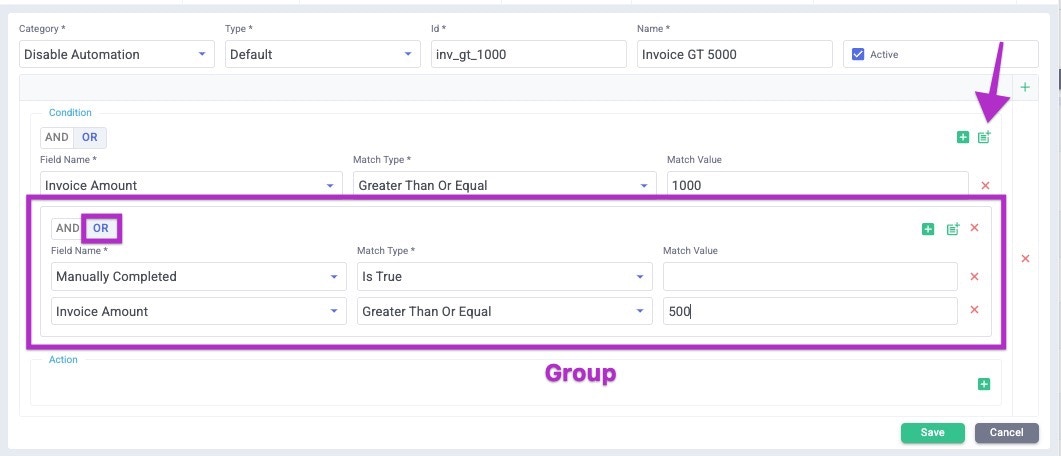
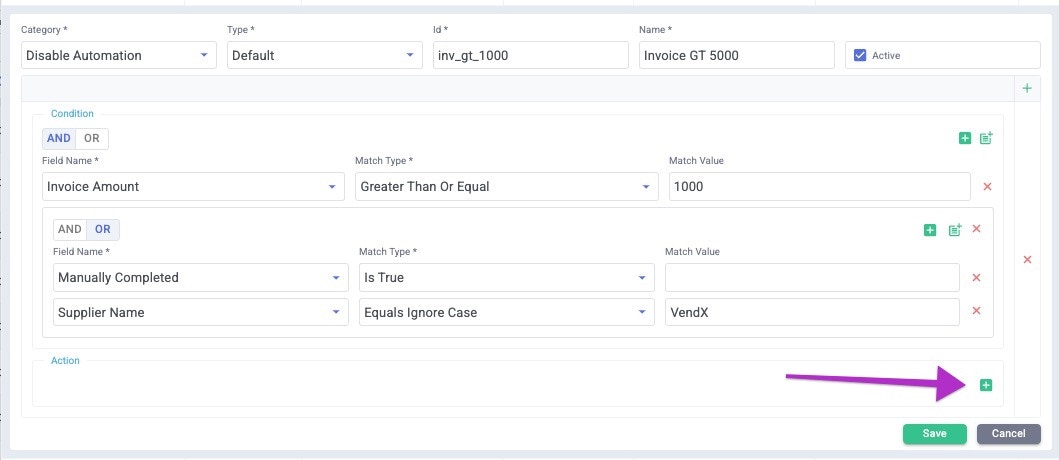
This example disables autopay for any invoice greater than or equal to $1000.\This example disables autopay for invoices greater than $1000 plus ANY invoice from supplier “VendX” for any amount. Using boolean OR matches against either one of these conditions.\ The following example uses grouping. It disables autopay for invoices greater than or equal to $1000 but ONLY if they are Manually Completed OR from supplier VendX.\
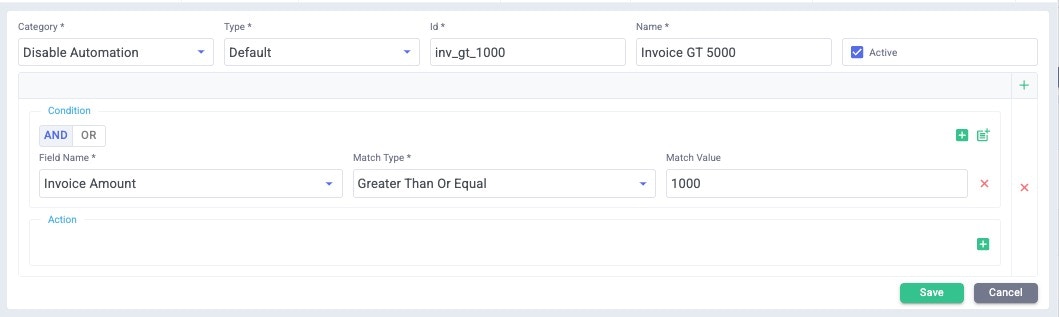
Defining Additional Actions
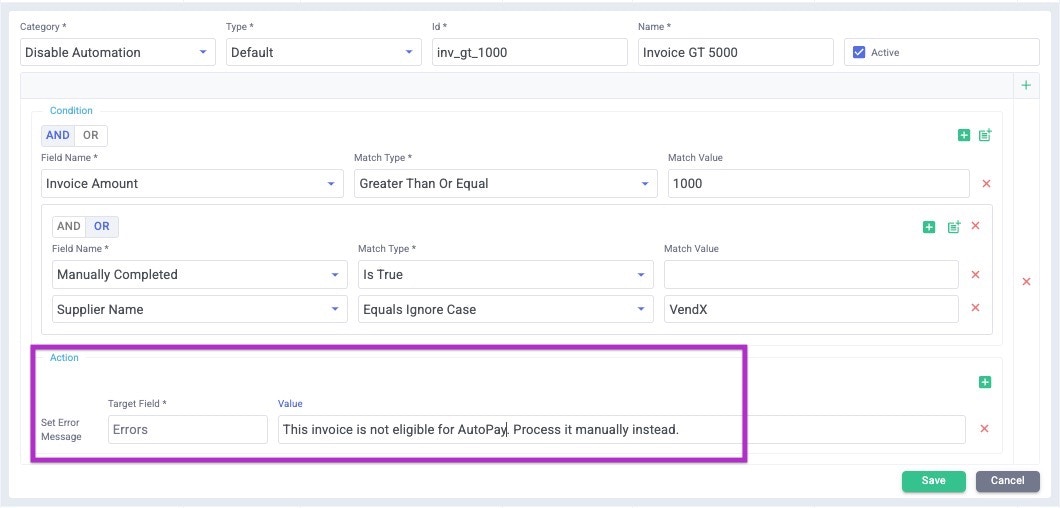
You may also define additional actions that happen when these conditions are met. These actions are taken after the automation is disabled and can be:- Setting a field value that is saved on the record
- Setting an error message that generates an error task and stops further execution
- Calculating a value that can be used within this process (for example, in a Javascript expression)
In the following example, Error Message is the action type, which generates an error task for the user to resolve and stops the task’s execution.\Click Save to finish, and then select the rule you just created to apply it to the task.

Expression Rule
Expression rules are built using the same techniques as the default rule, but instead of selecting fields and values to match, you define those conditions using Javascript expressions.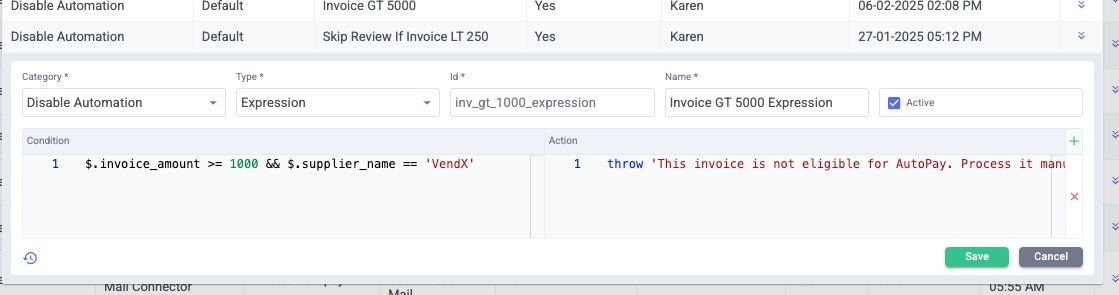
Javascript Rule
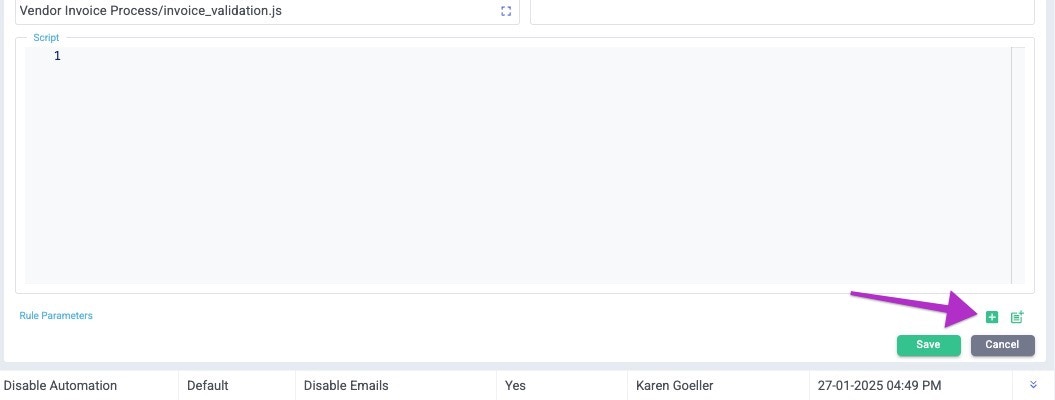
This rule type uses Javascript (either in an attached file or a function entered directly here) to determine the eligibility of a record to run this automation. Either click the [ ] icon in the Script File field to select an existing script file or enter the javascript code directly in the Script field.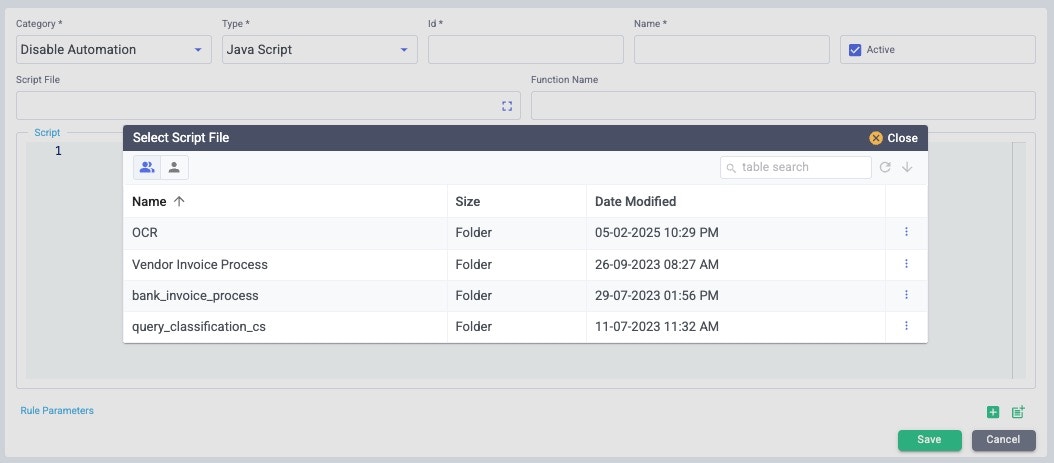
AI SPACE MANAGER
AI spaces are components that are part of the machine-learning tasks within a process. The computing needs of an AI space are usually intense, so they are set up as separate-but-trusted environments that work as components within Actionabl. AI spaces are typically used for classification or language detection models. These trained models sit separately from the core of Actionabl but are used by Actionabl within a process. In many ways, they run like an external component, but they are trusted items. When the Actionabl team sets up your system, the AI spaces are also set up as part of that process, so client users cannot edit these spaces. AI Space Manager is used simply to check the status, pause, or start one of the AI spaces, as needed. Details of an AI space include whether it is running, the mode(s) enabled, and a count of the current workers running in the space.
- Status: Not started or Running. A running space is available for use within a process. If a required space is not running, any process that depends on it will fail.
- API Mode: The space is set up to be accessible via an API connection.
- Worker Mode: The space allows multiple threads to run simultaneously for parallel processing.
- Worker Count: This shows how many worker threads are actively running in the space.
CRON JOB SCHEDULER
The Cron Job Scheduler in Actionabl is where you set up a task to run and match it with a schedule you’ve defined under Cron Schedules. This process creates a cron job. Cron jobs are tasks that are managed by a time-based scheduler that is built into all Unix-based operating systems. You use a cron schedule to specify precisely when and with what frequency the task or script should execute, such as “every 15 minutes” or “every other Thursday at 2 PM”. The Cron Job Scheduler shows all cron jobs currently set up:

Report Cron Setup
- Specify a unique Name for the cron. This should be informative when browsing the list of all crons. For example, bank_invoice_process_run_daily_2am
- Click the browse bracket in the Cron Schedule field, then select which of the available schedules you wish for this job. You can add a new schedule by clicking the green plus icon at the top right of the screen.\

- Click on the browse brackets in the Report Definition field to select the report script to schedule.
- The email template can be left blank to use the system’s default. Alternatively, click the browse brackets to select a different template.\

Batch Job Cron Setup
- Specify a unique Name for the cron. This should be informative when browsing the list of all crons. For example, bank_invoice_process_run_daily_2am
- Click the browse brackets [ ] in the Cron Schedule field, then select which of the available schedules you wish for this job. You can add a new schedule by clicking the green plus icon at the top right of the screen.\
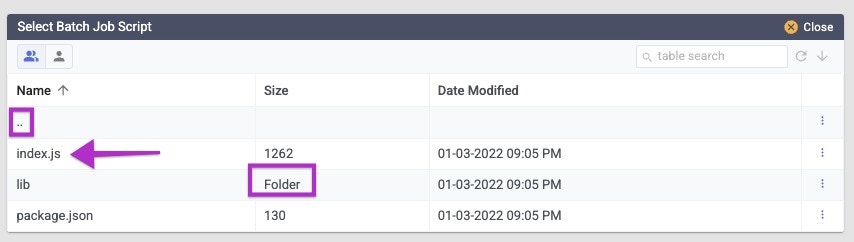
- Click on the browse brackets in the Batch Job Script field to select the script to schedule. \

- In the list of locations, browse to select the script file you want to schedule. If an item shows as a Folder type, click it to see the files inside it. Click the double dots .. to go up a level in browsing. When you find the script file you want, click it to select it.\
- Click the green Save button. If the script is marked Active it will run on the next scheduled cron time.
Task Event Cron Setup
- Specify a unique Name for the cron. This should be informative when browsing the list of all crons. For example, send_docusign_daily_9am
- Select the Event Type. Events are predefined in the system by your system administrator.\

- Click the browse brackets [ ] in the Cron Schedule field, then select which of the available schedules you wish for this job. You can add a new schedule by clicking the green plus icon at the top right of the screen.\
- Click the green plus sign at the top right of the screen.
- Enter a unique ID for the schedule. The ID must contain only letters, numbers, underscores, and dashes, and it cannot contain spaces.\

- Type a Name for this schedule. The name will appear to users on the list of schedules.
- Ensure that Active is checked.
- Click the plus sign on the right of the cron schedules to start setting up the parameters.\

- You can specify an optional Effective Start Date and Effective End Date for the schedule, which is helpful if you create a temporary cron job.
- Likewise, you can specify an Effective Start Time and Effective End Time. If you leave these fields blank and specify a start and end date, the job will start at midnight on the start date and end at 11:59 PM on the end date.
- Click the browse brackets [ ] to specify Disable Rule(s) that disqualify items from being included in this cron job. For details about defining rules, see Configuring Disable Rules for Automations.
-
Click the browse brackets [ ] next to Cron Expression to set up the schedule for jobs to run.\
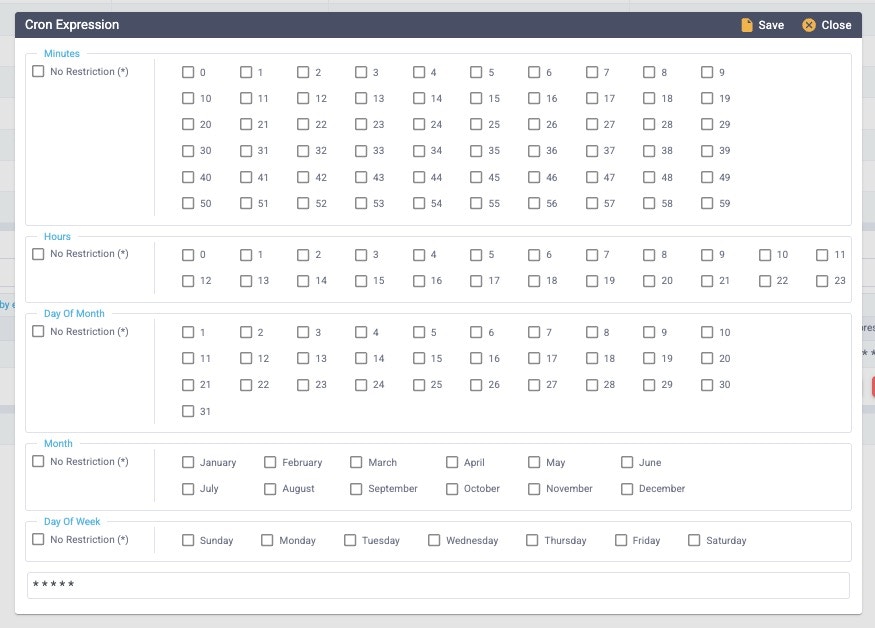
-
Check each appropriate box to build the schedule you want. You can select single or multiple options in each section or select “No Restriction” for sections that do not apply.
The following example sets the schedule to run daily at 9 PM:\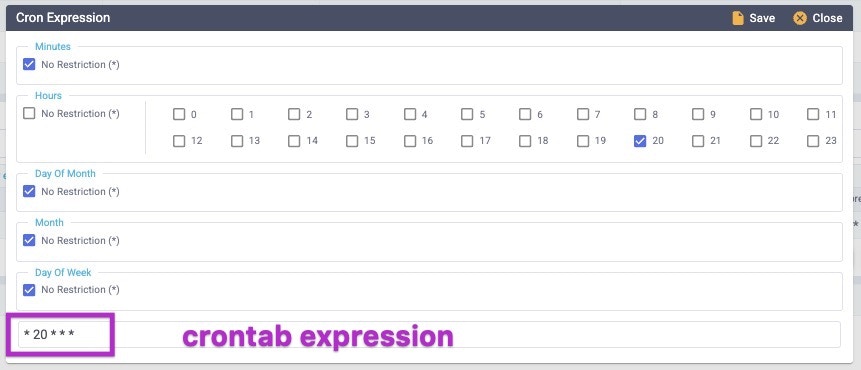
-
Click Save at the top right to save this parameter.\

- You can continue adding parameters to this cron schedule if you need.
- When the schedule contains all of the necessary parameters, click the green Save button to save it. If the “Active” box at the top is checked, this also activates the schedule.